Login |  Register |  FAQ
   
Post new topic Reply to topic  [ 5 posts ] 

Hive Fleet Leviathan v Blood Raven Space Marines 2500 points

 Post subject: Hive Fleet Leviathan v Blood Raven Space Marines 2500 points
PostPosted: Wed Aug 24, 2011 1:31 am 
Brood Brother
Brood Brother

Joined: Wed Feb 02, 2011 12:55 am
Posts: 20
Here is my first battle report. Diagrams of the table are attached as files for each turn.

Forces
Hive Fleet Leviathan Tyranids
Assault Swarm led by hive tyrant with 2 scythed hierodules, 3 carnifex and 3 units of gaunts.
Support Swarm led by hive tyrant with one barbed hierodule, 3 carnifex and 2 units of gaunts.
Small Swarm led by 3 tyranid warrior stands and 2 units of gaunts
Harridan Prime carrying 4 gargoyles
Trygon Prime with 8 raveners tunneling in
Lictor swarm of 5 lictors teleporting in
Brood nest

Blood Raven Space Marines
Detachment of 6 tactical marines in rhinos supported by 2 dreadnoughts and a razorback
Detachment of 6 tactical marines with rhinos
Detachment of 4 devastators with rhinos
Detachment of 4 assault marines
Squadron of 4 landraiders
Detachment Unit of 4 terminator marines led my librarian
Unit of 4 whirlwinds
Unit of 6 landspeeders

Game table and set up
The play area was dominated by a medium sized city in the middle, a river and small bluff running along the east table edge and two steep bluffs on the west side of the table. We decided that it costs 5cm to go up one level of terrain so climbing the bluffs would cost anywhere from 5cm to 20cm to get to the top depending how tall they were. We also decided about movement inside the city. To represent the buildings and ruble; all units moved at half speed and vehicles, but not war engines, could also move inside the city along the roads. The objectives were a series of communication bunkers spread out around the city. The marine player placed the first bunker on top of the steep bluff while the other two are placed just outside the city near the middle of the table and along the river to the east. The main Tyranid bunker was placed in the open near the river while another one was placed right off the river. The final bunker objective was placed on the remaining bluff near the west side of the table. The marines decided to setup the majority of their forces on the large steep bluff to the west while a tactical detachment and terminators loaded in Landraiders setup closer to the middle. The tyranids set up three major swarms in the middle while the harridan sets up next to the river to the east. The brood nest was placed right between the two objectives near the river. Once killed brood units were spawned it should be able to control both objectives with these new units. The lictors and trygon prime swarms were held off the table.


Attachments:
Setup.jpg
Setup.jpg [ 34.23 KiB | Viewed 1757 times ]
Top
 Profile Send private message  
 
 Post subject: Re: Hive Fleet Leviathan v Blood Raven Space Marines 2500 po
PostPosted: Wed Aug 24, 2011 1:32 am 
Brood Brother
Brood Brother

Joined: Wed Feb 02, 2011 12:55 am
Posts: 20
Turn #1
The first turn is rather uneventful with no combat and both sides simply maneuvering. The marines move and took up strong defensive positions along the steep bluffs while one tactical detachment moves into the city and occupies a building just in front of the communications bunker. The Landraiders move forward between the bluffs and the city and disembark the terminators, ready to support where needed. The Whirlwinds did not fire this turn because the marine player, trying to retain the initiative, was unable to relay accurate coordinates because of vox interference causing them to fail their activation and find themselves with no visible targets. The tyranids move forward along a broad front heading toward the steep bluffs. The small swarm heads into the city while the Harridan flies far across the table to land next to the undefended bunker on the marines side


Attachments:
Turn1.jpg
Turn1.jpg [ 39.67 KiB | Viewed 1756 times ]
Top
 Profile Send private message  
 
 Post subject: Re: Hive Fleet Leviathan v Blood Raven Space Marines 2500 po
PostPosted: Wed Aug 24, 2011 1:34 am 
Brood Brother
Brood Brother

Joined: Wed Feb 02, 2011 12:55 am
Posts: 20
Turn #2
Before the strategy roll, the tyranid player declared the lictors will teleport in and the trygon swarm will emerge from their tunnel behind the marine lines atop the bluff, next to the communications bunker. The marines win the strategy roll and decide to fire the Whirlwinds at the lictors knowing they are about to be overrun. Poor die rolling by the marine player leaves the lictors mostly unharmed. The lictors immediately charge into the Whirlwinds and destroy them easily. Seeing the raveners and trygon emerge from the ground, the assault marines’ kick in their jump packs and engage. Hopelessly outnumbered, the assault marines reap a heavy price on the bugs before being completely overwhelmed. A much reduced trygon swarm decides to engage the next closest marine unit: the landspeeders. Seeing the approaching swarm the landspeeders engage their lifter jets and rise above the enemy raining melta death on the remaining raveners, breaking the swarm and causing the trygon to flee, but in the process suffer near catastrophic losses and are broken. The terminators hear the fighting on the bluffs and move into action. Cresting the top and seeing the lictors they unleash their assault cannons killing many of the chameleon beast and breaking the remainder. The tactical detachment quickly gets into their rhinos and drives to secure the communication bunker. Seeing a lone lictor trying to hide in the bluffs; the marines dismount and quickly eliminate it with massed firepower.

With all the action to their rear now under control the devastators take a few pot shots at the approaching assault swarm but the tyranids hardly notice while moving up to the base of the bluffs. The support swarm moves up alongside the assault swarm and fires on the devastators above. The tough ceramite armor of the marines shrugs off most of the damage; the devastators still hold the high ground. The Harridan uses it twin bio cannons to fire on the tactical marines in the city only causing minor damage. Seeing this new threat, the landraiders swing around to the east to fire their high power lascannons. These snap shots only do minor damage to the flying behemoth.

In the end phase the landspeeders fail to rally and depart the field of battle. The trygon also fails to rally but because of its fearless nature continues to fall back. For spawning we decided to use the “smaller first” principle in determining the order. So far the only brood casualties are raveners from the trygon’s tunneling assault. The Brood Nest receives the majority of the reinforcements followed by the harridan with the remaining swarms getting one ravener apiece.


Attachments:
Turn2.jpg
Turn2.jpg [ 40.93 KiB | Viewed 1756 times ]
Top
 Profile Send private message  
 
 Post subject: Re: Hive Fleet Leviathan v Blood Raven Space Marines 2500 po
PostPosted: Wed Aug 24, 2011 1:35 am 
Brood Brother
Brood Brother

Joined: Wed Feb 02, 2011 12:55 am
Posts: 20
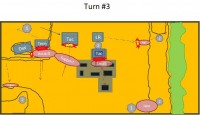
Turn 3
The space marines again win the strategy phase and the devastators let loose with a sustained burst of fire at the approaching assault swarm. The termagants in the front rank take a pounding, but not enough to slow the swarm. The Hormagaunts and ravener leap into action and charge up the steep bluff, quickly outpacing the other bugs. The devastators, having stationed themselves on the high ground, are too far up to reach, even for the fastest tyranids. So, doing what bugs do best, they charge the next closest unit. The terminators stand their ground and take the charge in true space marine fashion. By sheer weight of numbers the terminators are drug down one by one until only the librarian remains. The end result of the terminator fight (along with some terrible dice rolling by the tyranid player) causes the assault swarm to break and fall back licking its wounds. The librarian, exhausted and near death, breaks and falls back to regain his strength. The top of the bluffs is secure for now allowing the tactical detachment to load up in their rhinos and head down to counter the approaching support swarm. Seeing this newly arriving threat, the bio and venom cannons on the monstrous beasts let lose a hail of firepower, all the while advancing up the middle.

In the city, the small swarm senses it is now or never and charges the marines defending the building. Again the faster hormagaunts and raveners outdistance the slower tyranid warriors who quickly fall behind. The first wave of tyranids tries desperately to dislodge the marines, buying time with their lives, so the slower warriors and termagants can catch up. While the marines are holding their own inside the building they can’t get the upper hand and eventually the tyranid warriors are able to move up and assault the building. (After 2 inconclusive rounds of assaults, the tyranid warriors make it into close combat.) Three whole waves of tyranids have crashed against the marines only to be beaten back. After the battle the survivors survey the streets in front of the building only to see the roads choked with tyranid bodies. The marines have prevailed and held the vital building with only minor casualties while the few remaining warriors break and fall back.

The landradiers, having found their range to the harridan last turn, fire a sustained volley that hit home and cause the harridan to come crashing down, killing it and all the gargoyles clinging to its side. This breaks the recently spawned raveners who run behind some rocks and hide next to the communication bunker.


In the end phase, the marines regroup their forces waiting for the next inevitable attack. All except the librarian, who succumbs to his wounds just after turning over command to his senior sergeant (he failed his rally test). The broken tyranid forces still have intact synaptic nodes and this allows the hive mind to rally its dwindling forces. The raveners, formerly of the Harridan swarm, also rally and decide to stay hidden and lay an ambush next to the communications bunker. During spawning, a few wondering gaunts find their way back to the hive mind while the support swarm reorganizes for the final push. With the Brood Nest growing ever bigger, soon it will be a swarm to be reckoned with.

Victory Points
At this juncture, neither side controls enough victory conditions to win outright with the tyranids only controlling 2 of the 3 bunkers on their side of the table and the marines currently only controlling one. Both of the largest formations still roamed the battlefield but the tyranids have some minor units causing havoc on the marines side of the table


Attachments:
Turn3.jpg
Turn3.jpg [ 36.4 KiB | Viewed 1756 times ]
Top
 Profile Send private message  
 
 Post subject: Re: Hive Fleet Leviathan v Blood Raven Space Marines 2500 po
PostPosted: Wed Aug 24, 2011 1:36 am 
Brood Brother
Brood Brother

Joined: Wed Feb 02, 2011 12:55 am
Posts: 20
Turn 4
The marines easily win the strategy roll and all attention is turned toward the fast approaching support swarm. The landraiders let loose a sustained volley of lascannon fire at the larger tyranid creatures but failed to penetrate the monstrous creatures reinforced carapace. Realizing that the tactical marines are not fast enough to reach the river bunker and hiding raveners, they turn their missile launchers on the assault swarm. A few gaunts are killed but not enough to prevent the inevitable. Like an avalanche of teeth and claws, the support swarm slams in the marine strong point. Hormagaunts break into the ground floor while incredible amounts of firepower are directed at the marines firing from the windows. A desperate fight erupts in the building lobby that sees the marines holding off most of the clawed beasts but the Barbed Hierodule and carnifex acid shells take a heavy toll on the defenders and building alike. In the end the few surviving marines and hormagaunts are entombed forever in the collapsing building. Gravity knows neither enemy nor ally. The still powerful support swarm consolidates around the communications bunker, ready to continue its relentless advance next turn. The remnants of the assault and trygon swarms occupy the open ground and bunker to the west while the Brood Nest swarm easily extends its control to the remaining bunkers on the tyranid side of the table. With the now total occupation of the city by marauding tyranid swarms and the threat of lurking raveners to the east, the marine player decides to consolidate his hold around the buffs bunker while calling for immediate thunderhawk extraction.

Victory points
The tyranids are in firm control of all 3 communication bunkers along the tyranid side of the table. They also control the river bunker denying it to the marine player. The landraiders and the support swarm contest the bunker just outside the city while the bunker on the bluffs is strongly defended by the devastators. Both of the largest formations still roam the battlefield but the Hive Mind had pushed the marines off its side of the table while firmly establishing itself on the marine side.
Tyranids: 2
Space Marines: 0


Attachments:
Turn4.jpg
Turn4.jpg [ 33.39 KiB | Viewed 1756 times ]
Top
 Profile Send private message  
 
Display posts from previous:  Sort by  
Post new topic Reply to topic  [ 5 posts ] 


Who is online

Users browsing this forum: No registered users and 7 guests


You cannot post new topics in this forum
You cannot reply to topics in this forum
You cannot edit your posts in this forum
You cannot delete your posts in this forum
You cannot post attachments in this forum

Search for:
Jump to:  


Powered by phpBB ® Forum Software © phpBB Group
CoDFaction Style by Daniel St. Jules of Gamexe.net