Login |  Register |  FAQ
   
Post new topic Reply to topic  [ 14 posts ] 

Three Iyanden (4.2.4) battle reports from Heavy Bolter 2015

 Post subject: Three Iyanden (4.2.4) battle reports from Heavy Bolter 2015
PostPosted: Mon Jul 27, 2015 1:16 pm 
Brood Brother
Brood Brother
User avatar

Joined: Sat Jan 21, 2012 3:36 am
Posts: 71
Location: Melbourne, Australia
First time posting battle reports! These are my games from the Heavy Bolter tournament last weekend. I’ve used the latest (4.2.4) version of the Iyanden list, trying a combination of a heavy air presence and lots of tough ground-pounders. I’m certainly not the most experienced player out there (in fact, all of my 3,000 point games to date have been at the last two Heavy Bolter tournaments!) so I’m sure I’ve made a few blunders - mostly around misjudging movement before or during assaults… Still, I hope others enjoy reading how my games went.

My List:

Avatar: Free
Wraithgate: 50 points
Spirit Wraithlord Warhost: 6 x Wraithlord, Wraith Seer upgrade (450 points)
Spirit Wraithguard Warhost A: 4 x Wraithguard, 2 x Wraithlord, Spiritseer character (375 points)
Spirit Wraithguard Warhost B : 5 x Wraithguard, Spiritseer character (325 points)
Spirit Wraithblade Warhost: 4 x Wraithblades, Spiritseer character (225 points)
Engine of Vaul: 1 x Stormserpent (250 points)
Windrider Troupe: 5 x Jetbikes, 1 x Vyper (200 points)
Ranger Troupe: 5 x Rangers (125 points)
Night Spinners: 3 x Night Spinner (175 points)
Vampire Raider: 1 x Vampire Raider (200 points)
Phoenix Bombers: 3 x Phoenix Bombers (325 points)
Nightwing Interceptors: 3 x Nightwing Interceptors (300 points)

Image


Top
 Profile Send private message  
 
 Post subject: Re: Three Iyanden (4.2.4) battle reports from Heavy Bolter 2
PostPosted: Mon Jul 27, 2015 1:17 pm 
Brood Brother
Brood Brother
User avatar

Joined: Sat Jan 21, 2012 3:36 am
Posts: 71
Location: Melbourne, Australia
Game 1 vs Scott’s Necrons - Approved list version

C`TAN - Nightbringer [300]
TOMB COMPLEX [75]
INFANTRY PHALANX [405] Necron Lord, 6 Warriors, 3 Immortals, Pariahs
INFANTRY PHALANX [365] Necron Lord, 6 Warriors, 2 Immortals, Pariahs
INFANTRY PHALANX [325] Necron Lord, 6 Warriors, Pariahs, Immortals
PYLON [200]
PYLON [200]
MONOLITH MANIPLE #1 [275] 2 Obelisk, 2 Monolith
MONOLITH MANIPLE #2 [275] 2 Obelisk, 2 Monolith
MONOLITH MANIPLE #3 [275] 2 Obelisk, 2 Monolith
MONOLITH PHALANX [275] 3 Monoliths

Deployment:

I place the Nightspinners behind a tall building next to my Blitz, and the Rangers garrison the Wraithgate in the forest. Storm Serpent and Windhost go down just to the right of my artillery. Forgetting that the C’tan can teleport, Scott places him outside the Tomb Complex.

Necrons teleport in everywhere, but take lots of blast markers. Two Pylons in the wide street to the left, two Phalanx formations on my left flank, one on my right flank, and another to the right-hand side of the central forest. There are three Warrior formations ready to assault out of portals, and Monoliths right next to every unit I have on the table...

Image

Image

Turn 1:

E: Storm Serpent advances and fires at Maniple #1 on my left flank, killing an Obelisk and breaking the formation. It then retreats out of assault range.
E: Attempt to retain (activate off-table Wraithguard B), fail to activate.
N: Warrior unit Assaults out of a Monolith in Maniple #3 (on my right flank), wiping out the Windhost. They consolidate back into another Monolith.
E: Nightspinners sustain into Pylon A, breaking it.
N: Warrior unit Assaults out of the Monolith Phalanx, charging the Rangers that occupy the central forest. First round is a draw; second round sees the Rangers win! Broken warriors withdraw through the other Monolith portal.
E: Phoenix bombers Ground Attack Pylon B. AA shot misses; they fail to do any damage though.
N: Monolith Phalanx Assaults the Rangers planning to finish them off. First round is another draw! In the second round, the Rangers win by 1 - breaking the Monoliths (who flee for the left flank), and leaving 3 rangers with 2 blast markers. Those Rangers are taking their job seriously as “The Living Few."
E: Wraithguard A Assaults Maniple #2 out of the Wraithgate, wiping it out with FF attacks. Poor luck on the Living Metal saving throws, but they took a lot of hits.
N: Pylon B shoots at Wraithguard A, but does no damage.
E: Vampire and Wraithblades launch an Air Assault on Pylon B. AA causes 1 damage, then the Wraithblades wipe out the target.
N: Nightbringer doubles, fires at Wraithblades, no damage.
E: Nightwings Ground Attack the broken Maniple #1 on the left flank, wiping it out.
N: Maniple #3 (right flank) moves towards my table edge and regroups, removing all blast markers.
N: Largest Warrior formation retains, Assaults out of a Monolith, catching both the Storm Serpent and Night Spinners on my Blitz objective. Both Eldar formations are wiped out with minimal Necron casualties. (Note: I may have made an error here, as those Monolith portals were already used earlier in the turn)

End: Aircraft disengage safely. Wraithblades fail to remove any BM; Wraithguard A and Rangers remove 1BM each. Necrons do various rally/regenerate things.

Turn 2:

E: Wraithguard B double out of the Wraithgate to support the Wraithblades, shooting at the Nightbringer but causing no damage.
N: Nightbringer Assaults the Wraithblades, killing only 1, and taking a wound in return. Supporting fire from Wraithguard B destroys the C’Tan.
E: Wraithblades assault Pylon B, destroying it.
N: Maniple #3 moves towards the Wraithgate, but has no LOS through the forest.
N: Warriors retain, Assault out of a Monolith in Maniple #3, charging into Wraithguard A. The Eldar take minimal losses and wipe out all Necron infantry.
E: Phoenix bombers Ground Attack Maniple #3, killing one Monolith and one Obelisk, breaking the formation.
N: Warriors (on my Blitz) go into Overwatch.
E: Rangers Marshall, shooting at the broken Maniple #3 and killing an Obelisk with a blast marker.
N: Warriors (off table) fail to activate.
E: Nightwings Ground Attack and finish off Maniple #3.

Turn 3:

No blow-by-blow notes here as we were running out of time in the round. The Necrons didn’t have many units left, but the Iyanden formations didn’t have much mobility to run after distant objectives. I started by bringing my Wraithlord warts on through the Wraithgate, finally giving me a Supreme Commander re-roll. I didn’t have the mobility to reach my own Blitz objective, or to safely reach the enemy Blitz: Wraithguard A was close enough to double up to it, but there was still a Warrior formation waiting off table. So, the Wraithguard and Wraithlords grabbed both Take and Hold objectives, while the last Warrior formation emerged from the Tomb Complex. Ground attacks from the Nightwings, Phoenix Bombers, and an Air Assault on the large Warrior formation finally cleared my own Blitz - though the Wraithblades were wiped out in the assault.

Result: Eldar 2 (Take and Hold, They Shall Not Pass), Necrons 0


Top
 Profile Send private message  
 
 Post subject: Re: Three Iyanden (4.2.4) battle reports from Heavy Bolter 2
PostPosted: Mon Jul 27, 2015 1:18 pm 
Brood Brother
Brood Brother
User avatar

Joined: Sat Jan 21, 2012 3:36 am
Posts: 71
Location: Melbourne, Australia
Game 2 vs. Jim’s Tyranids (EPICUK)

BIG ASSAULT SWARM [350] 4 Tyranid Warrior, 8 Termagant, 8 Hormaguant
NORMAL ASSAULT SWARM [200] 2 Tyranid Warrior, 4 Termagant, 4 Hormaguant
NEST SWARM [410] 4 Termagant, 4 Dactylis, Zoanthrope
GENESTEALER SWARM [150] 6 Genestealer
HARASSMENT SWARM [225] 1 Harridan and 0-4 Gargoyles
LICTOR SWARM [200] 4 Lictor
SUBTERRANEAN SWARM [340] 1 Trygon and 2 Raveners, 3 Ravener

Deployment:

A familiar setup (Nightspinners on the Blitz, Rangers garrisoning a central objective, Storm Serpent and Windhost on the right. I started with the Wraithlords on the table this time. Tyranids stretched from one table edge to the other: Nest swarm on the Blitz (right-hand side of the table), one Genestealer formation garrisoned on the left, and the other on the far right flank (near the Blitz). Other units were fairly symmetrical, with Harassment swarms out on each flank.

I didn’t note down which swarm was which, so I’ll describe their table positions in terms of left, centre and right - the formations approached pretty much straight down the table.

Image

Turn 1:

T: An Assault swarm doubled forwards on the far right flank, moving into buildings.
E: Nightspinners sustain and fire into the nearby Genestealers, killing 2.
T: Assault swarm on the left flank marches forwards.
E: Nightwings Ground Attack, dealing 1 damage to the Harridan on the left flank.
T: That (left) Harassment swarm promptly flies forwards and attacks the Nightwings, doing no damage though.
E: Windhost cautiously advances in the centre, protected by tall buildings.
T: Nest swarm (Dactylis) fire on the Rangers and Windhost - dealing 1 BM to the Rangers, and killing 1 Jetbike and the Vyper. Apparently some Tyranids *do* shoot. Lesson learned.
E: Wraithlords march forwards, ahead of the Rangers.
T: Genestealers try to Assault the Rangers, fail to activate and break.
E: Phoenix bombers Ground Attack the broken Genestealers, failing to do any damage but killing 1 via Blast Marker.
T: Failed attempt to advance with another Assault swarm.
E: Rangers regroup and remove all blast markers.
T: Big assault swarm (centre) fails to double.
E: Vampire stands down.
T: Big assault swarm (right-hand side) marches forward.
E: Wraithguard A advances out of the Wraithgate, taking up a supporting position behind the Wraithlords and Rangers.
T: Harassment swarm on right flank marches.

Genestealers rally.

Turn 2:

Lictors teleport immediately behind the Nightspinners. Subterranean swarm appears on the right flank, just in front of the Harridan and its brood. Tyranids win Initiative. Jim thinks about Assaulting the Nightspinners before realising that he would have no attacks with the Lictors...

T: Large assault swarm (centre) doubles into support range of my front line.
T: Large assault swarm (right) retains, Assaults everything… clipping assault against the Wraithlords, intermingled with Rangers and Wraithguard A. I realise that counter-charge moves can only put more models in range of the supporting fire, and I can’t bring anything else to bear on the Assaulting unit. Wraithlords kill 5 Termagants, taking 1 casualty. I still lose by 7, wiping out the Rangers, and breaking the Wraithlords and Wraithguard A. Nearby Storm Serpent (behind a building) takes a blast marker.

Before:
Image

After:
Image

E: Wraithguard B Assault from the Storm Serpent, intending to get in FF range of the Subterranean swarm. Jim informs me that the Raveners can counter-charge 10, putting the Wraithguard in CC instead. Murder ensues. 2 broken Wraithguard stagger away.
T: Harassment swarm (right) moves up to Assault the broken Wraithlords and Wraithguard A (I should have fallen back enough to separate the units). I kill the Gargoyles but lose the combat, and the Wraithlords are wiped out. Storm Serpent takes another blast marker.
E: Nightwings Ground Attack the Nest swarm and kill 2 Dactylis.
T: Nest swarm goes on Overwatch.
E: Raider and Wraithblades Air Assault the Nest swarm, taking 1 damage from AA (Zoanthrope), and a blast marker from overwatch fire. Kill both remaining Dactylis, break the formation.
T: Rearguard Genestealers assault the Wraithblades, breaking them after both sides take casualties. Vampire is destroyed.
E: Phoenix Bombers Ground Attack the Nest swarm in the hopes of grabbing the BTS, killing the nest itself but leaving assorted Termagants still alive.
T: Subterranean swarm assaults and wipes out the Nightspinners.

Result: Eldar 0, Tyranids 5. Lessons learned: NEVER get within 10cm of a Tyranid swarm. Ever.


Top
 Profile Send private message  
 
 Post subject: Re: Three Iyanden (4.2.4) battle reports from Heavy Bolter 2
PostPosted: Mon Jul 27, 2015 1:19 pm 
Brood Brother
Brood Brother
User avatar

Joined: Sat Jan 21, 2012 3:36 am
Posts: 71
Location: Melbourne, Australia
Game 3 vs. Joel’s House Lakar Knight World Defense Force

Knight Household 770 [BTS] Knight Baron, 6 Knight Paladins
Knight Household 570 - 6 Knight Paladins
Knight Household 300 - 3 Knight Paladins
Custodian Household 375 - 3 Knights Castellan
Custodian Household 375 - 3 Knights Crusader
Lancer Household 300 - 3 Knigths Lancer
Rough Rider Platoon 150 - 6 Rough Riders
Thunderbolt Squadron 150 - 2 Thunderbolts
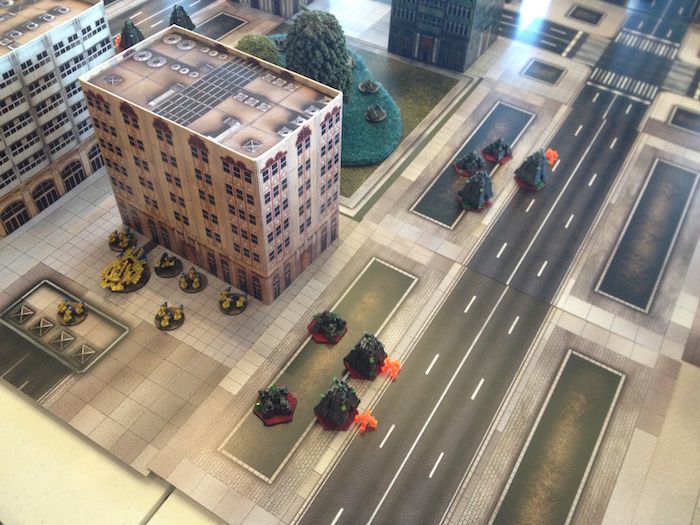
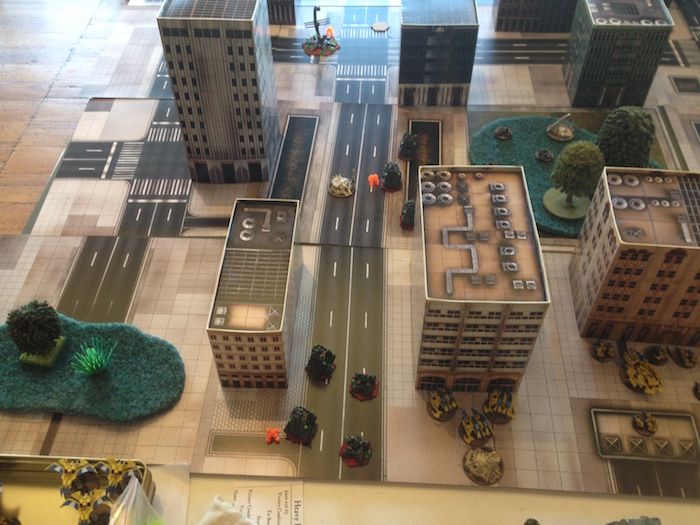
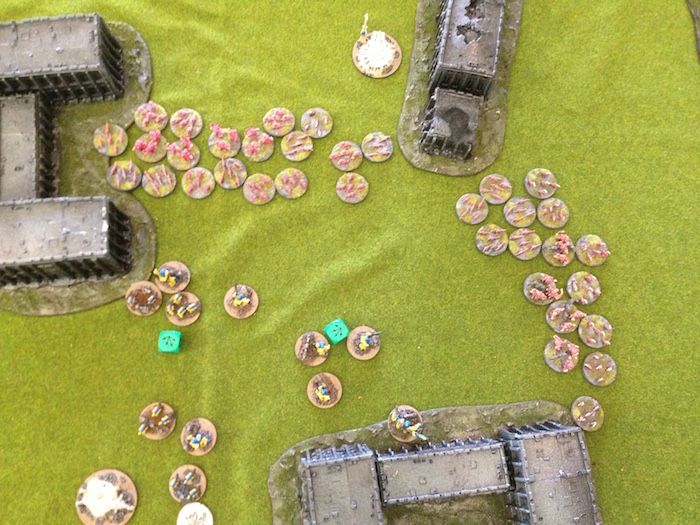
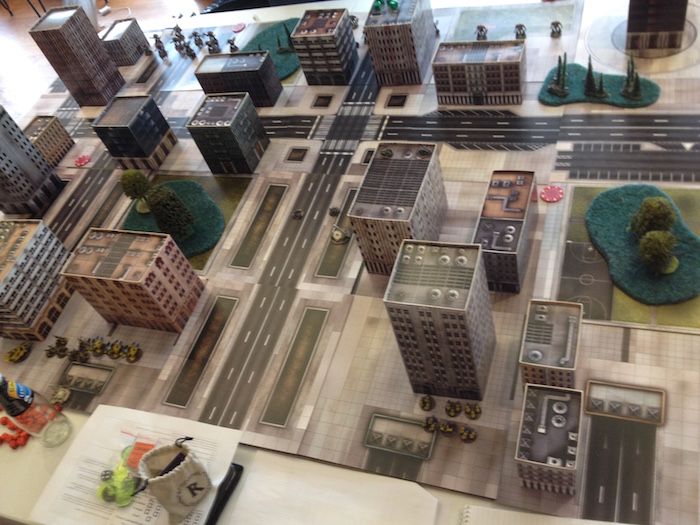
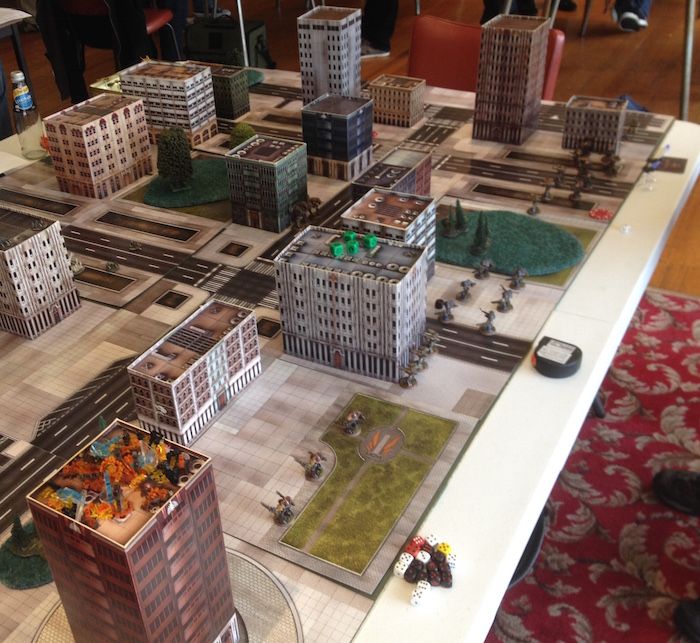
Deployment:

Back on the city table again. I put the Nightspinners on my Blitz, Storm Serpent and Wraithguard A on the left, Windhost on the right, and use the Rangers to garrison the right-hand objective (Wraithgate) that Joel has placed out in the open. This time, my objectives are on the left, while his are on the right. He places Baron's Paladin household next to his Blitz on the far left; the other large unit in the centre, and smaller formations across the table. Lancers garrison an objective on the left; Rough Riders take the far left flank.

Image

Image

Turn 1:

K: Paladins Advance towards Wraithgate and shoot the Rangers from beyond their Overwatch range, killing 1.
E: Nightspinners Sustain, doing 1 damage and 3 BM to the Lancers.
K: Rough Riders March forwards.
E: Wraithguard A doubles into the forest on the left.
K: Castellan formation advances and fires into the Rangers, wiping them out.
E: Windhost Marches on right flank.
K: Lancers advance towards Wraithgate.
E: Phoenix Bombers Ground Attack, breaking the Rough Riders.
K: Thunderbolts Intercept, killing a Phoenix.
E: Nightwings Intercept, killing a Thunderbolt.
K: Baron’s Paladins double forward.
E: Vampire and Wraithblades Air Assault the Crusaders, killing two and breaking the unit. Surviving Crusader falls back to the Blitz.
K: Small Paladin unit doubles toward the Windhost on the right flank.
E: Storm Serpent advances on left flank.

Turn 2:

Avatar is summoned from the Wraithblades, up near the enemy Blitz objective. It stands between the Wraithblades and the Baron’s household.

E: Phoenix Bombers Ground Attack the Baron’s Paladin household, doing 1 DC and 2 BM.
K: Castellans move across towards the left, shooting the Wraithblades and placing a blast marker.
E: Nightspinners sustain into the large Paladin formation approaching the Wraithgate, dealing 1 DC and 3 BM.
K: Baron’s Paladins advance around a building and fire at the Wraithblades, breaking them.
E: Wraithlords Assault out of the Wraithgate, charging into the five Paladins. As Joel starts rolling an enormous pile of Macro attacks, I realise that I’ve misjudged things (assuming that only their extra attacks were MW…). Three damage to the Knights, 3 dead Wraithlords (including the Wraithseer). Wraithlords win the combat, but are broken. Paladins withdraw.

Image

K: Lancers Assault the broken Wraithlords, wiping them out with their attacks.
E: Storm Serpent advances and shoots the Baron's Paladins, placing one BM and moving into range to support assaults.
K: Small Paladin formation shoots the Windriders, killing 2 jetbikes.
E: Wraithguard A doubles through the forest and shoots the Castellans, placing 1 BM.
K: Thunderbolt Intercepts, failing to damage the Phoenix Bombers.
E: Avatar charges the Baron’s household. Despite hitting with every attack, the Knights save all but one hit and cut him down. By this stage the Knights have one dead and several damaged Paladins (attacking from multiple directions has meant they spread damage out), and they have seven blast markers - still not enough to slow them down though.
The Knights are out of activations, with the Rough Riders and Crusader both broken.
E: Vampire Ground Attacks the broken Crusader, killing it.
E: Nightwings Ground Attack the broken Paladins, dealing 1 DC (from blast markers, after missing every attack).

Aircraft leave safely, and the Rough Riders rally. Broken Wraithblades fail to rally.

Turn 3:

No blow-by-blow notes here. Short on time and no objectives held, so we needed to lift the pace a bit.

Small Paladin unit finished off the Windhost on the right flank, crossing over the halfway line. Lancers marched across to support them, taking one objective and giving me two units to kill if I wanted to claim They Shall Not Pass. Wraithguard A fails to activate, standing right next to the Castellans. In reply the Castellans annihilate the Wraithguard (and Wraithlords) of formation A, giving them the second objective.

Wraithguard B assaults the broken Paladins out of the Wraithgate. There’s not enough room between the enemy and the buildings though, and some units are in CC counter-charge range. The Spirit Seer kills a knight with her Singing Spear, but I roll badly on my FF attacks and the combat is drawn. In the second round, all Paladins counter-charge and wipe out the Wraithguard.

I can’t get the Take and Hold objectives, Blitz or They Shall Not Pass, and don’t have enough ground units to even think about Defend the Flag. I try to throw everything into the enemy BTS: the Vampire fails to activate, the Paladins shoot down the Storm Serpent, then the Phoenix Bombers, Nightspinners and Nightwings only manage to land a single point of damage on the Baron’s unit.

Result: Knights 2 (BTS, Take and Hold), Eldar 0.


Top
 Profile Send private message  
 
 Post subject: Re: Three Iyanden (4.2.4) battle reports from Heavy Bolter 2
PostPosted: Mon Jul 27, 2015 1:20 pm 
Brood Brother
Brood Brother
User avatar

Joined: Sat Jan 21, 2012 3:36 am
Posts: 71
Location: Melbourne, Australia
Post-mortem:

Those were my first games playing against all three factions. Infantry + Aircraft is a very different style of play to the heavily mechanised Iyanden that I brought last year, and while I loved the air superiority, I really missed having some mobility once the webway units hit the table. I think I’d prefer to swap the Vampire for a second Storm Serpent, if I had the models to do so.

The varied Spirit formation sizes were great: each felt like they had a good role to play, and it really helps break up the "yet another 6 Wraithguard" feel of the old list.

4 Wraithblades were consistently excellent for exactly one combat, but couldn’t support any other combats nearby due to their lack of FF. They worked well in a Vampire, though I’d be tempted to try a second Vampire to airlift them out after their combats.

4 Wraithguard + 2 Wraithlords: My favourite formation, with the Wraithlords providing cover on the advance. Flexible, not too expensive. I prefer this to taking 6 Wraithguard.

5 Wraithguard: A nice balance between 4 (too easily broken) and 6 (too expensive). Able to handle most targets if you don’t get them countercharged. Worth the 325 points, but they’re slow and more vulnerable to AP shooting than the mixed formation was.

6 Wraithlords: Taken as a slightly cheaper 6-man formation that could host the Wraithseer, with some ranged attacks that could have some (any!) impact if they needed to deploy on foot. They did reasonable damage even in FF, but didn’t really get a chance to shine. Breaking a full Paladin household in assault was nice, but it cost me my BTS to do so.

This list actually fits into the old 1 core : 1 support restriction (due to the number of aircraft), but I think the 1:2 ratio works far better - it actually allows some flexibility in list design, rather than forcing people to play air-heavy or extremely monotonous infantry. You'll still have 3+ core Spirit formations in an average list, which keeps the construct-heavy theme and makes it look and play very differently to the other Craftworlds.


Last edited by Morsla on Mon Jul 27, 2015 11:21 pm, edited 1 time in total.

Top
 Profile Send private message  
 
 Post subject: Re: Three Iyanden (4.2.4) battle reports from Heavy Bolter 2
PostPosted: Mon Jul 27, 2015 3:23 pm 
Brood Brother
Brood Brother

Joined: Mon Nov 05, 2012 9:35 am
Posts: 3338
Location: Norrköping, Sweden.
Thanks for the reports! Great job!

_________________
https://epic40ksweden.wordpress.com/

"You have a right to be offended" - Steve Hughes
"Your feelings are hurting my thoughts" - Aron Flam


Top
 Profile Send private message  
 
 Post subject: Re: Three Iyanden (4.2.4) battle reports from Heavy Bolter 2
PostPosted: Mon Jul 27, 2015 4:15 pm 
Brood Brother
Brood Brother
User avatar

Joined: Tue Jul 05, 2005 11:39 pm
Posts: 1974
Location: South Yorkshire
Quote:
E: Rangers Marshall, shooting at the broken Maniple #3 and killing an Obelisk with a blast marker.


Obelisks (and monoliths) are fearless so should not have been destroyed by BMs when broken.


Top
 Profile Send private message  
 
 Post subject: Re: Three Iyanden (4.2.4) battle reports from Heavy Bolter 2
PostPosted: Mon Jul 27, 2015 4:29 pm 
Brood Brother
Brood Brother
User avatar

Joined: Tue Jul 05, 2005 11:39 pm
Posts: 1974
Location: South Yorkshire
Quote:
E: Wraithguard B Assault from the Storm Serpent, intending to get in FF range of the Subterranean swarm. Jim informs me that the Raveners can counter-charge 10, putting the Wraithguard in CC instead. Murder ensues. 2 broken Wraithguard stagger away.


Raveners only counter charge 5cm (20cm move, infiltrate only works when the formation makes an engage action not for or during counter charges).

from rulebook
2.1.4 Infiltrators
Some units are noted as being infiltrators. These are allowed to double their speed when they make a charge move (and only when they charge!), and they can also ignore enemy zones of control from the formation they are charging. These two special abilities allow them to sneak past enemy units when they charge in order to attack enemy units that are further back. Note that the unit coherency rules still apply to infiltrators.

from FAQ
2.1.4 Infiltrators
Q: Do Infiltrators get double movement if they counter charge?
A: No. As it states in the rulebook the double movement is only when the Infiltrator charges.


Top
 Profile Send private message  
 
 Post subject: Re: Three Iyanden (4.2.4) battle reports from Heavy Bolter 2
PostPosted: Mon Jul 27, 2015 4:35 pm 
Brood Brother
Brood Brother
User avatar

Joined: Tue Jul 05, 2005 11:39 pm
Posts: 1974
Location: South Yorkshire
Thanks for the reports,very enjoyable read, cheers.


Top
 Profile Send private message  
 
 Post subject: Re: Three Iyanden (4.2.4) battle reports from Heavy Bolter 2
PostPosted: Tue Jul 28, 2015 12:26 am 
Brood Brother
Brood Brother
User avatar

Joined: Sat Jan 21, 2012 3:36 am
Posts: 71
Location: Melbourne, Australia
Thanks for the clarifications dptdexys! That would have made the second Tyranid assault play out much differently (FF Wraithguard vs FF Raveners...), but I think the overall game result would still have been pretty much the same after the first big assault (taking out 3/8 ground activations) crippled me. Now that I've seen how effectively supporting units can pin down an Assault target, I need to try using that tactic myself ;)

Good to know about the fearless Necron vehicles. I was fairly lucky in that game as they all teleported in with a few blast markers on them, making them easy to break - they should have been a bit tougher to wipe out though. The portal assaults were a constant threat, but I managed to get an activation advantage quite early by breaking so many of the armoured formations.


Top
 Profile Send private message  
 
 Post subject: Re: Three Iyanden (4.2.4) battle reports from Heavy Bolter 2
PostPosted: Tue Jul 28, 2015 2:49 am 
Brood Brother
Brood Brother
User avatar

Joined: Fri Feb 14, 2003 12:46 am
Posts: 27069
Location: Edmond, Oklahoma USA
Hi!

Sweet setup and report!

Primarch

_________________
Primarch


The Primarchload
Magnetized Titans Tutorial
Net Epic Gold
Heresy Rules


Top
 Profile Send private message  
 
 Post subject: Re: Three Iyanden (4.2.4) battle reports from Heavy Bolter 2
PostPosted: Tue Jul 28, 2015 5:48 am 
Purestrain
Purestrain
User avatar

Joined: Mon Jul 28, 2003 10:43 pm
Posts: 7925
Location: New Zealand
Great reports!!

_________________
http://hordesofthings.blogspot.co.nz/


Top
 Profile Send private message  
 
 Post subject: Re: Three Iyanden (4.2.4) battle reports from Heavy Bolter 2
PostPosted: Tue Jul 28, 2015 10:46 am 
Brood Brother
Brood Brother
User avatar

Joined: Thu Jan 17, 2013 5:35 am
Posts: 200
Hey Morsla

Thanks heaps for the Batreps, they were well written and made for a great read.
Your feedback was good and I liked the way you reflected on the list.
Jims nids are a tough list to face and they punish you if you intermingle.
I would agree with you about needing a second storm serpent in that list to help ensure the wraith formations make those engagements.

Anyway thanks again for the Batreps.

Cheers

Mic


Top
 Profile Send private message  
 
Display posts from previous:  Sort by  
Post new topic Reply to topic  [ 14 posts ] 


Who is online

Users browsing this forum: No registered users and 2 guests


You cannot post new topics in this forum
You cannot reply to topics in this forum
You cannot edit your posts in this forum
You cannot delete your posts in this forum
You cannot post attachments in this forum

Search for:
Jump to:  


Powered by phpBB ® Forum Software © phpBB Group
CoDFaction Style by Daniel St. Jules of Gamexe.net