Login |  Register |  FAQ
   
Post new topic Reply to topic  [ 17 posts ]  Go to page 1, 2  Next

Epic Tau terrain WIP

 Post subject: Epic Tau terrain WIP
PostPosted: Fri Mar 15, 2013 12:31 am 
Brood Brother
Brood Brother
User avatar

Joined: Tue May 17, 2011 3:25 pm
Posts: 148
Location: Faversham, UK
Have a look at WIP of Tau perimeter wall I've just started.
Not sure how to add multiple pictures as I don't post too often but will try to upload from comp, if not there's always ImageShack(:
First pic is of 1mm thick plasticard cut to shape as base for terrain.
Attachment:
IMG_0692.jpg
IMG_0692.jpg [ 54.47 KiB | Viewed 3105 times ]

Ok I've got hang of uploading-easy, thanks to our ITs I guess:]
Then I've added 0.5mm card with smaller diameter as inner prop for pre-shaped wooden planks, bought from local DIY store (one roughly 2m long piece):
Attachment:
IMG_0694.jpg
IMG_0694.jpg [ 50.93 KiB | Viewed 3102 times ]

Here is pic of perimeter wall greenstuffed and you can see pencilled lines drew using standard Epic infantry base and 2.5mm square rod as guidance for what comes after:
Attachment:
IMG_0695.jpg
IMG_0695.jpg [ 87.15 KiB | Viewed 3102 times ]

_________________
Fight not for hate of what lies ahead
But for love of what you protect


Last edited by HerrR on Fri Mar 15, 2013 1:05 am, edited 3 times in total.

Top
 Profile Send private message  
 
 Post subject: Re: Epic Tau terrain WIP
PostPosted: Fri Mar 15, 2013 12:51 am 
Brood Brother
Brood Brother
User avatar

Joined: Tue May 17, 2011 3:25 pm
Posts: 148
Location: Faversham, UK
Here plastic tubing of around 2.5mm diam is cut in half using carefully razor saw:
Attachment:
IMG_0702.jpg
IMG_0702.jpg [ 33.78 KiB | Viewed 3100 times ]

Cutting, cutting:
Attachment:
IMG_0703.jpg
IMG_0703.jpg [ 70.35 KiB | Viewed 3100 times ]

Next another level of card, 1mm, as another prop for wall and for 6mm fellows to see over the lip of walls:
Attachment:
IMG_0707.JPG
IMG_0707.JPG [ 97.46 KiB | Viewed 3100 times ]

You can see cut out pieces, they required dry matching and slight filing to fit all 8 of them, starting from the opposite of open wall section to make it easier as on 2 following pics:
Attachment:
IMG_0708.jpg
IMG_0708.jpg [ 64.45 KiB | Viewed 3100 times ]

Attachment:
IMG_0710.jpg
IMG_0710.jpg [ 67.01 KiB | Viewed 3100 times ]

_________________
Fight not for hate of what lies ahead
But for love of what you protect


Last edited by HerrR on Fri Mar 15, 2013 1:01 am, edited 1 time in total.

Top
 Profile Send private message  
 
 Post subject: Re: Epic Tau terrain WIP
PostPosted: Fri Mar 15, 2013 1:01 am 
Brood Brother
Brood Brother
User avatar

Joined: Tue May 17, 2011 3:25 pm
Posts: 148
Location: Faversham, UK
Now the pre-cut halves of plastic pipe are being glued on the inner lip of walkway:
Attachment:
IMG_0712.JPG
IMG_0712.JPG [ 115.45 KiB | Viewed 3098 times ]

And that's the last so far pic with Tau and Kroot looking to further 'lesser evil':
Attachment:
IMG_0714.JPG
IMG_0714.JPG [ 104.7 KiB | Viewed 3097 times ]

To be continued...

_________________
Fight not for hate of what lies ahead
But for love of what you protect


Top
 Profile Send private message  
 
 Post subject: Re: Epic Tau terrain WIP
PostPosted: Wed Mar 20, 2013 10:59 pm 
Brood Brother
Brood Brother
User avatar

Joined: Tue May 17, 2011 3:25 pm
Posts: 148
Location: Faversham, UK
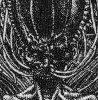
I've used this cut to shape transparent plastic as stencil for rough form of 'pillars' and by setting it in the middle of each wall section figure out shape of the wall to cut out inside each little pillar/support.
Attachment:
IMG_0727.JPG
IMG_0727.JPG [ 67.31 KiB | Viewed 3018 times ]

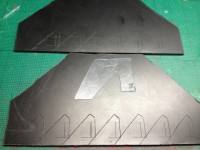
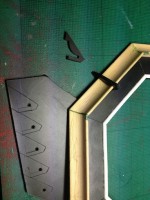
Another view with cutting started by drilling in place where support will contact top of the wall:
Attachment:
IMG_0728.jpg
IMG_0728.jpg [ 80.15 KiB | Viewed 3018 times ]

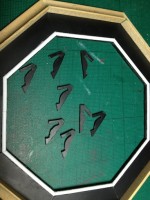
Here after a bit of fiddly filing all 8 of them are ready to be glued to the wall:
Attachment:
IMG_0729.jpg
IMG_0729.jpg [ 83.41 KiB | Viewed 3018 times ]

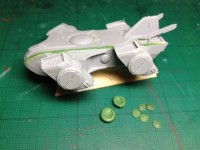
Here example of molded and cast Tau logo from the side of Orca lander (used Vaseline as release agent):
Attachment:
IMG_0730.JPG
IMG_0730.JPG [ 62.48 KiB | Viewed 3018 times ]

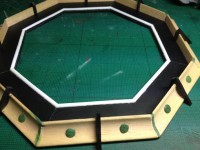
And here the model nearly ready, just need some greenstuffing of gaps between supports and walls:
Attachment:
IMG_0731.JPG
IMG_0731.JPG [ 73.02 KiB | Viewed 3018 times ]


It will need to be painted next.
Comments and constructive criticism welcome (:

To be continued...

_________________
Fight not for hate of what lies ahead
But for love of what you protect


Top
 Profile Send private message  
 
 Post subject: Re: Epic Tau terrain WIP
PostPosted: Fri Mar 22, 2013 8:13 am 
Brood Brother
Brood Brother
User avatar

Joined: Sat Apr 30, 2011 3:04 pm
Posts: 2757
Very creative! Looks good. You might want to make sure you prime the wood bits with something heavy unless you want them to look like painted wood when you are done.

_________________
Nitpicks Knapsack (Scratchbuilding and 3D designing and printing and painting)


Top
 Profile Send private message  
 
 Post subject: Re: Epic Tau terrain WIP
PostPosted: Fri Mar 29, 2013 11:28 am 
Brood Brother
Brood Brother
User avatar

Joined: Fri Sep 07, 2012 8:59 am
Posts: 1240
Location: London
Ha, this one slipped my attention! ;)

Looking really good!
Will you bring it along to the club when done or do we need to pilgrimage to yours? :D

_________________
Image


Top
 Profile Send private message  
 
 Post subject: Re: Epic Tau terrain WIP
PostPosted: Tue Apr 09, 2013 10:17 pm 
Brood Brother
Brood Brother
User avatar

Joined: Tue May 17, 2011 3:25 pm
Posts: 148
Location: Faversham, UK
Small update. So much work, so little time(: I've changed profile of supports to more curvy ones and added little ramps so to make it look more practical. Little power station building was made of 40k Tau bitz and some resin drop outs. As walkways, ramps and painted Tau symbols are treated with liquid mask from Vallejo (brilliant stuff- can wholeheartedly recommend) now it's question to blast walls with aerograph.
BTW, thanks Nitpick for advise, I have applied something like 4-5 layers of thick PVA on those wooden walls, we will see how it looks painted.

Attachment:
IMG_0743.JPG
IMG_0743.JPG [ 91.79 KiB | Viewed 2693 times ]

_________________
Fight not for hate of what lies ahead
But for love of what you protect


Top
 Profile Send private message  
 
 Post subject: Re: Epic Tau terrain WIP
PostPosted: Tue Apr 09, 2013 10:41 pm 
Brood Brother
Brood Brother
User avatar

Joined: Sat Apr 30, 2011 3:04 pm
Posts: 2757
Looking good so far!

_________________
Nitpicks Knapsack (Scratchbuilding and 3D designing and printing and painting)


Top
 Profile Send private message  
 
 Post subject: Re: Epic Tau terrain WIP
PostPosted: Tue Apr 16, 2013 12:23 am 
Brood Brother
Brood Brother
User avatar

Joined: Tue May 17, 2011 3:25 pm
Posts: 148
Location: Faversham, UK
It took more work then expected but first finished terrain piece is here ;D
Attachment:
IMG_0751.JPG
IMG_0751.JPG [ 80.88 KiB | Viewed 2608 times ]

_________________
Fight not for hate of what lies ahead
But for love of what you protect


Top
 Profile Send private message  
 
 Post subject: Re: Epic Tau terrain WIP
PostPosted: Tue Apr 16, 2013 8:03 am 
Brood Brother
Brood Brother
User avatar

Joined: Sat Apr 30, 2011 3:04 pm
Posts: 2757
Nice! I like the creativity here. I am a huge fan of selective weathering and I think it would look even better with some powder dusted on it. Especially on the black parts that would not stay that black for long outdoors. Also, where do nyou get in? Or out.

_________________
Nitpicks Knapsack (Scratchbuilding and 3D designing and printing and painting)


Top
 Profile Send private message  
 
 Post subject: Re: Epic Tau terrain WIP
PostPosted: Tue Apr 16, 2013 5:00 pm 
Brood Brother
Brood Brother
User avatar

Joined: Tue May 17, 2011 3:25 pm
Posts: 148
Location: Faversham, UK
Yep I was toying with idea of dry bushing dark blue,
cold colour as a contrast to perimeter wall.

I was ready for this question from conception
of the project- it's designed for skimmers 8)

Always appreciate input.

Now some weathering and varnishing and on with
other bits of (Tau) terrain.
Stay tuned...

_________________
Fight not for hate of what lies ahead
But for love of what you protect


Top
 Profile Send private message  
 
 Post subject: Re: Epic Tau terrain WIP
PostPosted: Tue Apr 16, 2013 6:09 pm 
Brood Brother
Brood Brother
User avatar

Joined: Tue Jul 31, 2007 6:28 pm
Posts: 856
Location: UK - Bristol
I like that, good use of stuff and well made.
Top shout.

_________________
http://angelbarracks.co.uk/


Top
 Profile Send private message  
 
 Post subject: Re: Epic Tau terrain WIP
PostPosted: Tue Apr 16, 2013 9:29 pm 
Brood Brother
Brood Brother
User avatar

Joined: Sat Apr 30, 2011 3:04 pm
Posts: 2757
HerrR wrote:
Now some weathering and varnishing and on with
other bits of (Tau) terrain.
Stay tuned...


Sounds like a nice plan! Tuned in.

_________________
Nitpicks Knapsack (Scratchbuilding and 3D designing and printing and painting)


Top
 Profile Send private message  
 
 Post subject: Re: Epic Tau terrain WIP
PostPosted: Sun Apr 21, 2013 5:42 pm 
Brood Brother
Brood Brother
User avatar

Joined: Tue May 17, 2011 3:25 pm
Posts: 148
Location: Faversham, UK
With perimeter wall weathered and varnished we can continue.
A while ago (when their website was still active) I've bought few terrain pieces from Old Crow Models.
So here is the one I'm going to convert to 'Coalition Centre':
Attachment:
IMG_0715.jpg
IMG_0715.jpg [ 56.4 KiB | Viewed 2501 times ]

This pic shows a hole drilled where it should be and a vertical groove - to begin 'tausation'.
Attachment:
IMG_0716.jpg
IMG_0716.jpg [ 78.23 KiB | Viewed 2501 times ]

Here are 2 pieces of wood that will be used as spires and a hole is extended and smoothened.
Attachment:
IMG_0723.JPG
IMG_0723.JPG [ 66.06 KiB | Viewed 2501 times ]

And here 'spires' have been sanded to shape and pins are fitted for strenght on top of building:
Attachment:
IMG_0724.JPG
IMG_0724.JPG [ 62.28 KiB | Viewed 2501 times ]

_________________
Fight not for hate of what lies ahead
But for love of what you protect


Top
 Profile Send private message  
 
Display posts from previous:  Sort by  
Post new topic Reply to topic  [ 17 posts ]  Go to page 1, 2  Next


Who is online

Users browsing this forum: No registered users and 12 guests


You cannot post new topics in this forum
You cannot reply to topics in this forum
You cannot edit your posts in this forum
You cannot delete your posts in this forum
You cannot post attachments in this forum

Search for:
Jump to:  


Powered by phpBB ® Forum Software © phpBB Group
CoDFaction Style by Daniel St. Jules of Gamexe.net