Finally got the time to make a battle report for the list. The maps are more or less done while having some issues here and there, but i'm quite satisfied with them this time. Also take into account that my keyboard is working badly, so there's going to be many letters missing that escaped my gaze while correcting.
Points:
3000Scenario:
Tournament ScenarioForces:
OGBM 3.4 and
Tau Vior'LA 1.8.aIncompertus, 3000 POINTS
Gargant Bigmob (3.4 - Developmental)
==================================================
GREAT GARGANT [750]
Mekboy Big Boss, (Kustom) Flakka Dakka, 3 Gatling Kannon
GARGANT [575]
2 Gatling Kannon, Soopa Zzap Gun
GARGANT [625]
(Kustom) Flakka Dakka, Gatling Kannon, 2 Mega Lobba
GARGANT [600]
2 Gatling Kannon, Grot Guided Missile
FIGHTA-BOMMERS [150]
3 Fighta-Bommers
FIGHTA-BOMMERS [150]
3 Fighta-Bommers
LOOTA WARBAND (NORMAL) [150]
6 Boyz, 2 Grotz, Killa Kan
Incompertus, 3000 POINTS
Tau Vior'la (1.8a Developmental)
==================================================
CRISIS BATTLESUIT CADRE [325]
Shas'el Commander, 5 XV8 Crisis Battlesuit unit, 2 Gun Drones
CRISIS BATTLESUIT CADRE [400]
5 XV8 Crisis Battlesuit unit, 2 Gun Drones, Shas'o Commander
CRISIS BATTLESUIT CADRE [325]
Shas'el Commander, 5 XV8 Crisis Battlesuit unit, 2 Gun Drones
ARMOURED SUPPORT GROUP [425]
2 extra Hammerhead Gunships (Rail- or Fusionhead), Skyray, 4 Hammerhead Gunship (Railhead)
RECON SKIMMER GROUP [150]
3 Pathfinder Tetra, 2 Piranha
RECON SKIMMER GROUP [150]
3 Pathfinder Tetra, 2 Piranha
SKYSWEEP SUPPORT GROUP [250]
3 Skyray Air Defense Gunships
XV128 STORMSURGE FORMATION [250]
2 XV128 Stormsurges
XV128 STORMSURGE FORMATION [250]
2 XV128 Stormsurges
BARRACUDA SQUADRON [150]
2 Barracuda Fighters
BARRACUDA SQUADRON [150]
2 Barracuda Fighters
TIGER SHARK AX-1-0 [175]
1 Tiger Shark AX-1-0
First of all. There was no damage from dangerous terrain, so i'll avoid mention it each time for simplicity.
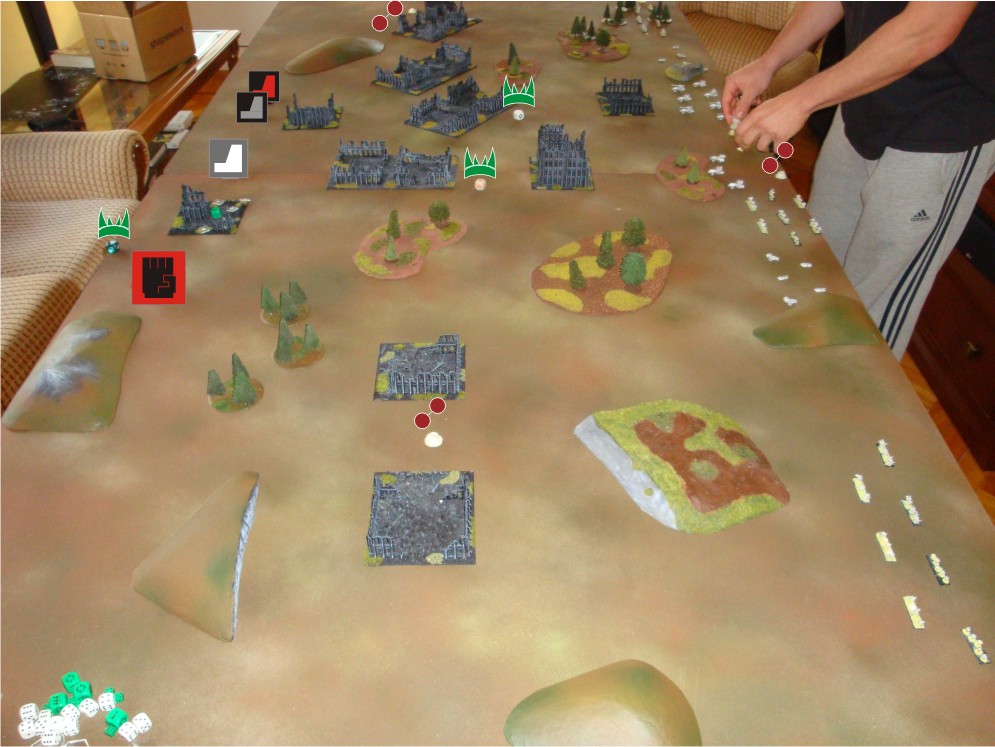
Deployment:
- I put my objectives in the center, in front of his Blitz. He puts his on the sides.
- The Orks are deployed towards the center, close to each other in pairs for the AA umbrella.
- Tau deploy across the battlefield, concentrating on the center and my left flank.
- Only a Killa Kan formation is placed as a garrison, on the ruins near my blitz.
- Orks get very lucky with maximum shields on everyone except the White Gargant on the middle getting the minimum amount. So the Great Gargant has a big 12 shields, 2 more Gargants with 6 and the last with 4.
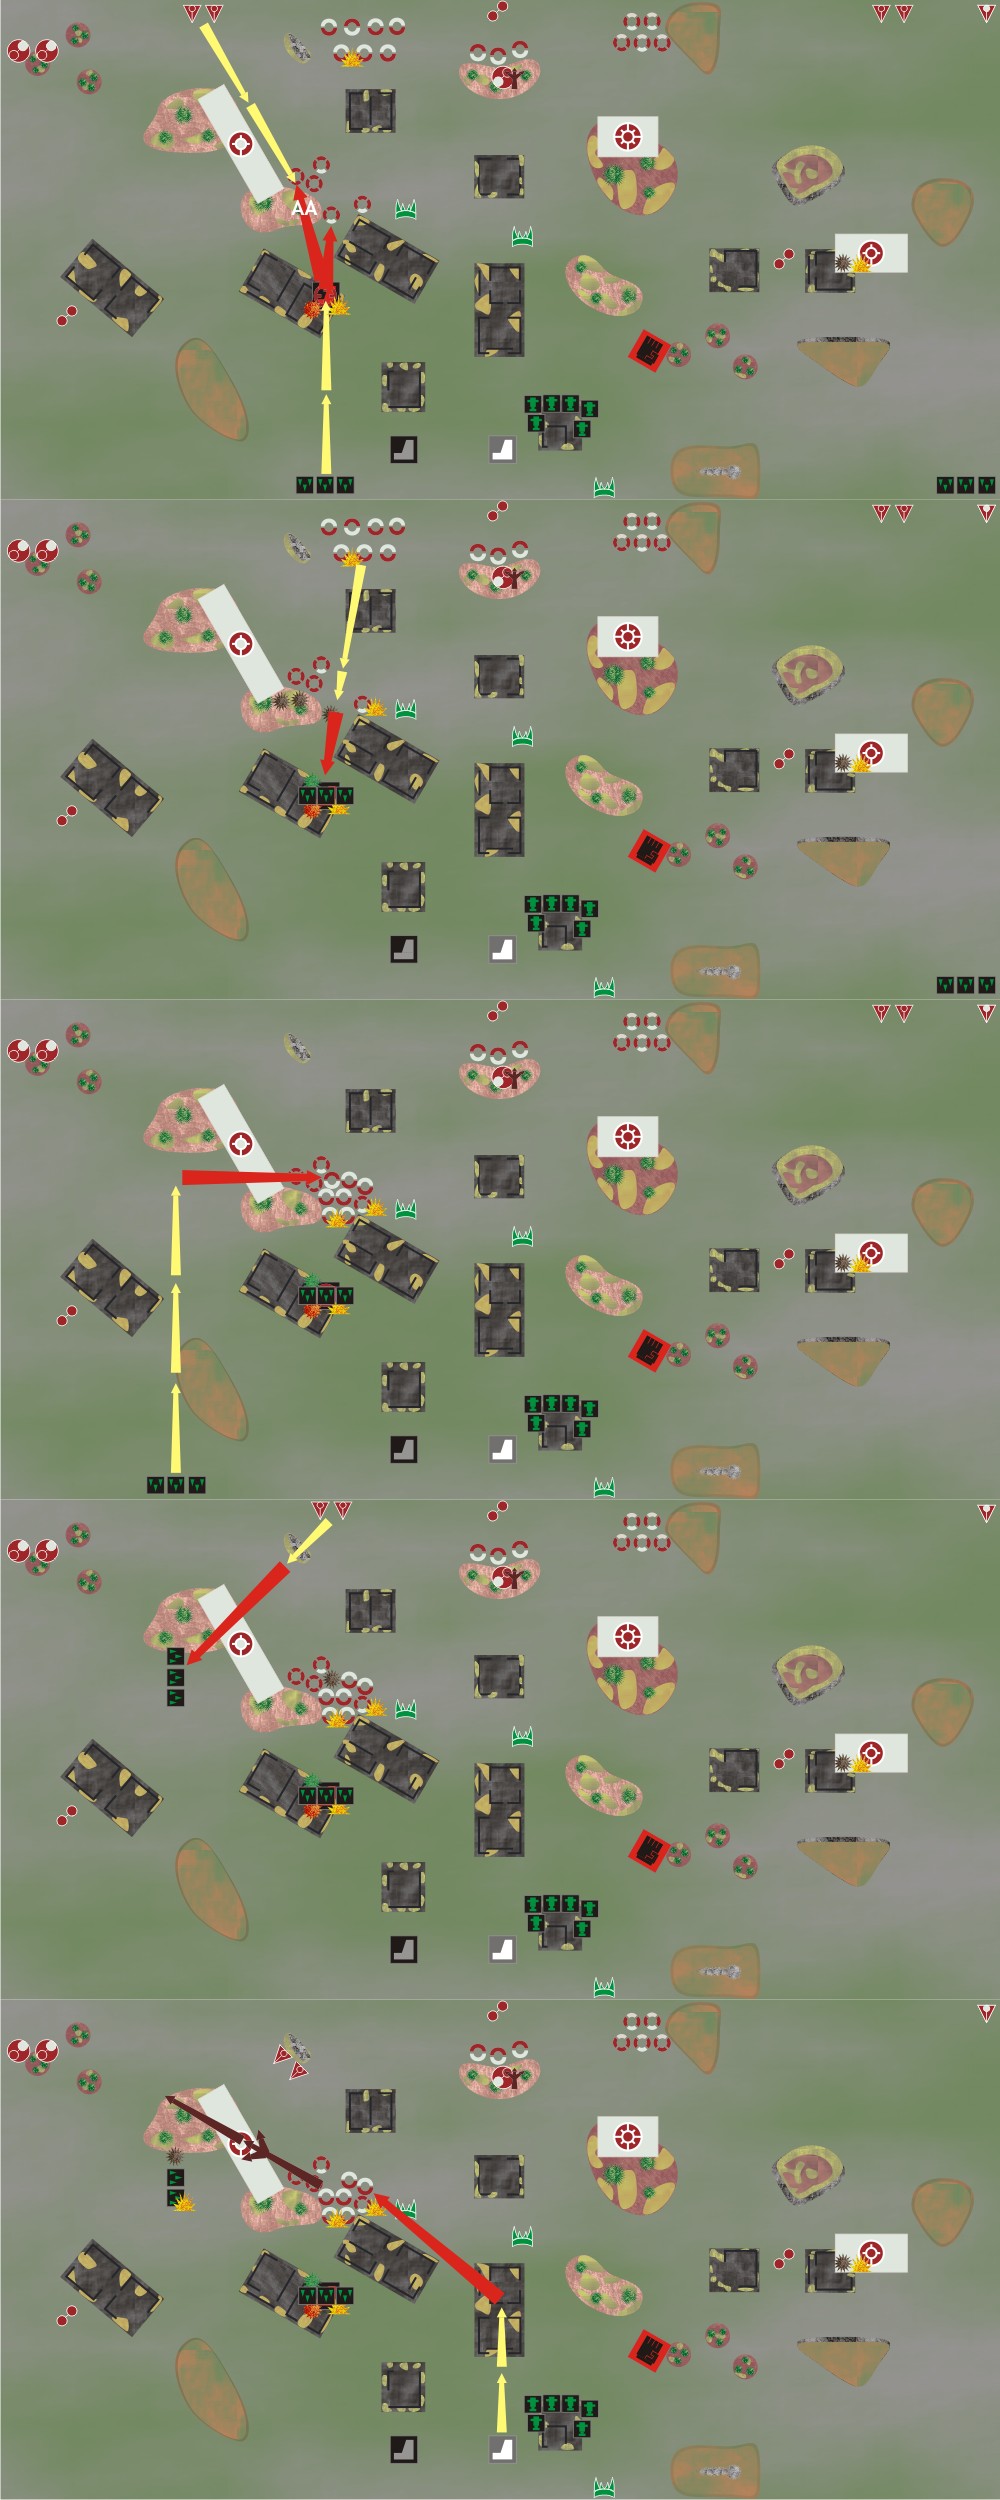
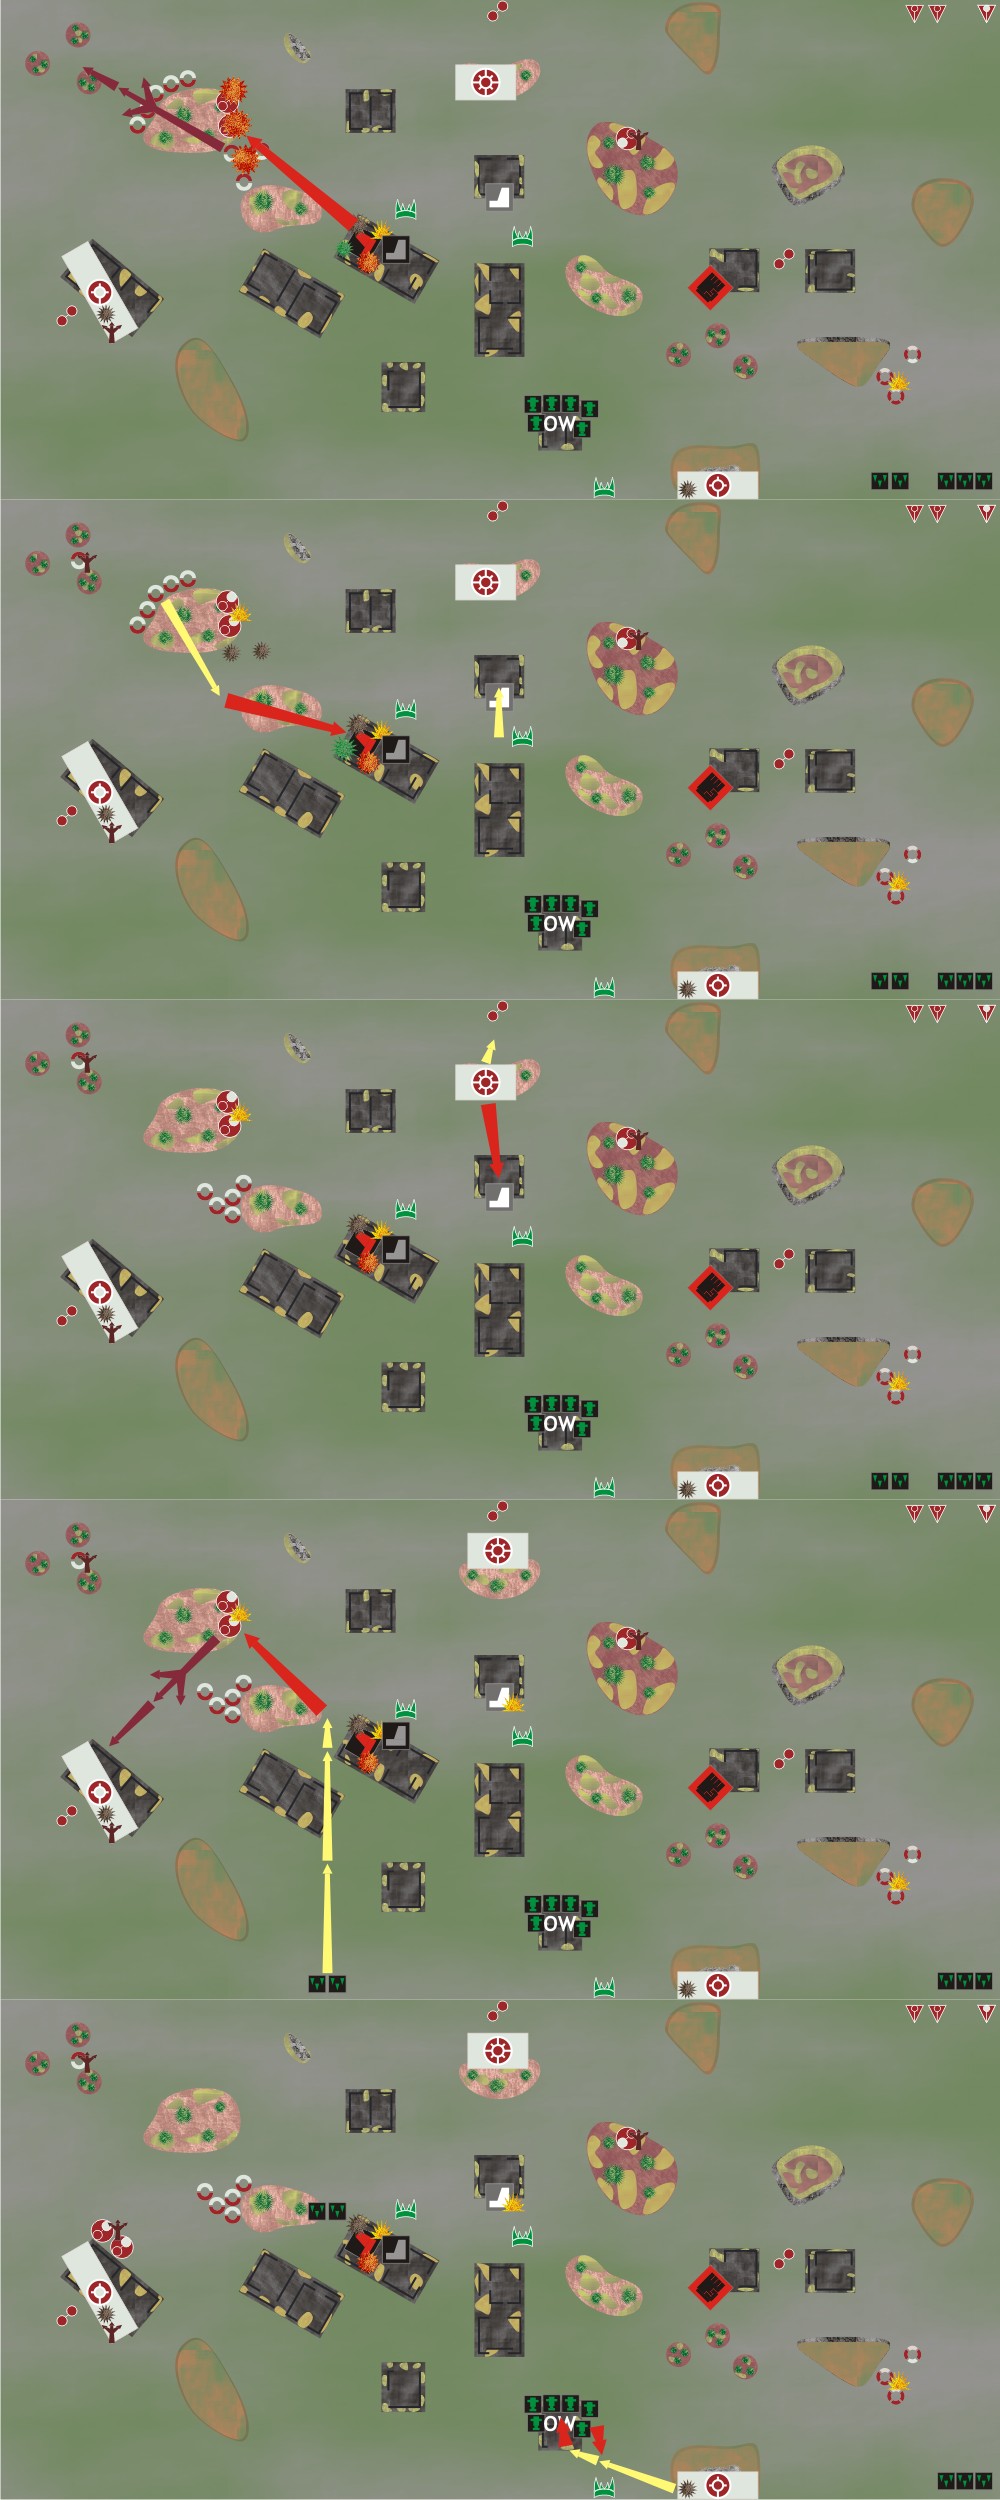
 Turn 1. Tau get the initiative:T:
 Barracudas go on cAP.
O: Killa Kans fails and holds, removing the BM.
T: crisis 3 marchs to the ruins and near the Tau objective.
O: Grey Gargant sustain fire with one missle to the Stormsurges in the center, destroying one
and breaking the formation, which heads to the forest.
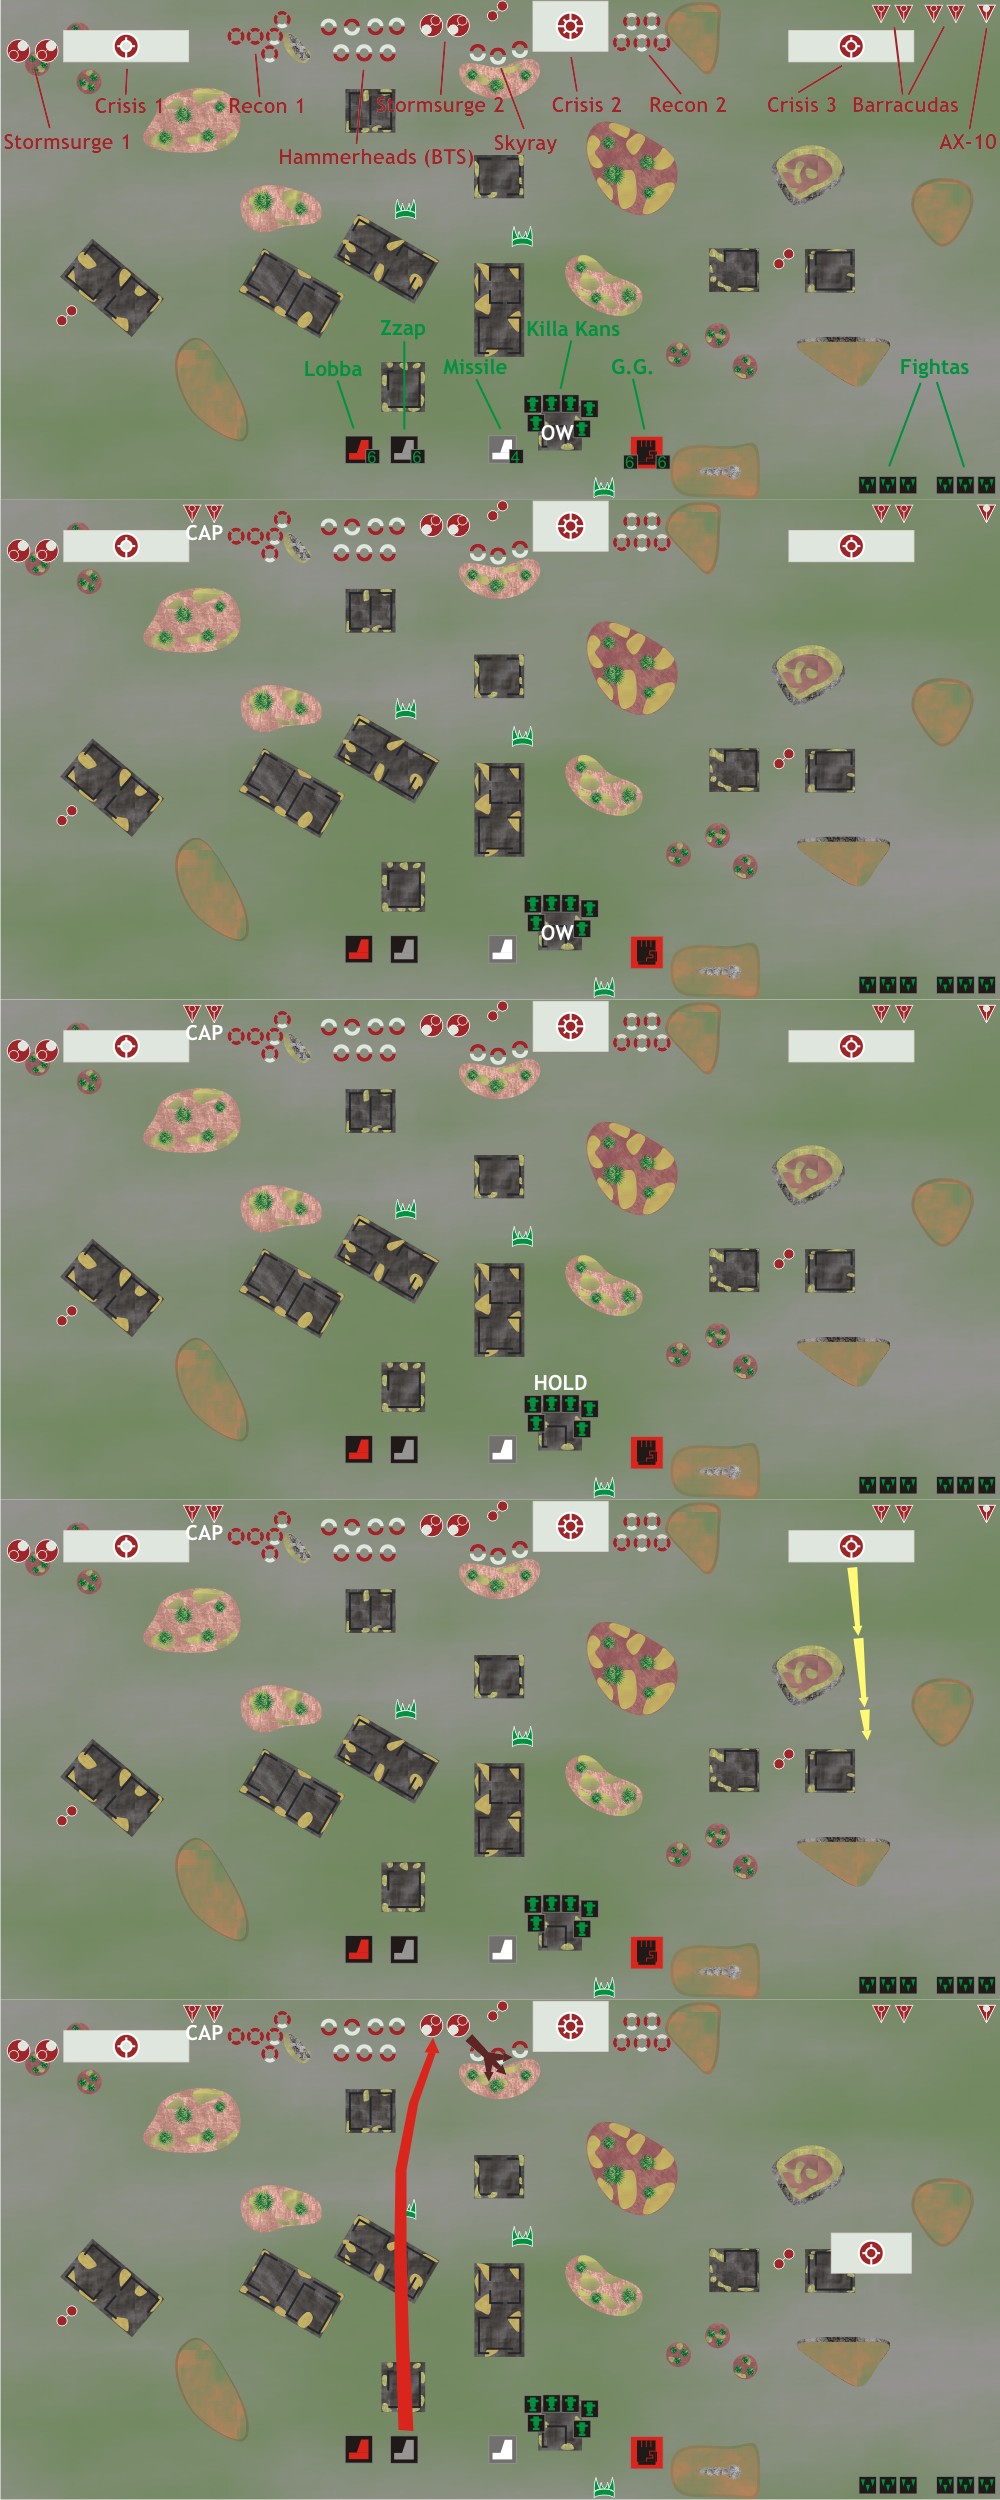 T:
T: crisis 2 doubles towards the forest in the center, out of the sight of any Ork.
O: Great Gargant doubles and shoots crisis 3, killing one stand.
T: crisis 1 marches towards he forest in the middle-left.
O: Red Gargant doubles with a Push'em harder towards the ruins in the middle left and shoots the Hammerheads, not causing damage but 3 BMs from a lucky 12 BPS on the Lobba.
T: Recon 1 doubles towards the reckless Red Gargant, shooting and marking him with one unit and keeping the rest hidden.
 O:
O: Fightas ground attack Recon 1 and Barracudas activate cAP in answer. Fightas shoot from above the Gargant to use its AA umbrella and the Barracudas choose to dive in, receiving AA from the Gargant. They get very unlucky when not only they receive the maximum 4 shoots, but 2 hit at 6+ and both Barracudas fall even after they chose to jinx. Free from the Barracudas, Fightas destroy the Tetra, unmarking the Gargant.
T: Hammerheads double towards the Red Gargant, shooting and marking it again and damaging 1 shield.
O: Orks choose again to ground attack the unit marking the Gargant, destroying it.
T: Barracudas intercept this latter Fightas at 30cm, taking one down.
O: White Gargant doubles to the front, rotating to shoot the Hammerheads, destroying one and breaking the formation, which heads to the big forest on the left flank.
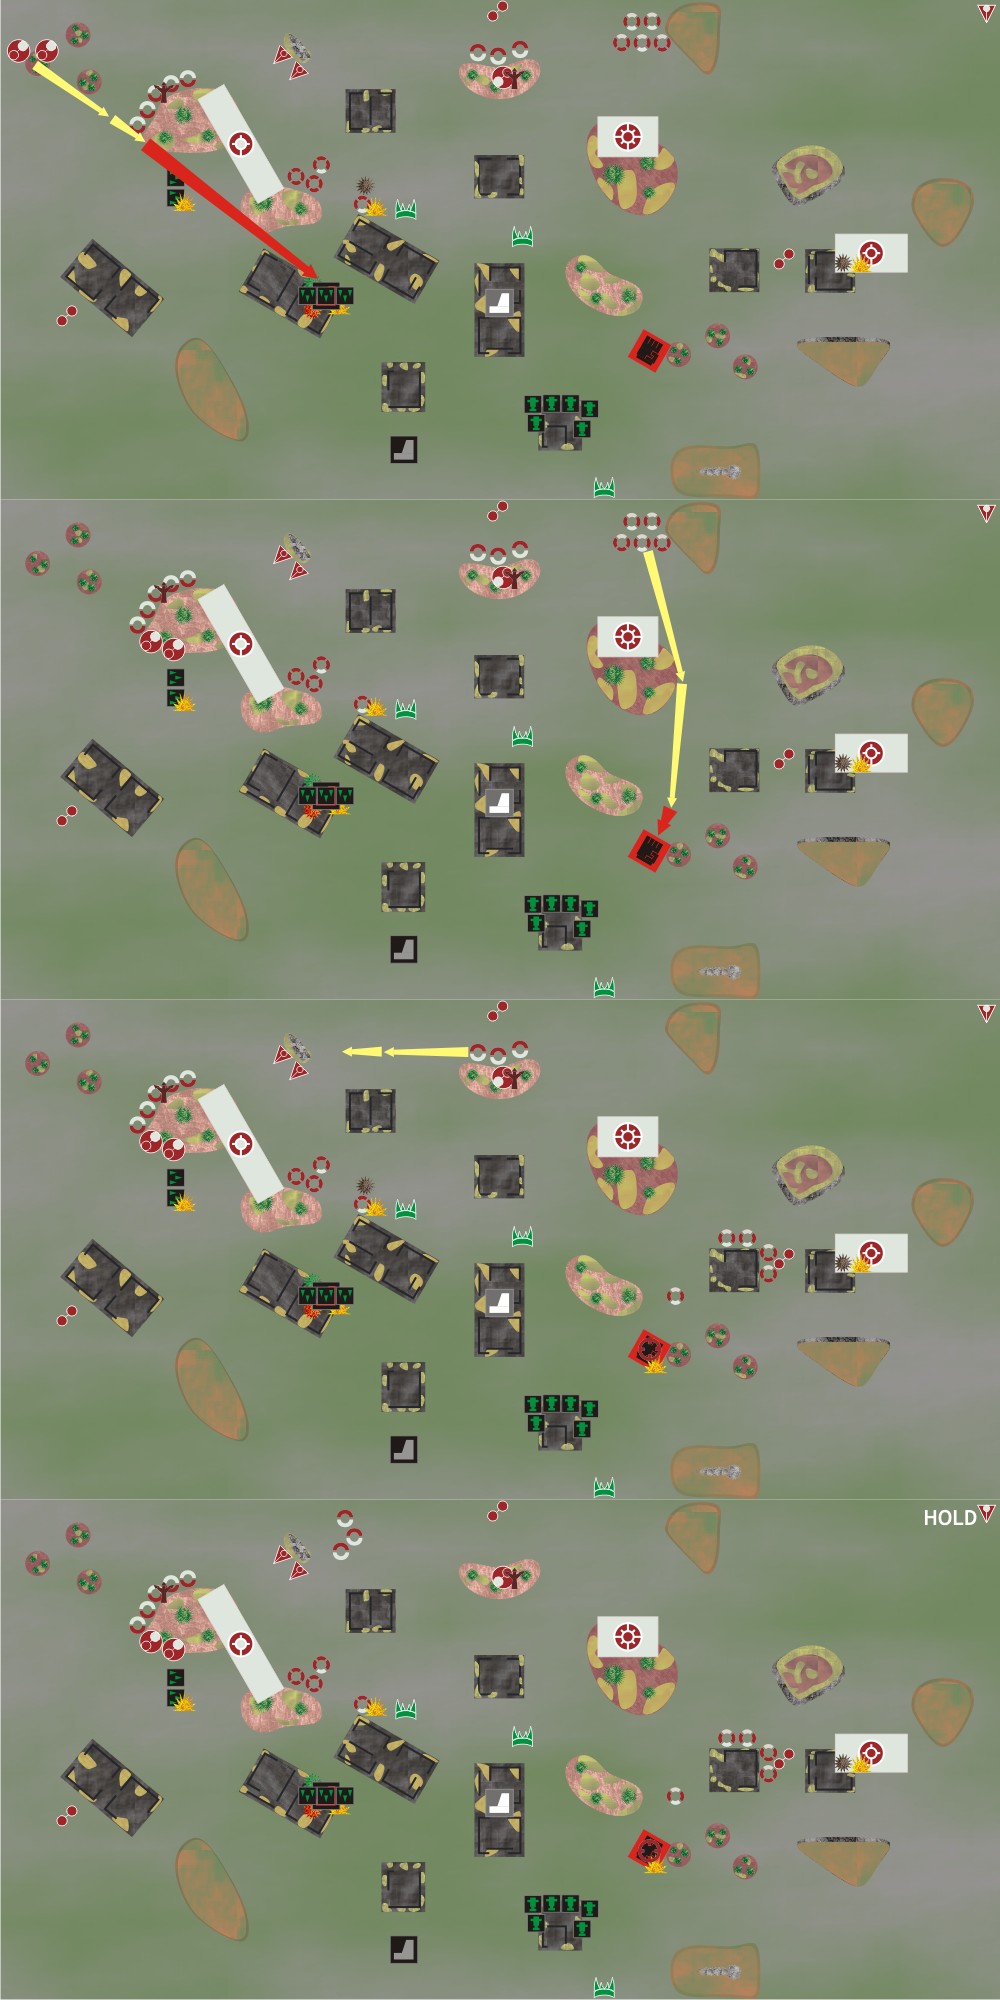
 T:
T: Stormsurge double and shoot Red Gargant through a tiny gap, taking down 1 shield.
T: Recon 2 double to the Great Gargant, placing him under the ZOc of one Tetra while the rest hides behind the ruins.
T: Skyray double to place both Fighta formations under its AA umbrella.
T: AX-10 fails to activate.
- Everyone rallies except the Great Gargant and broken Stormsurge.
- Fightas get one BM each when returning. Barracudas return unscathed.
- Red Gargant manages to prevent extra fires but gets damage from it.
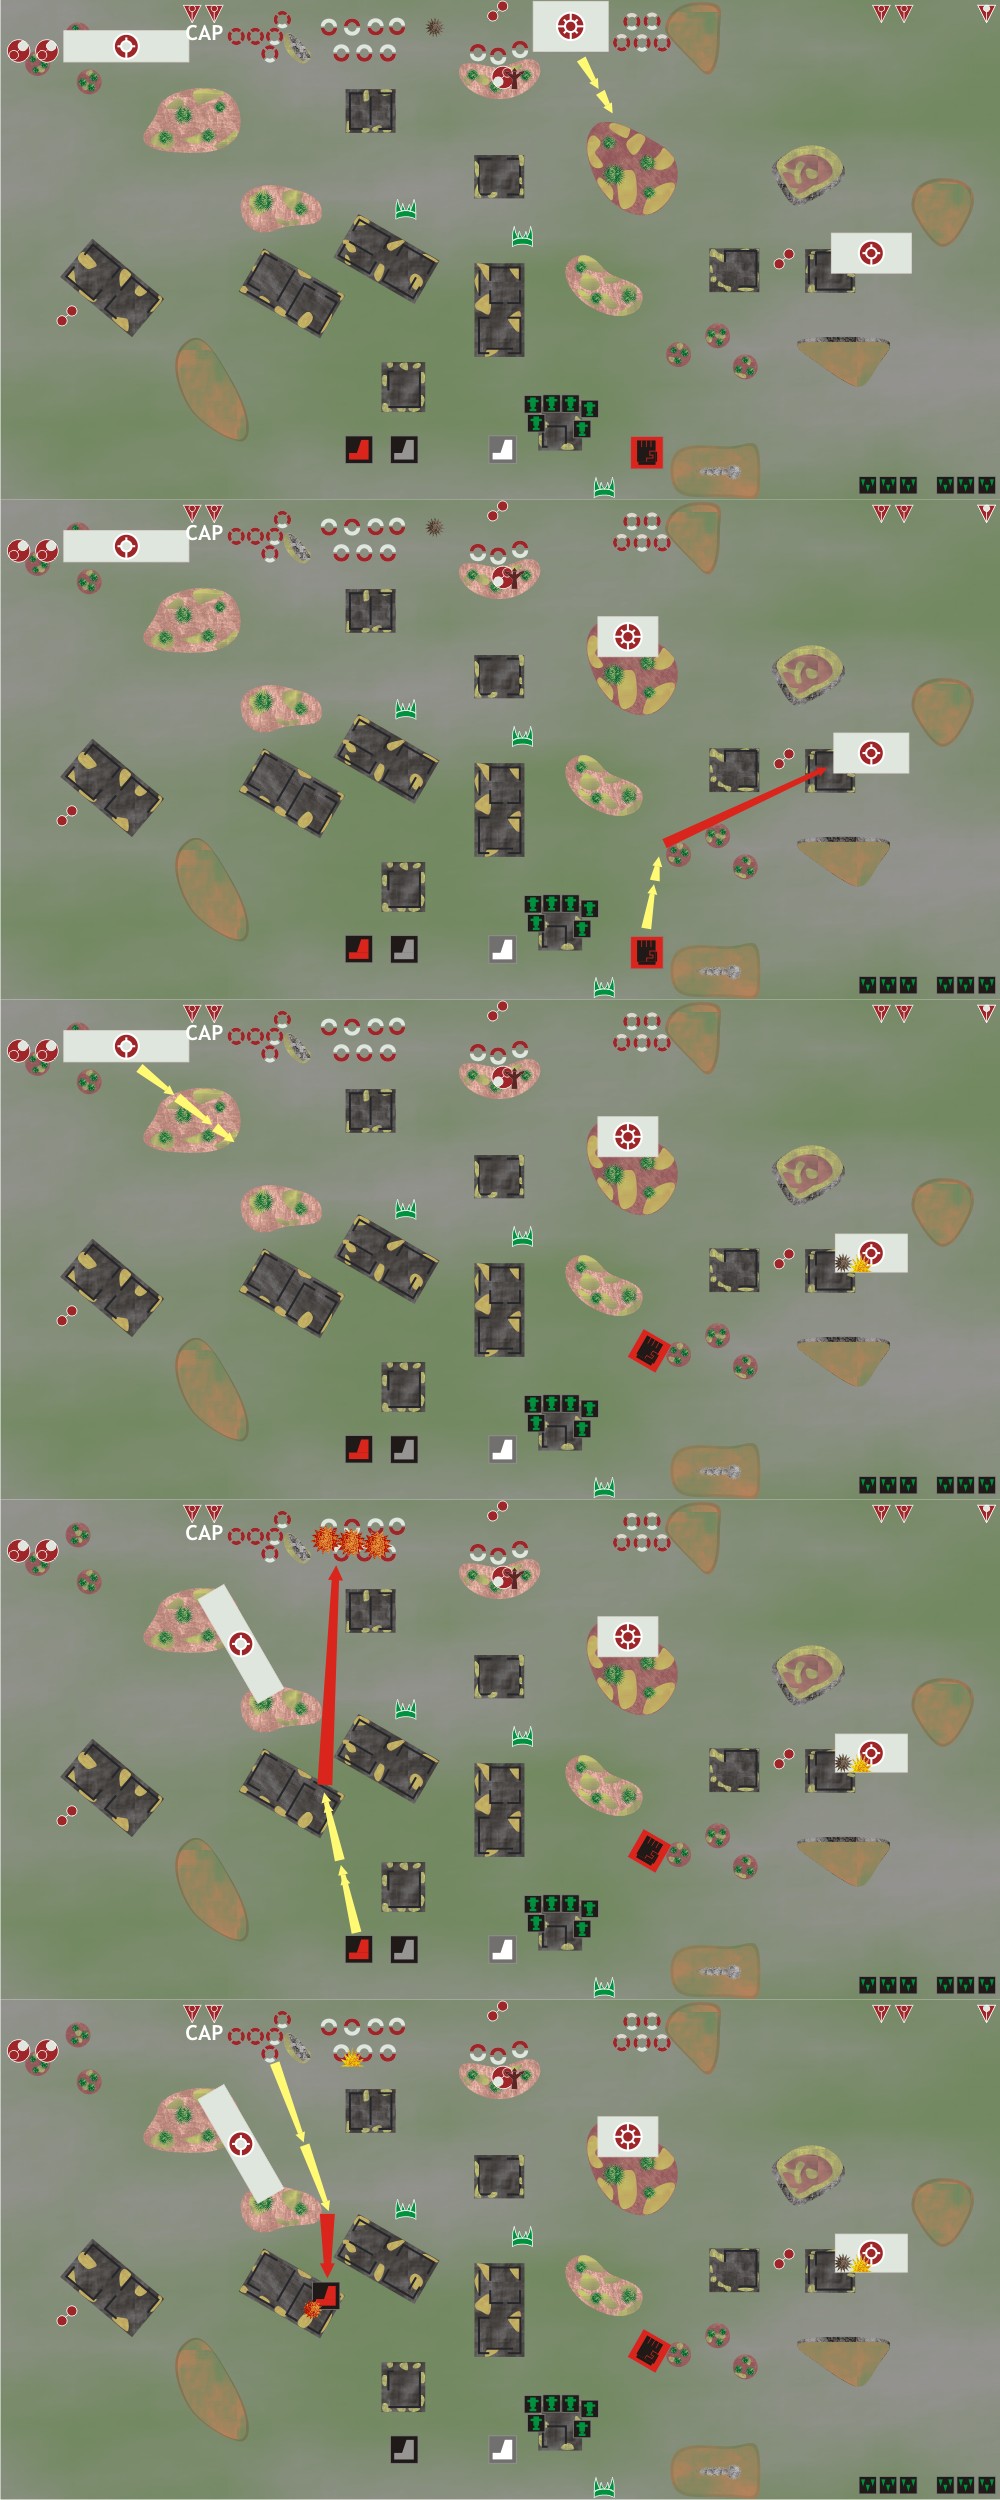
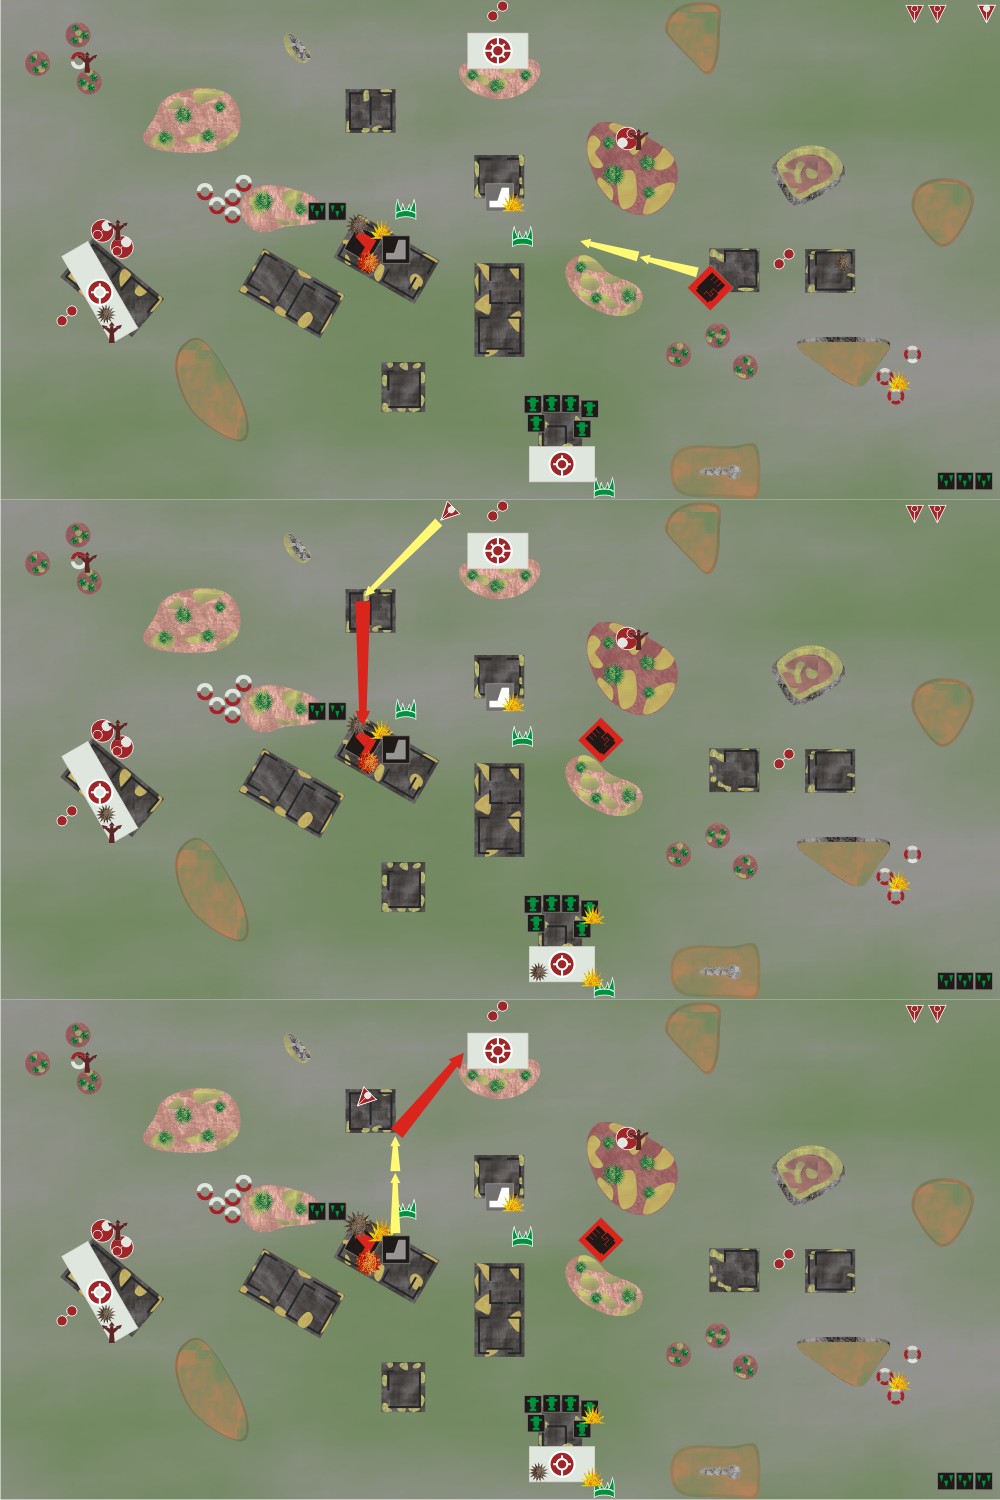
Turn 2. Orks get the initiative and prepare the onslaught.O: Red Gargant assaults the Recon 1 and choses to intermingle with crisis 1 with a -2, but miscalculating and not getting enough people under 15cm to deny the +1 for size, which ends up being lucky for him when the round ends in a draw and on the second round it wins destroying all of Recon 1 and one crisis unit. The crisis flee to the ruins with the Tau objetive and the Gargant consolidates back to the ruins, claiming the Ork objective.
T: Skyray advances towards the left, shoots and marks Red Gargant, hiding partially from him with a forest.
T: Tau retain with the Hammerheads but fail even with the Shas'o repetition, choosing to remove BMs.
O: Formation of 3 Fightas ground attak Recon 2 from above the Great Gargant's AA umbrella, killing two, breaking the formation which heads to behind a hill on the right flank.
T: Barracudas fail to activate.
 O:
O: Great Gargant fails and advances to the ruins.
T: AX-10 fails to activate.
O: Formation of 2 Fightas fail to activate.
T: Stormsurge advance near the Skyrays, in the forest, and shoot the Red Gargant, taking down 1 shield.
O: Killa Kans get into Overwatch.
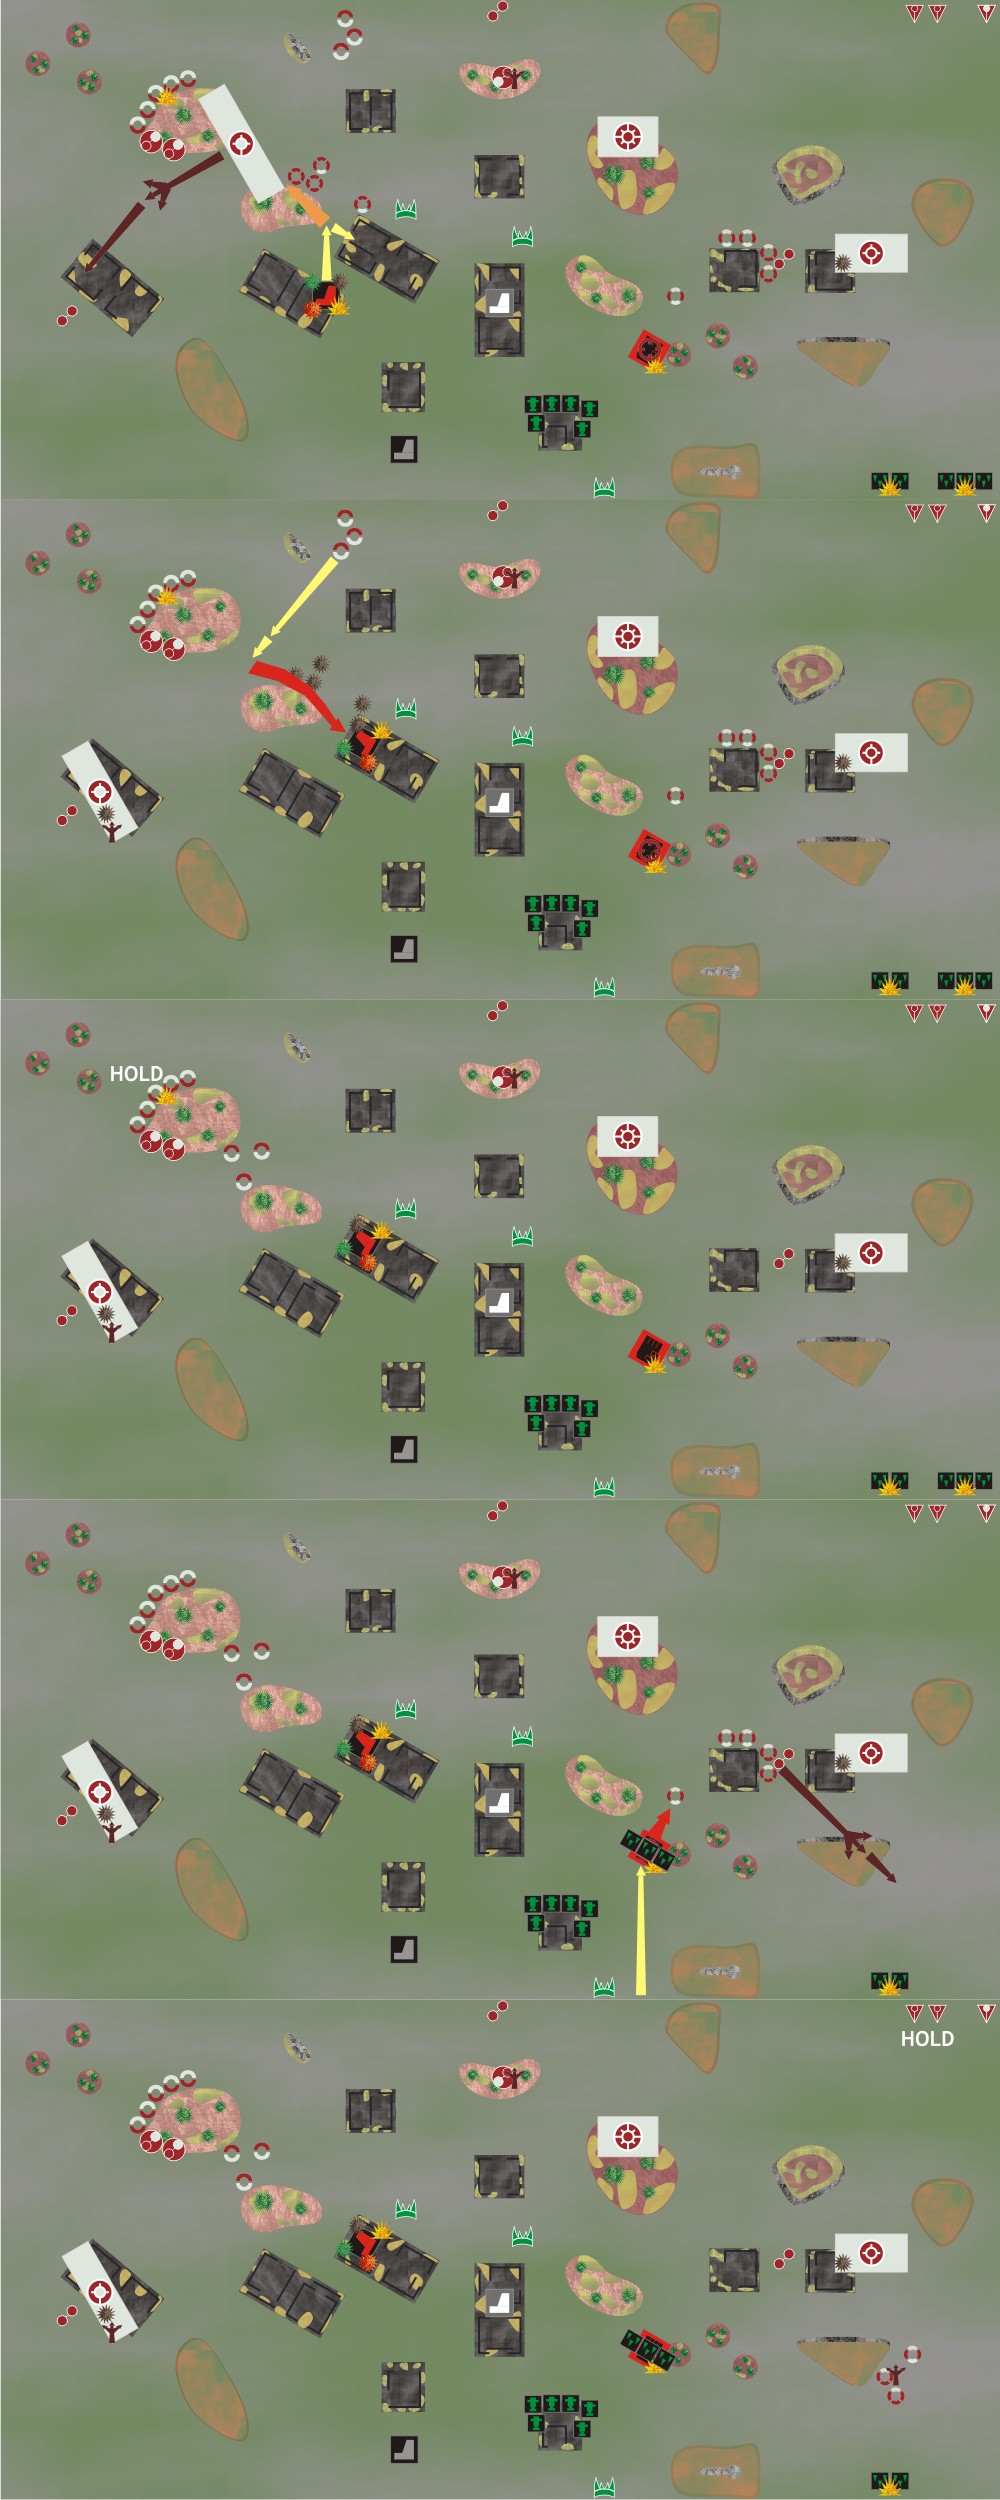
 T:
T: crisis 2 doubles towards its Blitz, shooting from the forest towards Red Gargant for no damage.
O: Grey Gargant marches to join his red fellow.
T: crisis 3 marches towards Ork deployment area avoiding the Great Gargant, hiding behind a hill while looking at the Blitz.
O: White Gargant doubles forward, shooting crisis 2 for no damage, and capturing and objective.

- Tau cry in despair when all rally except the most important, crisis 1 and Stormsurge (again).
- All air formation returns safely without incidents.
- Red Gargant gets and extra fire and damage and begins to prepare the barbecue.
Turn 3. Again in a decisive moment, the Orks get the initiative.O: Red Gargant inaugurates the turn again, but fails and chooses to shoot at the Stormsurges. A lucky dice throw gets the Gargant 10BPs which he uses to cover both the Stormsurges and nearby Skyrays, destroying two Skyrays and no damage on the Stormsurges, breaking the Skyrays and giving 3BMS to the Stormsurges putting them on the brim of breaking. Skyrays retreat to the upper-left corner, behind some trees.
T: Hammerheads advance towards the forest in front of the Red GArgant, and pop up to shoot it for the last shield. A big hurray comes from the Tau side!
O: crisis 2 advances, shoots at the White Gargant, and retreats using their jump packs to avoid its assault range and him claiming the objective.
T: Formation of 2 Fightas ground attack the Stormsurges, breaking them with the last BM, which retreat to the left near crisis 1.
T: crisis 3 doubles towards the Blitz, and the Killa Kans activate the overwatch with no results, contesting the objective, and shoot the Killa Kans with no results either. Settle in the ruins with the Killa Kans, while glaring at each other.
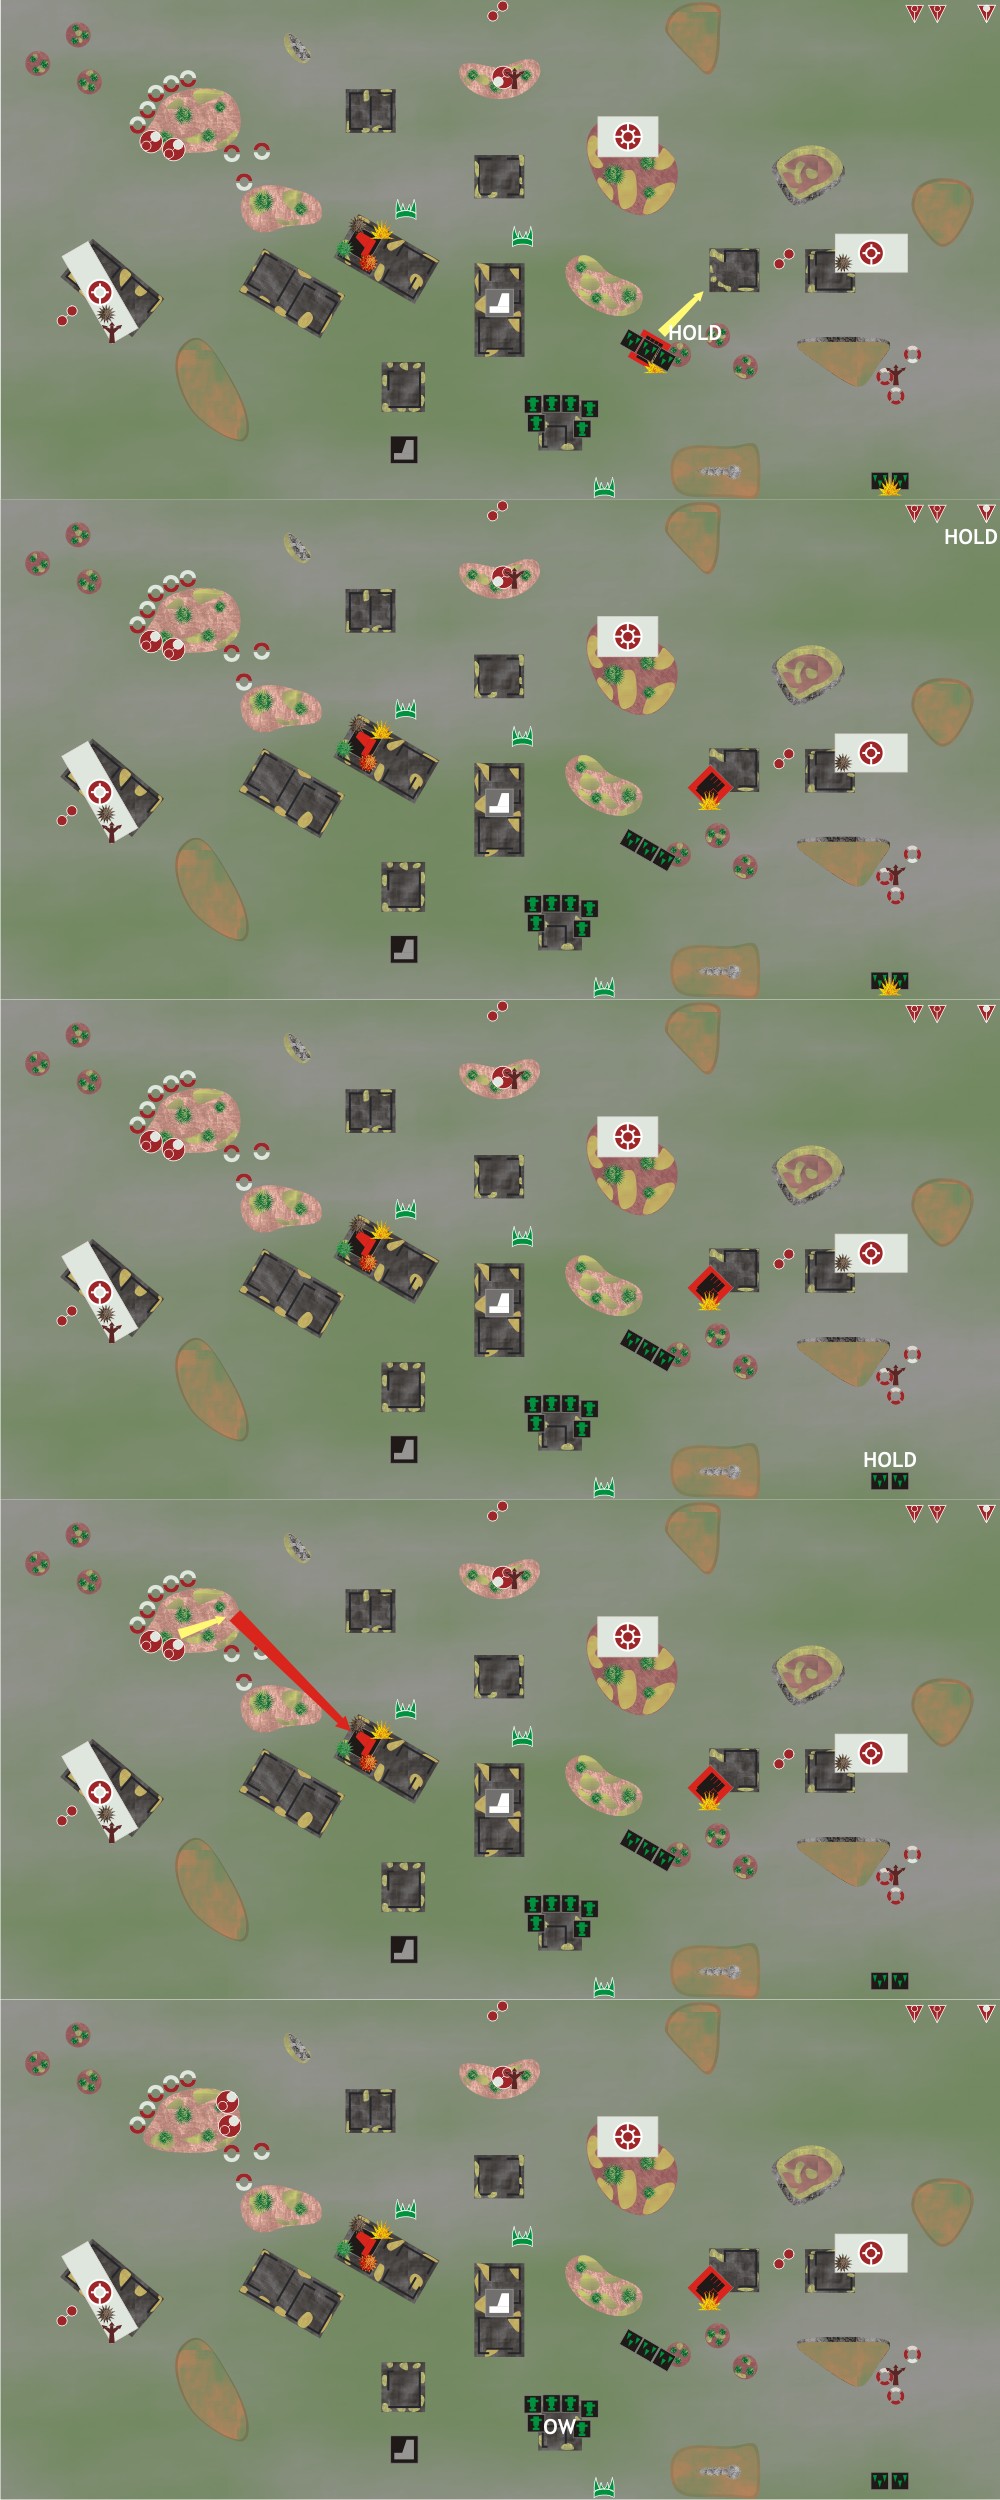
 O:
O: Seeing there is nothing else to do, the Great Gargant doubles towards the right Ork objetive to double secure a point.
T: AX-10, seeing the skies free and no shields at sight, ground attacks the Red Gargant and causes 2Dcs and another critical, putting it on the brink of being both destroyed and broken.
O: Great Gargant prepares the field and doubles to fire on crisis 2 while still apturing the objective, just in ase, but inflicts no damage.
 O:
O: Orks retain and ground attack the crisis 2 again, and again no one dies.
T: Barracudas, intending to retake Tau's honour, ground attack the Red Gargant, and while not making damage, give it its last bast marker, breaking it. The Gargant chooses to stay where it is, it is a warm place after all.
O: White Gargant, assaults with a Push'em up the surprised crisis 2 that thought were out of range. The crisis get wiped up completely and the Gargant places himself on the Blitz.
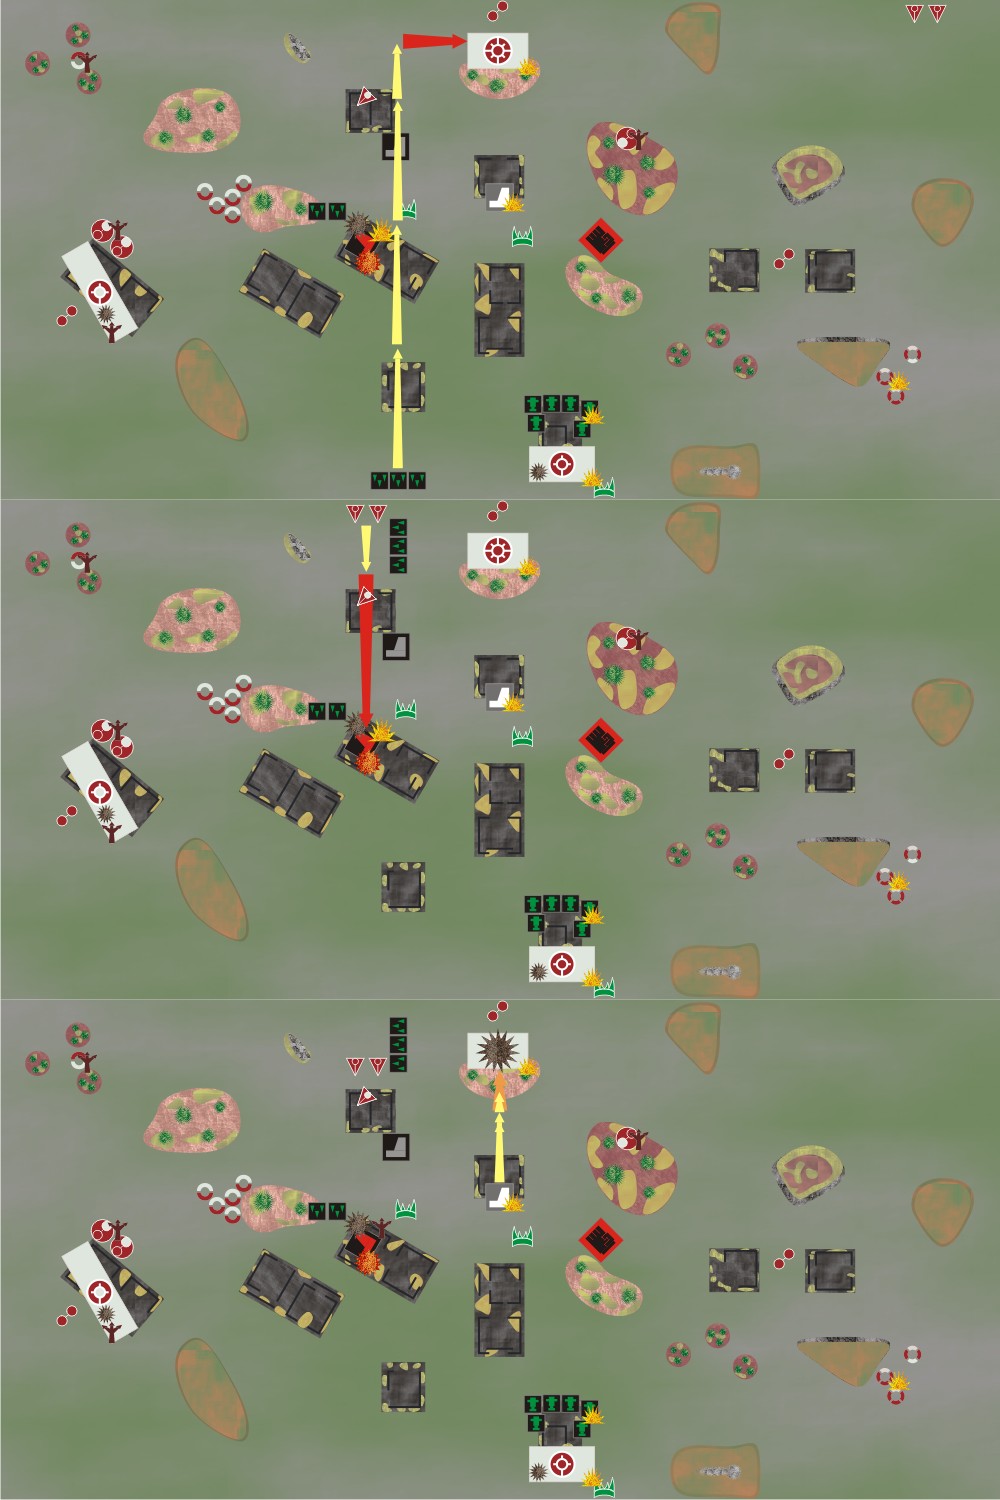
At this point, we decided that there was no way the Tau could win in this situation, at most make the game last till the fourth turn and lose more Tau and probably the Red Gargant, so we called it done.
Victory for the greenskins! The victorious Orks swarm the Red Gargant full of jealously as they had all the fun and torch it, with the fire becoming the center of party for the next days.
The conclusions will have to wait till tomorrow, unfortunately.