Login |  Register |  FAQ
   
Post new topic Reply to topic  [ 9 posts ] 

OGBM 3.4 vs Tau Vior'La 1.8a

 Post subject: OGBM 3.4 vs Tau Vior'La 1.8a
PostPosted: Sun Jan 29, 2017 12:25 am 
Brood Brother
Brood Brother
User avatar

Joined: Mon Aug 31, 2015 4:24 pm
Posts: 399
Location: Galicia
Finally got the time to make a battle report for the list. The maps are more or less done while having some issues here and there, but i'm quite satisfied with them this time. Also take into account that my keyboard is working badly, so there's going to be many letters missing that escaped my gaze while correcting.

Points: 3000
Scenario: Tournament Scenario
Forces: OGBM 3.4 and Tau Vior'LA 1.8.a


Incompertus, 3000 POINTS
Gargant Bigmob (3.4 - Developmental)
==================================================

GREAT GARGANT [750]
Mekboy Big Boss, (Kustom) Flakka Dakka, 3 Gatling Kannon

GARGANT [575]
2 Gatling Kannon, Soopa Zzap Gun

GARGANT [625]
(Kustom) Flakka Dakka, Gatling Kannon, 2 Mega Lobba

GARGANT [600]
2 Gatling Kannon, Grot Guided Missile

FIGHTA-BOMMERS [150]
3 Fighta-Bommers

FIGHTA-BOMMERS [150]
3 Fighta-Bommers

LOOTA WARBAND (NORMAL) [150]
6 Boyz, 2 Grotz, Killa Kan


Incompertus, 3000 POINTS
Tau Vior'la (1.8a Developmental)
==================================================

CRISIS BATTLESUIT CADRE [325]
Shas'el Commander, 5 XV8 Crisis Battlesuit unit, 2 Gun Drones

CRISIS BATTLESUIT CADRE [400]
5 XV8 Crisis Battlesuit unit, 2 Gun Drones, Shas'o Commander

CRISIS BATTLESUIT CADRE [325]
Shas'el Commander, 5 XV8 Crisis Battlesuit unit, 2 Gun Drones

ARMOURED SUPPORT GROUP [425]
2 extra Hammerhead Gunships (Rail- or Fusionhead), Skyray, 4 Hammerhead Gunship (Railhead)

RECON SKIMMER GROUP [150]
3 Pathfinder Tetra, 2 Piranha

RECON SKIMMER GROUP [150]
3 Pathfinder Tetra, 2 Piranha

SKYSWEEP SUPPORT GROUP [250]
3 Skyray Air Defense Gunships

XV128 STORMSURGE FORMATION [250]
2 XV128 Stormsurges

XV128 STORMSURGE FORMATION [250]
2 XV128 Stormsurges

BARRACUDA SQUADRON [150]
2 Barracuda Fighters

BARRACUDA SQUADRON [150]
2 Barracuda Fighters

TIGER SHARK AX-1-0 [175]
1 Tiger Shark AX-1-0


First of all. There was no damage from dangerous terrain, so i'll avoid mention it each time for simplicity.


Deployment:

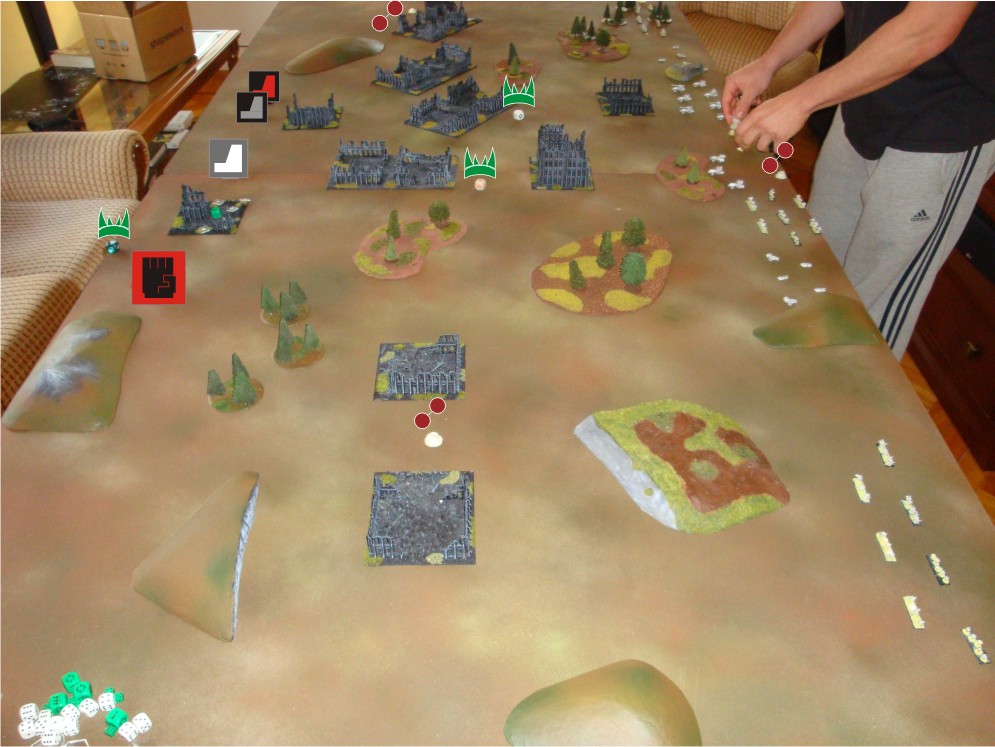
- I put my objectives in the center, in front of his Blitz. He puts his on the sides.
- The Orks are deployed towards the center, close to each other in pairs for the AA umbrella.
- Tau deploy across the battlefield, concentrating on the center and my left flank.
- Only a Killa Kan formation is placed as a garrison, on the ruins near my blitz.
- Orks get very lucky with maximum shields on everyone except the White Gargant on the middle getting the minimum amount. So the Great Gargant has a big 12 shields, 2 more Gargants with 6 and the last with 4.
Image


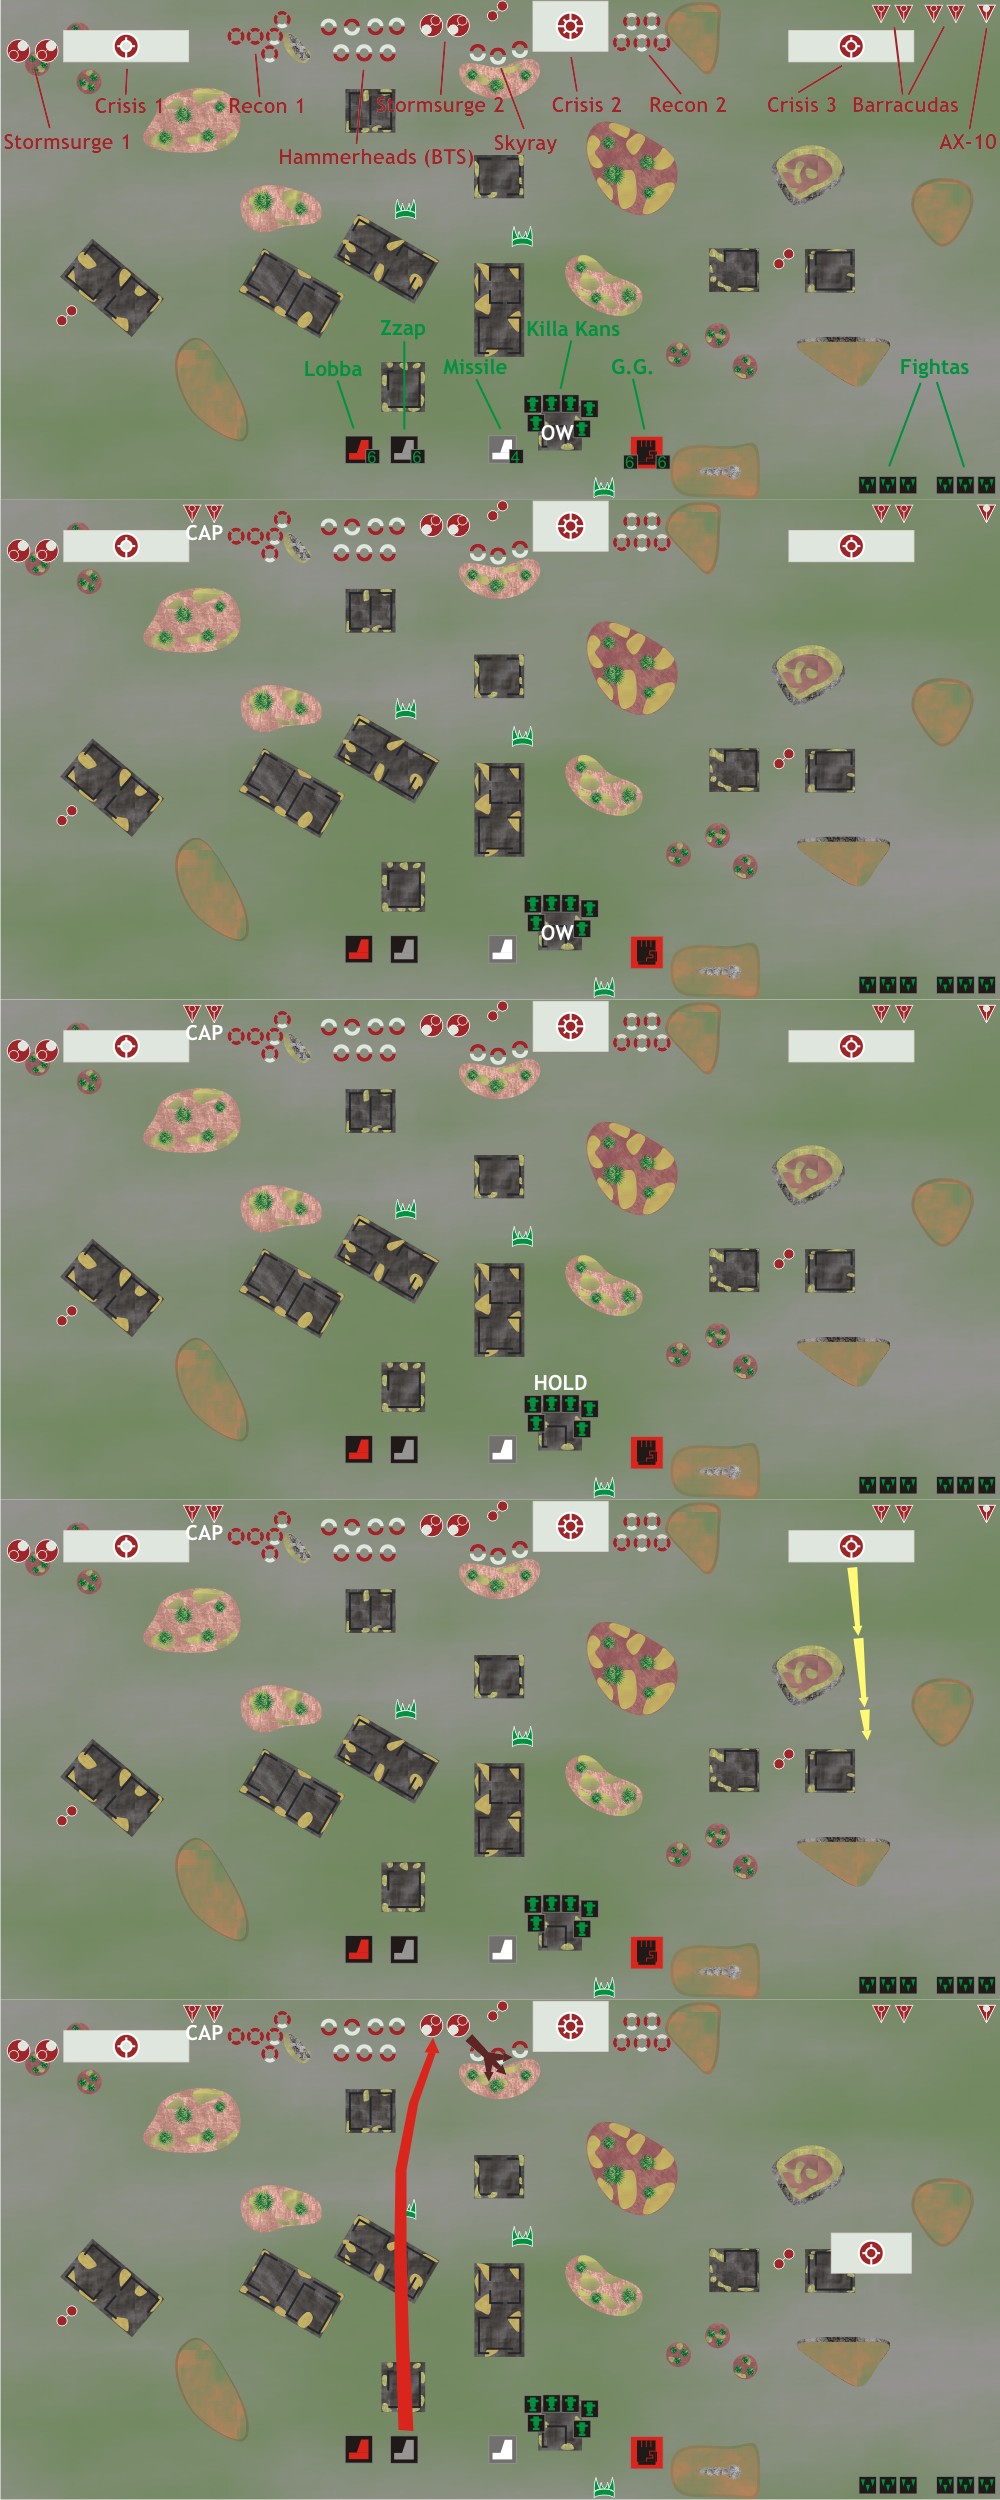
Turn 1. Tau get the initiative:

T: Barracudas go on cAP.
O: Killa Kans fails and holds, removing the BM.
T: crisis 3 marchs to the ruins and near the Tau objective.
O: Grey Gargant sustain fire with one missle to the Stormsurges in the center, destroying one
and breaking the formation, which heads to the forest.
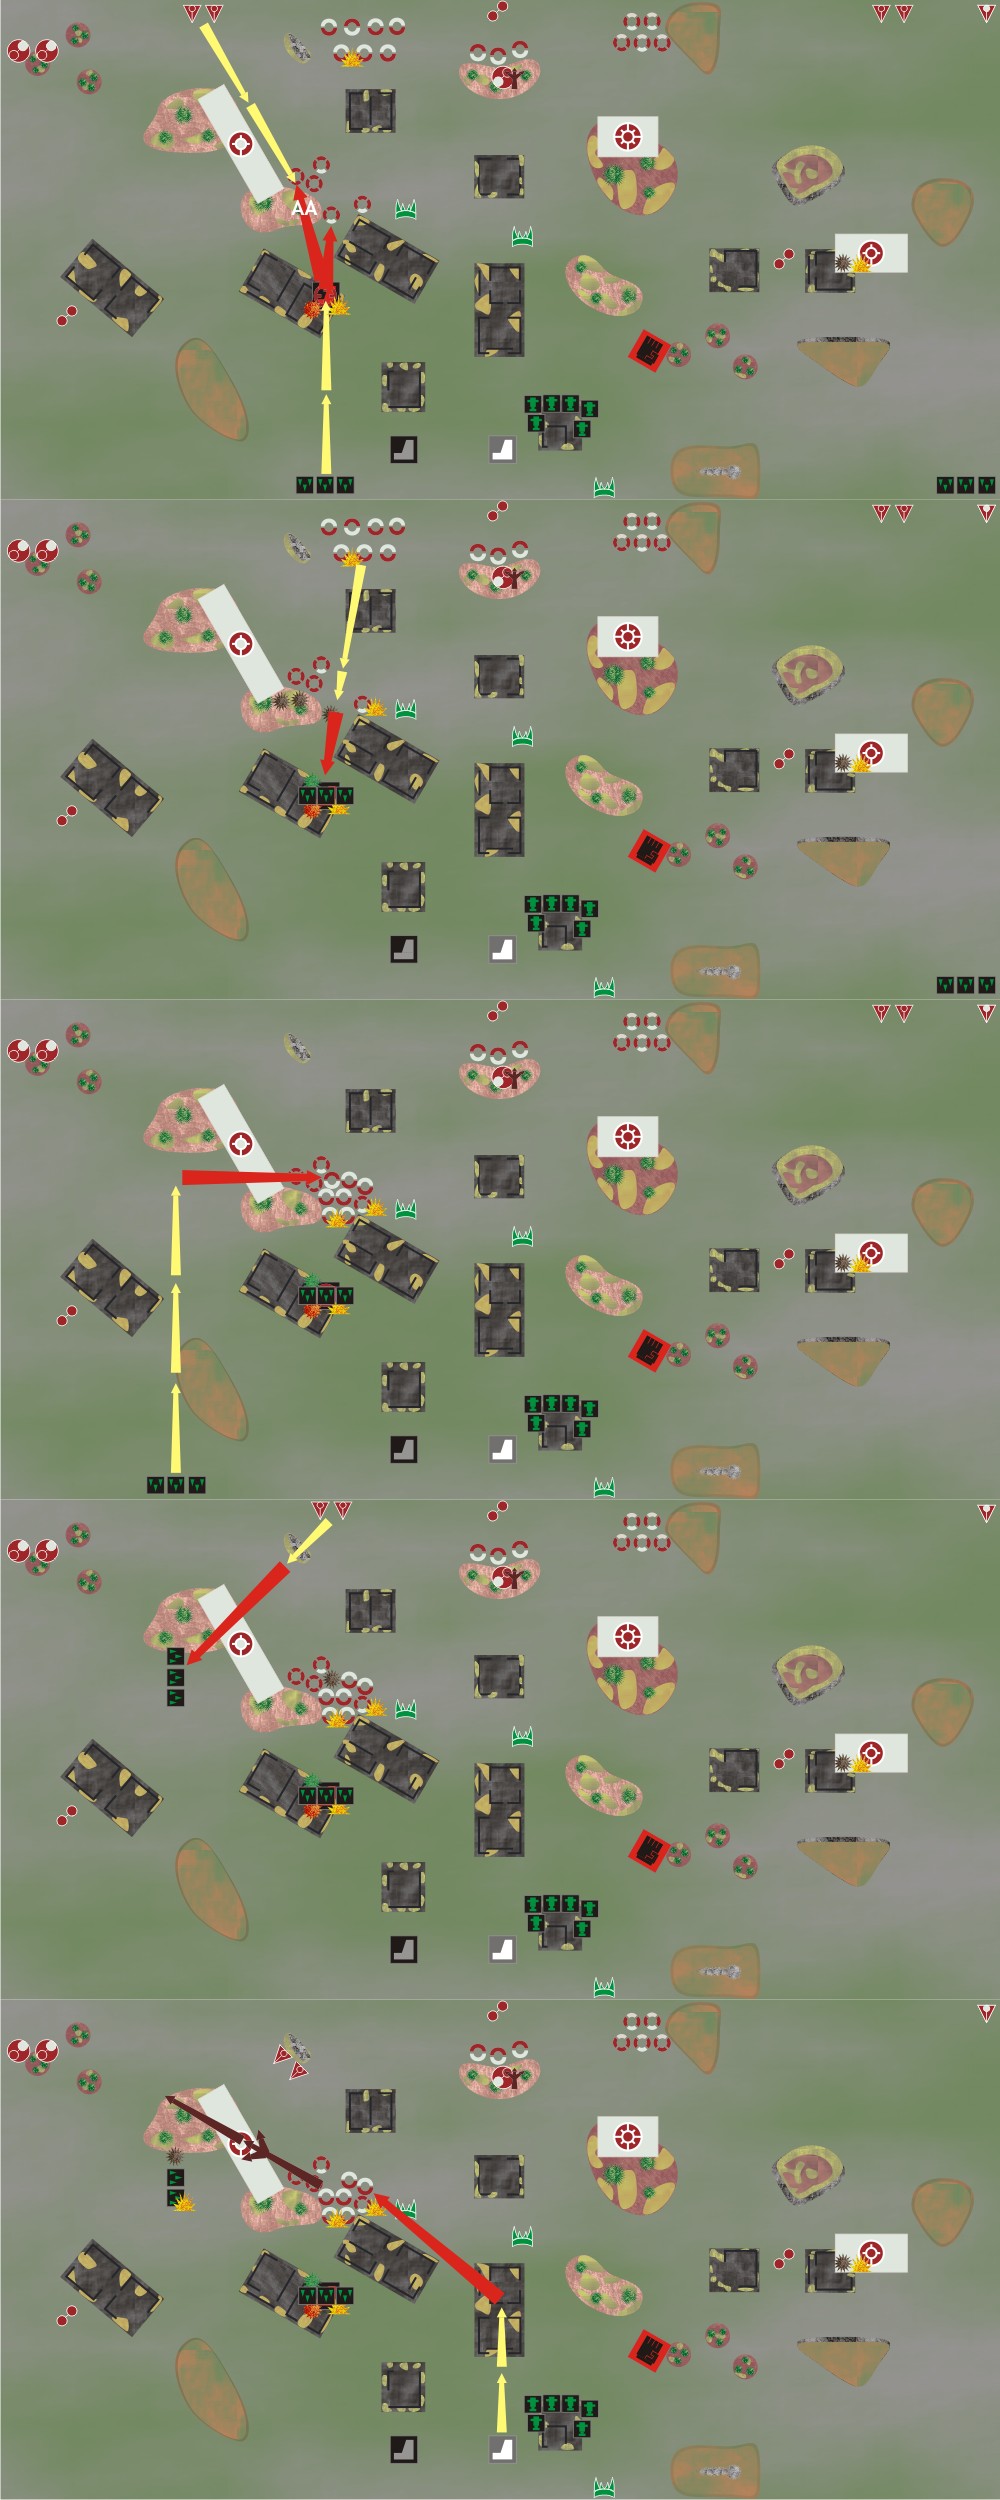
Image


T: crisis 2 doubles towards the forest in the center, out of the sight of any Ork.
O: Great Gargant doubles and shoots crisis 3, killing one stand.
T: crisis 1 marches towards he forest in the middle-left.
O: Red Gargant doubles with a Push'em harder towards the ruins in the middle left and shoots the Hammerheads, not causing damage but 3 BMs from a lucky 12 BPS on the Lobba.
T: Recon 1 doubles towards the reckless Red Gargant, shooting and marking him with one unit and keeping the rest hidden.
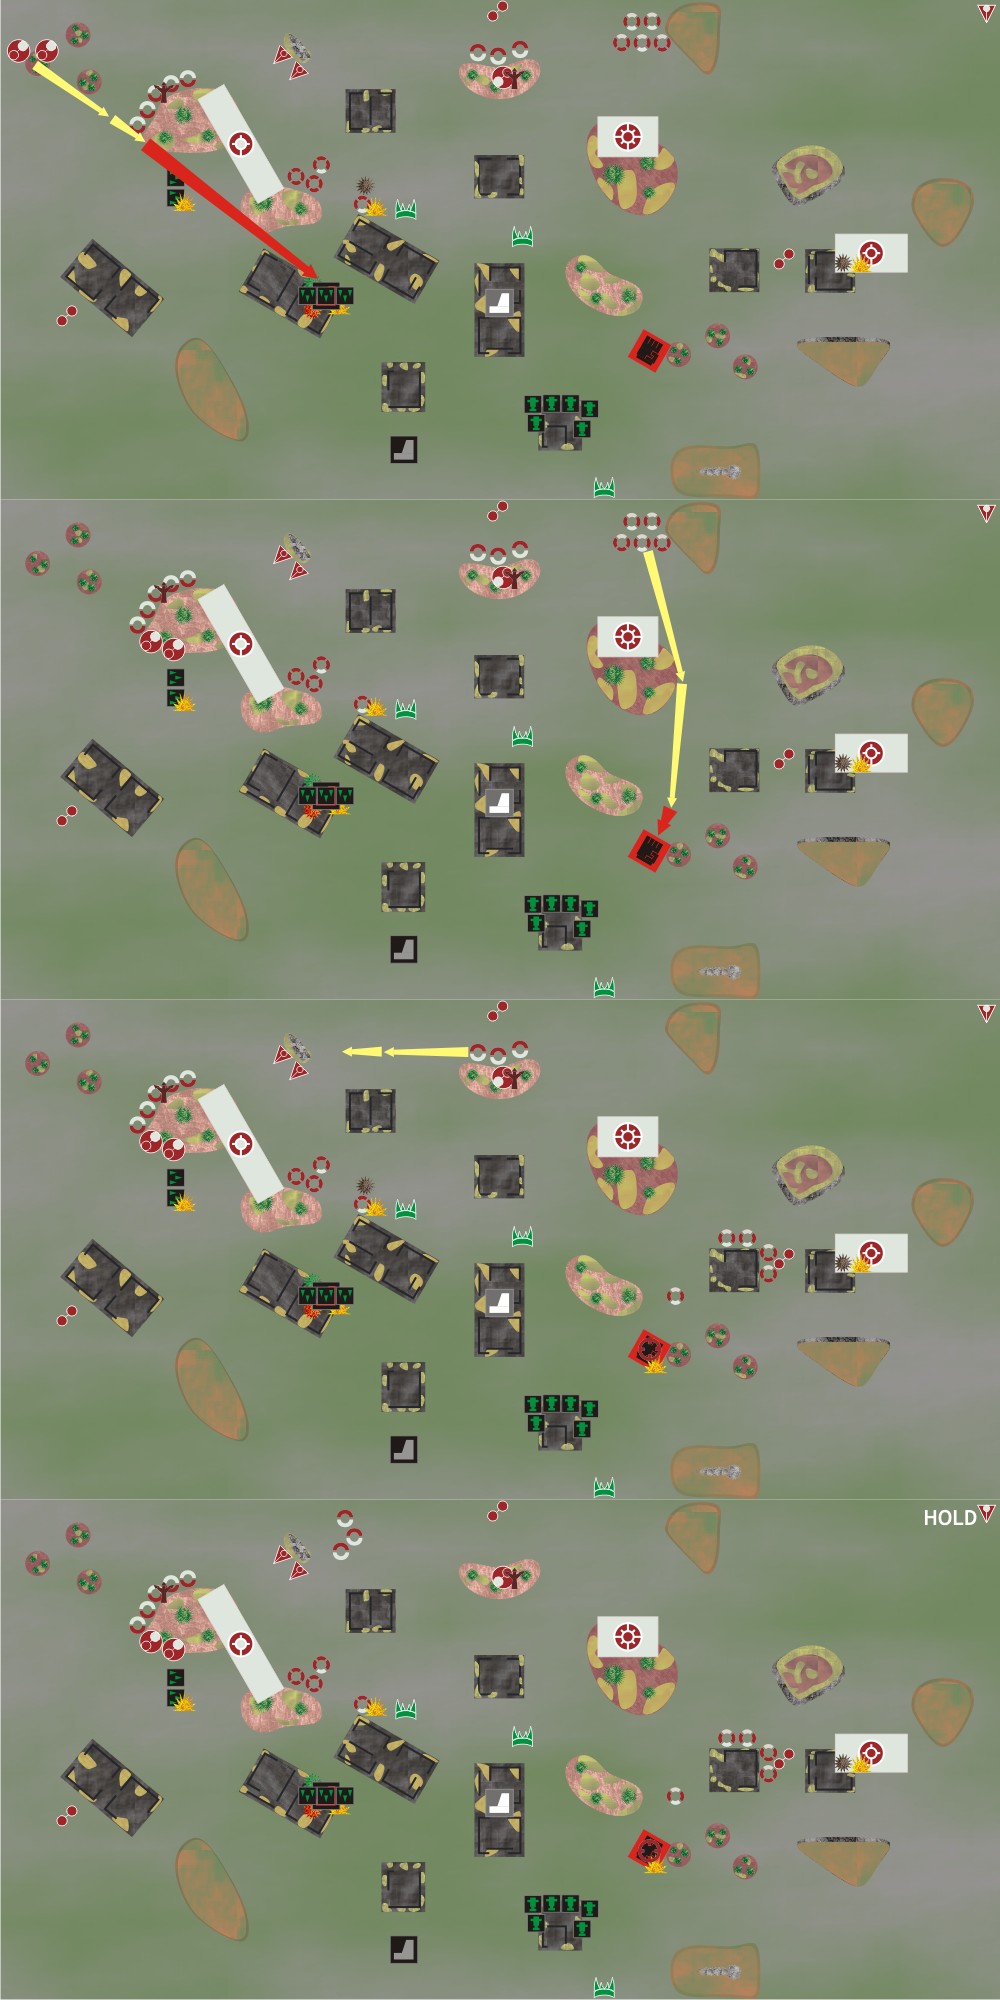
Image


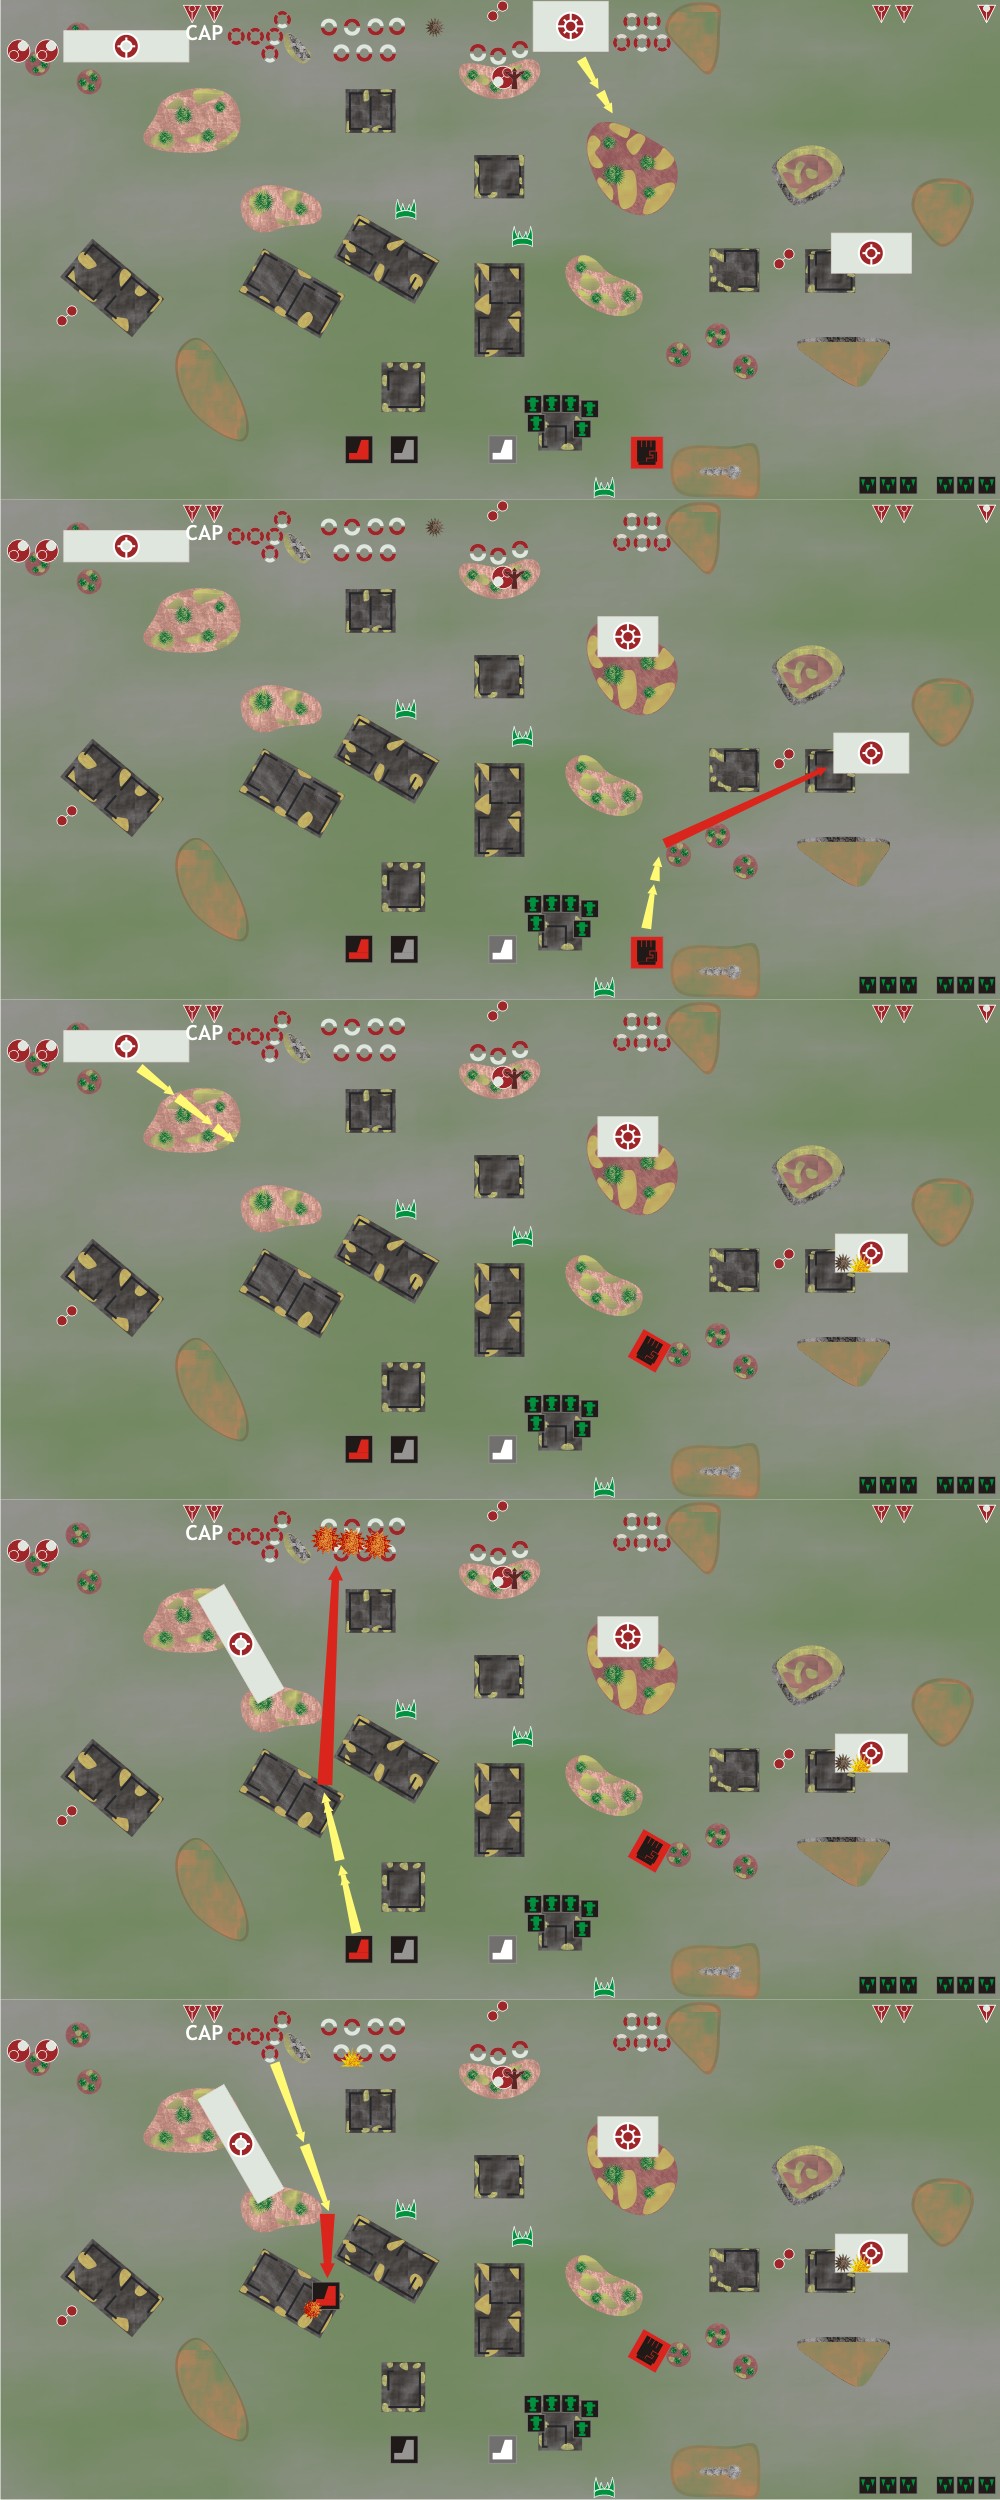
O: Fightas ground attack Recon 1 and Barracudas activate cAP in answer. Fightas shoot from above the Gargant to use its AA umbrella and the Barracudas choose to dive in, receiving AA from the Gargant. They get very unlucky when not only they receive the maximum 4 shoots, but 2 hit at 6+ and both Barracudas fall even after they chose to jinx. Free from the Barracudas, Fightas destroy the Tetra, unmarking the Gargant.
T: Hammerheads double towards the Red Gargant, shooting and marking it again and damaging 1 shield.
O: Orks choose again to ground attack the unit marking the Gargant, destroying it.
T: Barracudas intercept this latter Fightas at 30cm, taking one down.
O: White Gargant doubles to the front, rotating to shoot the Hammerheads, destroying one and breaking the formation, which heads to the big forest on the left flank.
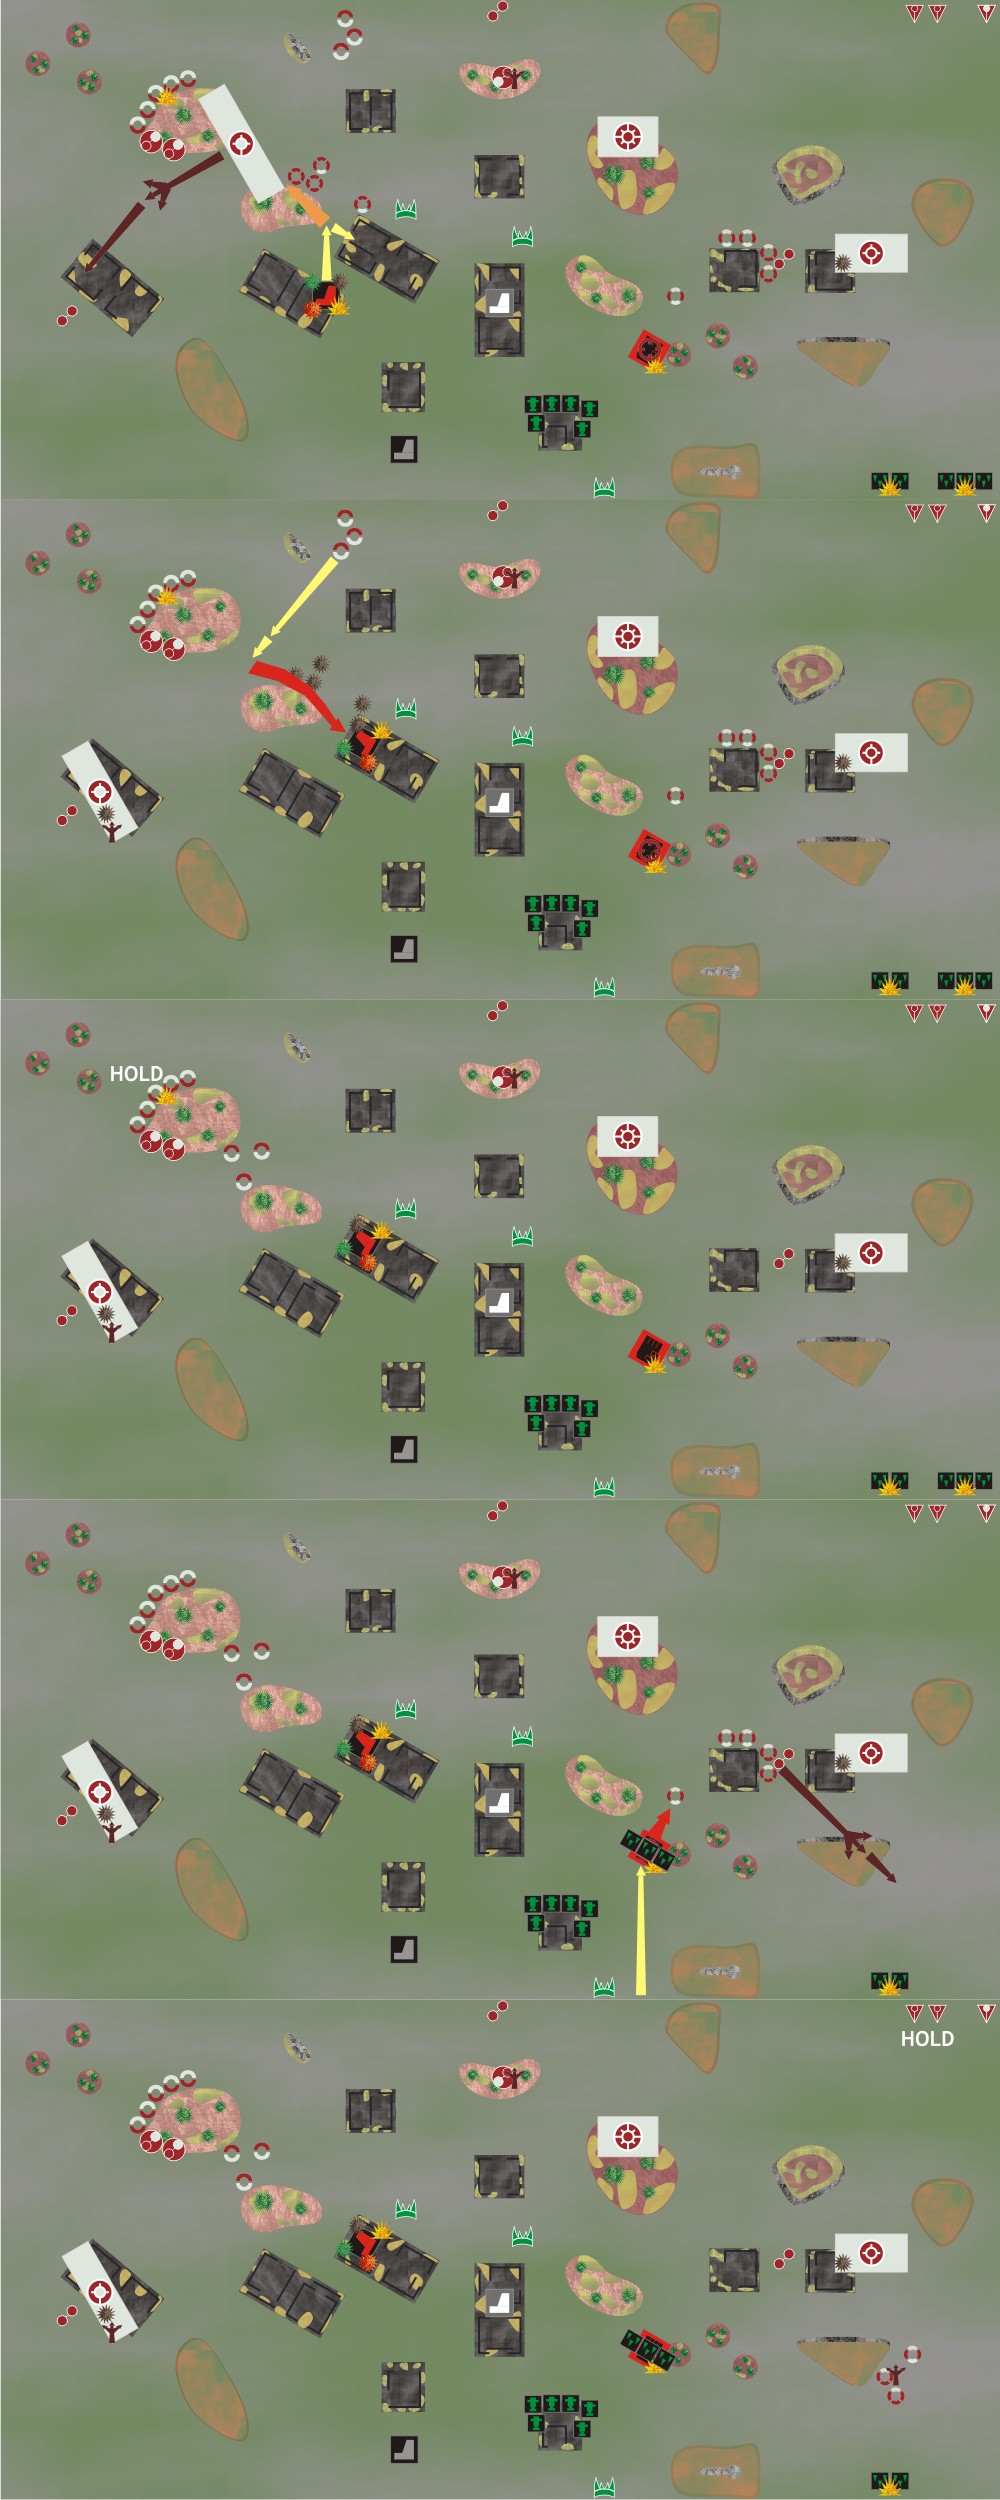
Image


T: Stormsurge double and shoot Red Gargant through a tiny gap, taking down 1 shield.
T: Recon 2 double to the Great Gargant, placing him under the ZOc of one Tetra while the rest hides behind the ruins.
T: Skyray double to place both Fighta formations under its AA umbrella.
T: AX-10 fails to activate.
Image

- Everyone rallies except the Great Gargant and broken Stormsurge.
- Fightas get one BM each when returning. Barracudas return unscathed.
- Red Gargant manages to prevent extra fires but gets damage from it.


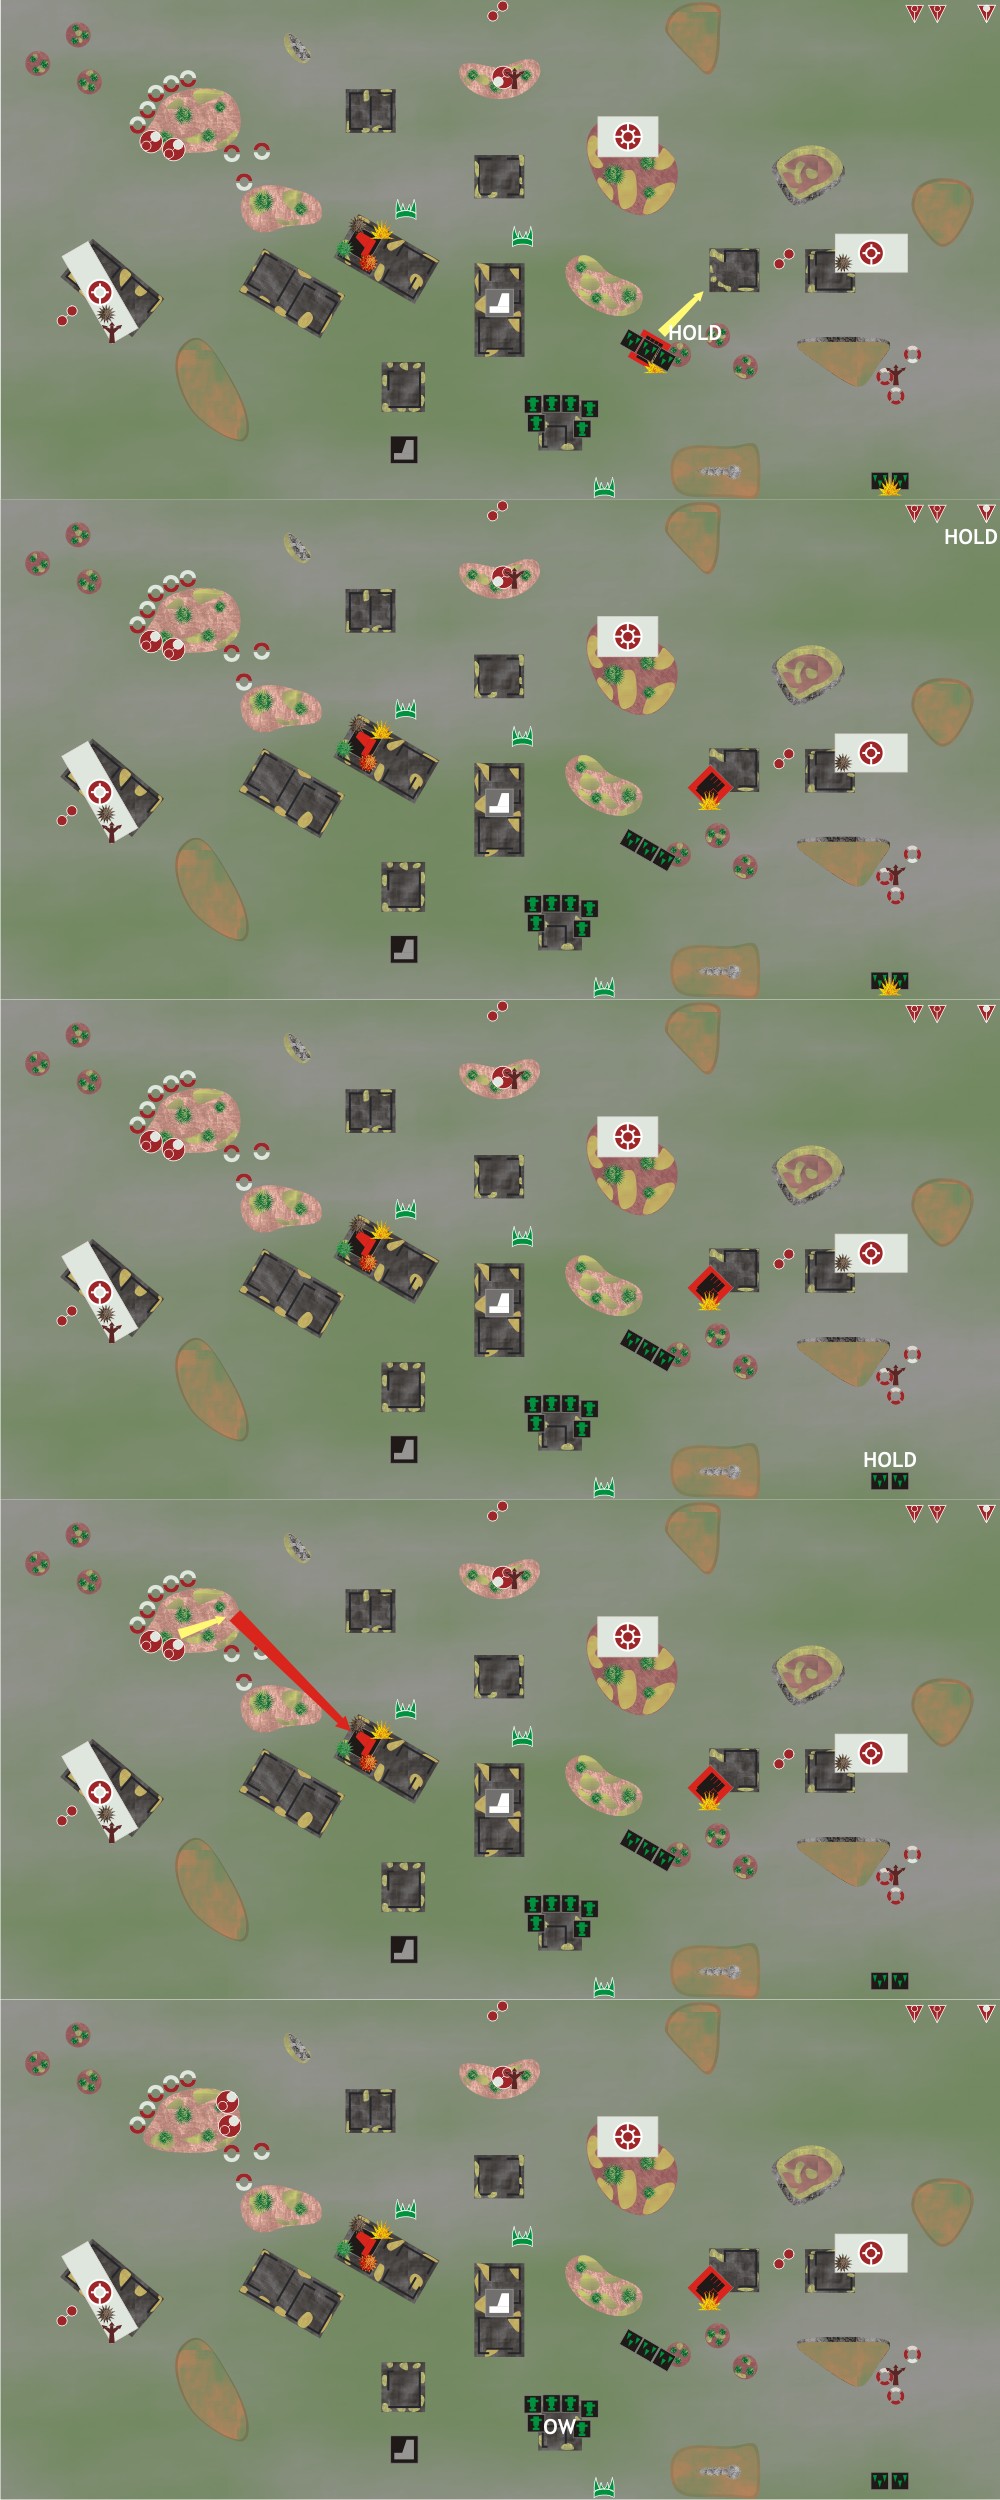
Turn 2. Orks get the initiative and prepare the onslaught.

O: Red Gargant assaults the Recon 1 and choses to intermingle with crisis 1 with a -2, but miscalculating and not getting enough people under 15cm to deny the +1 for size, which ends up being lucky for him when the round ends in a draw and on the second round it wins destroying all of Recon 1 and one crisis unit. The crisis flee to the ruins with the Tau objetive and the Gargant consolidates back to the ruins, claiming the Ork objective.
T: Skyray advances towards the left, shoots and marks Red Gargant, hiding partially from him with a forest.
T: Tau retain with the Hammerheads but fail even with the Shas'o repetition, choosing to remove BMs.
O: Formation of 3 Fightas ground attak Recon 2 from above the Great Gargant's AA umbrella, killing two, breaking the formation which heads to behind a hill on the right flank.
T: Barracudas fail to activate.
Image


O: Great Gargant fails and advances to the ruins.
T: AX-10 fails to activate.
O: Formation of 2 Fightas fail to activate.
T: Stormsurge advance near the Skyrays, in the forest, and shoot the Red Gargant, taking down 1 shield.
O: Killa Kans get into Overwatch.
Image


T: crisis 2 doubles towards its Blitz, shooting from the forest towards Red Gargant for no damage.
O: Grey Gargant marches to join his red fellow.
T: crisis 3 marches towards Ork deployment area avoiding the Great Gargant, hiding behind a hill while looking at the Blitz.
O: White Gargant doubles forward, shooting crisis 2 for no damage, and capturing and objective.
Image

- Tau cry in despair when all rally except the most important, crisis 1 and Stormsurge (again).
- All air formation returns safely without incidents.
- Red Gargant gets and extra fire and damage and begins to prepare the barbecue.


Turn 3. Again in a decisive moment, the Orks get the initiative.

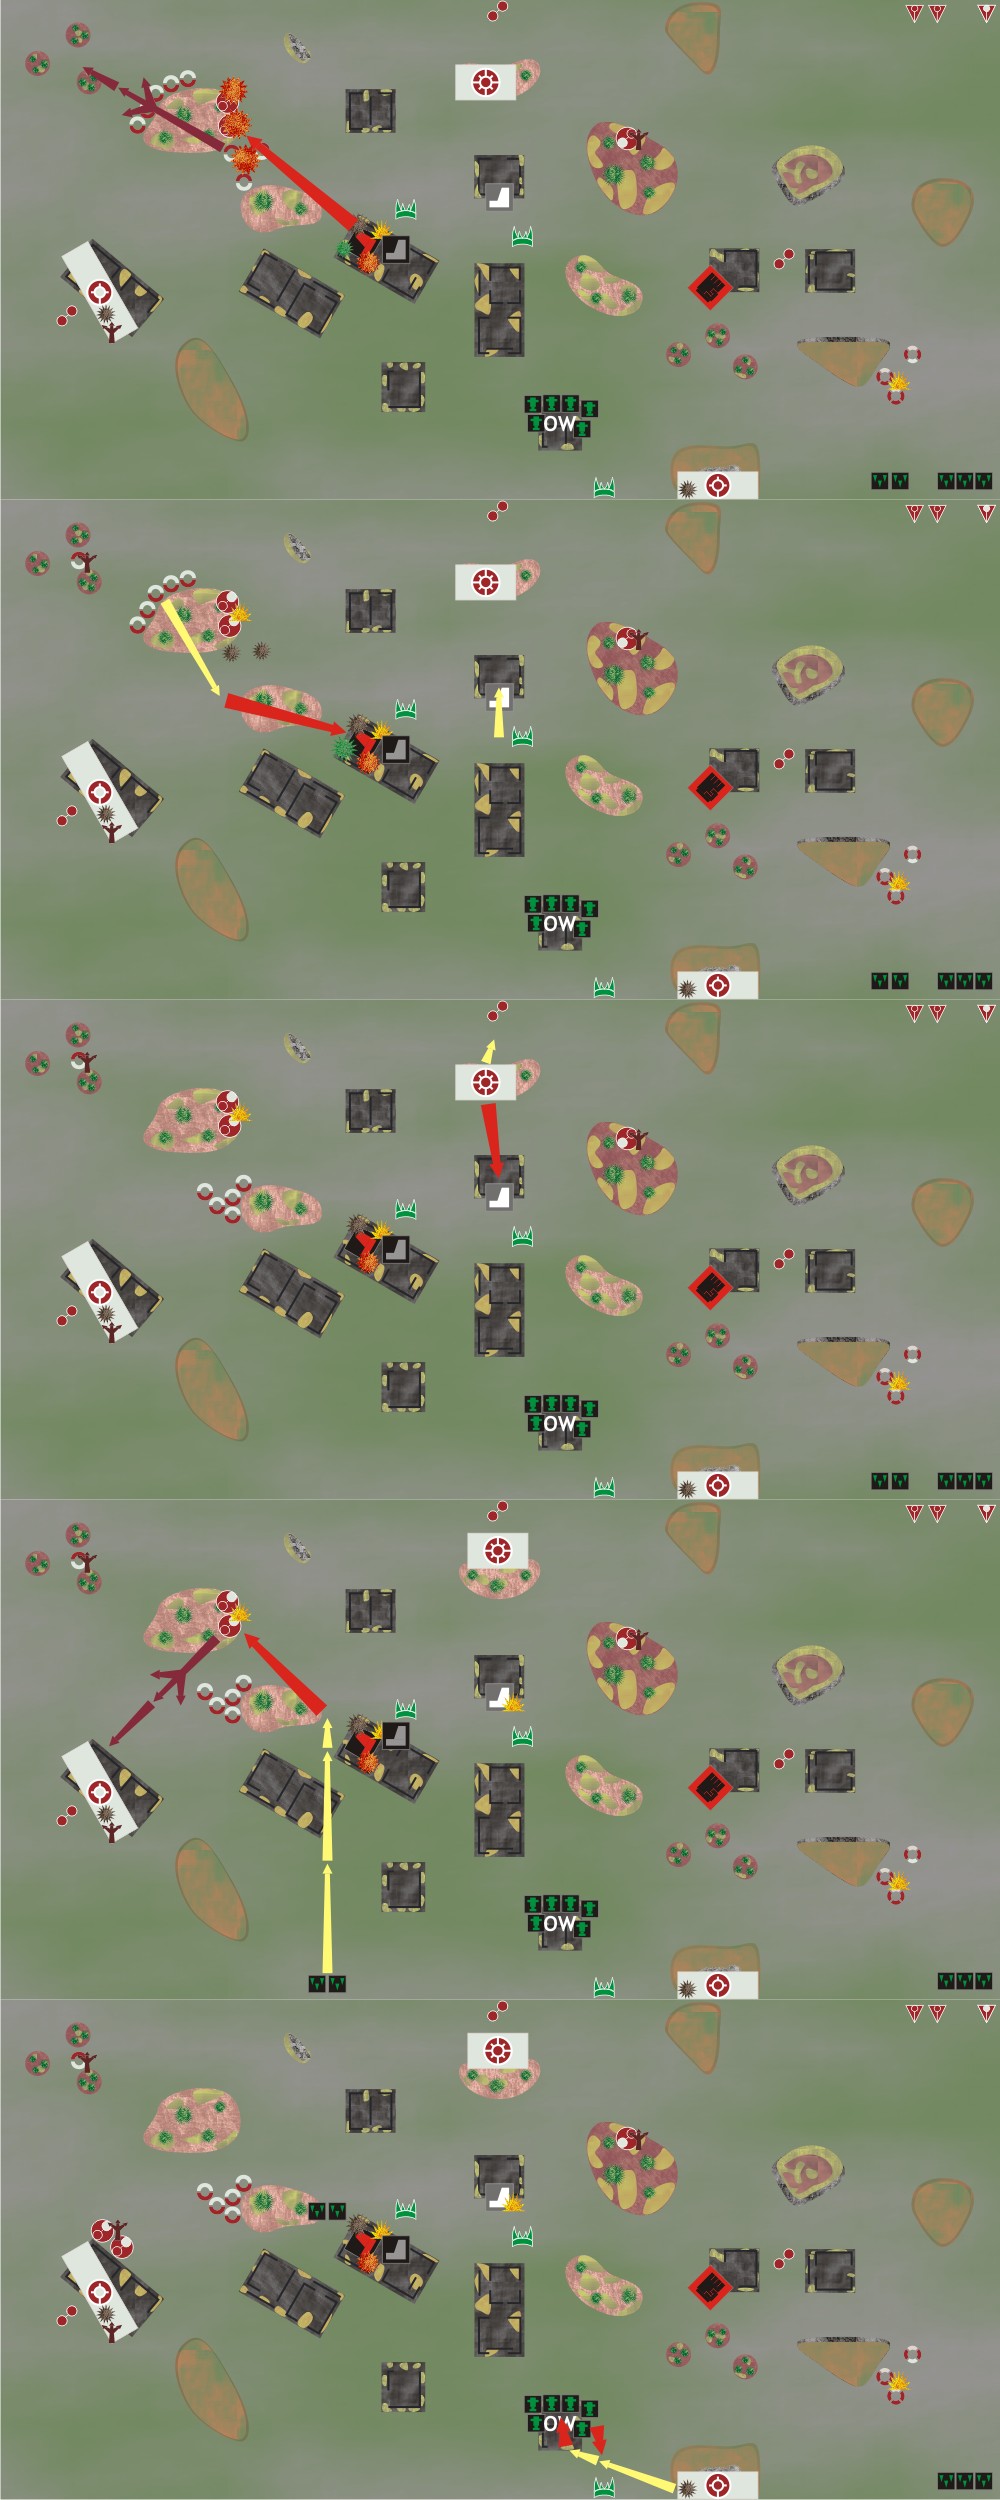
O: Red Gargant inaugurates the turn again, but fails and chooses to shoot at the Stormsurges. A lucky dice throw gets the Gargant 10BPs which he uses to cover both the Stormsurges and nearby Skyrays, destroying two Skyrays and no damage on the Stormsurges, breaking the Skyrays and giving 3BMS to the Stormsurges putting them on the brim of breaking. Skyrays retreat to the upper-left corner, behind some trees.
T: Hammerheads advance towards the forest in front of the Red GArgant, and pop up to shoot it for the last shield. A big hurray comes from the Tau side!
O: crisis 2 advances, shoots at the White Gargant, and retreats using their jump packs to avoid its assault range and him claiming the objective.
T: Formation of 2 Fightas ground attack the Stormsurges, breaking them with the last BM, which retreat to the left near crisis 1.
T: crisis 3 doubles towards the Blitz, and the Killa Kans activate the overwatch with no results, contesting the objective, and shoot the Killa Kans with no results either. Settle in the ruins with the Killa Kans, while glaring at each other.
Image


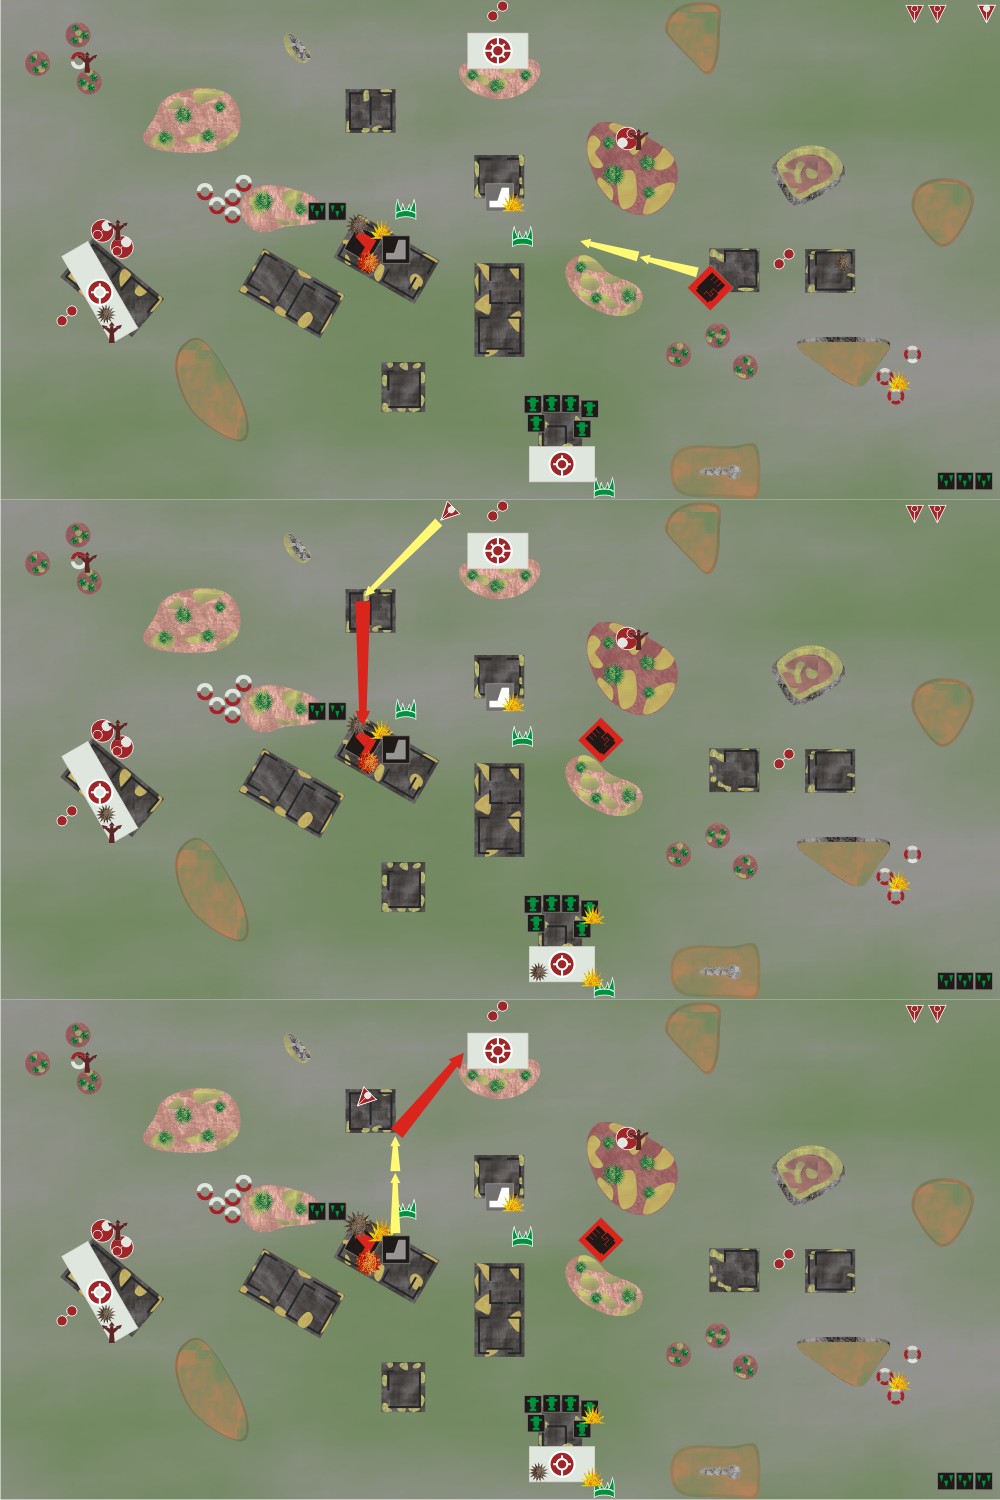
O: Seeing there is nothing else to do, the Great Gargant doubles towards the right Ork objetive to double secure a point.
T: AX-10, seeing the skies free and no shields at sight, ground attacks the Red Gargant and causes 2Dcs and another critical, putting it on the brink of being both destroyed and broken.
O: Great Gargant prepares the field and doubles to fire on crisis 2 while still apturing the objective, just in ase, but inflicts no damage.
Image


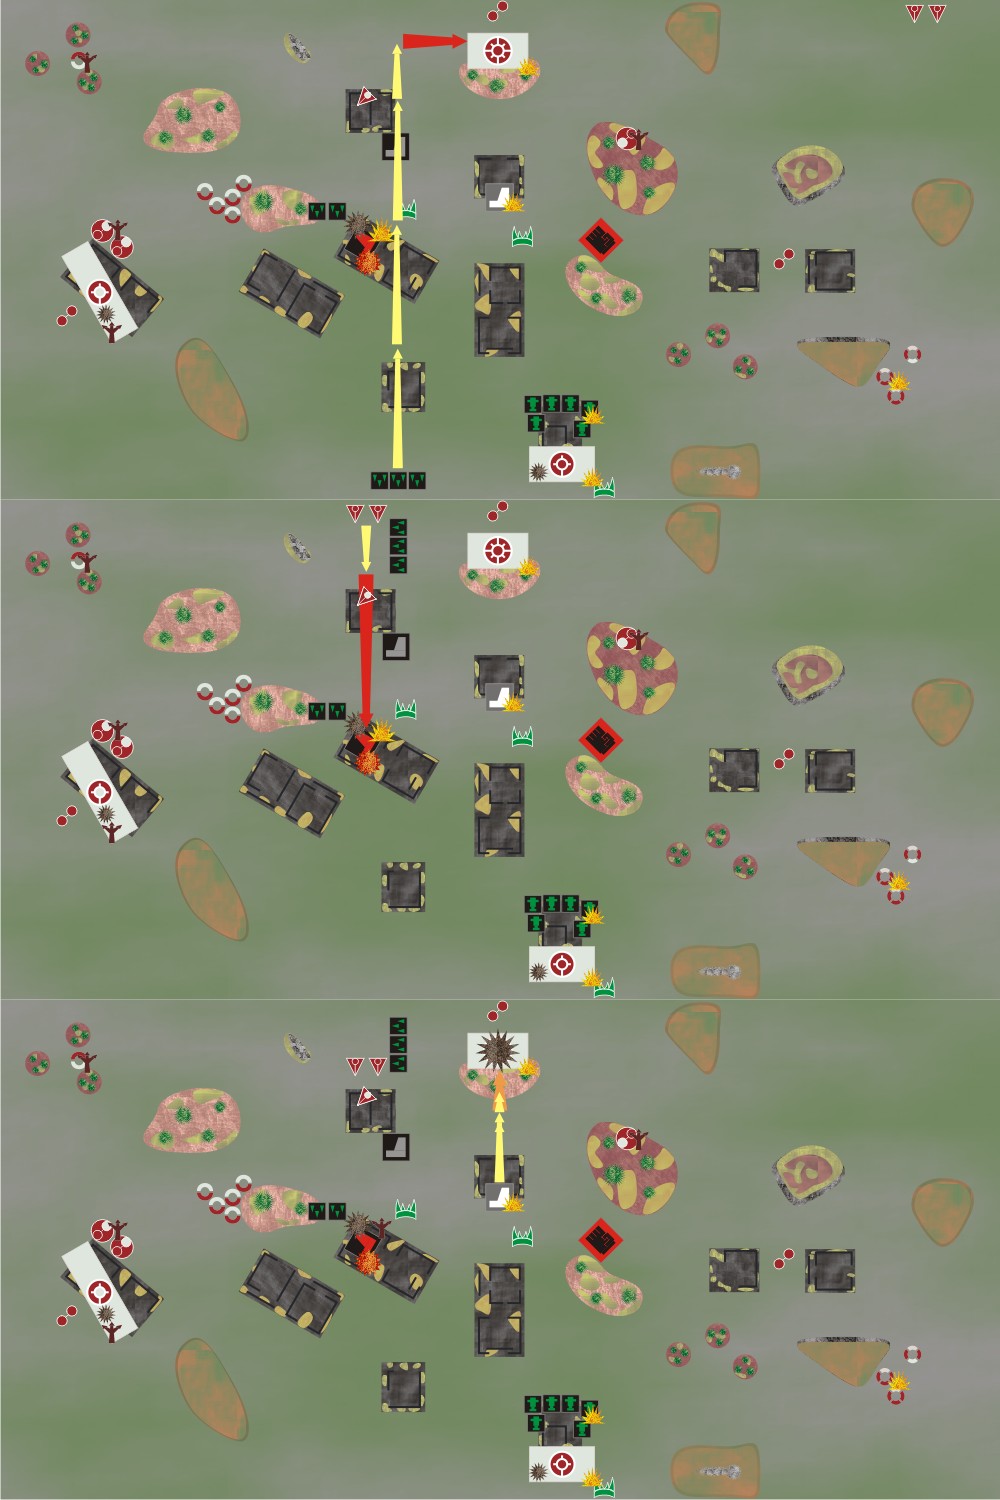
O: Orks retain and ground attack the crisis 2 again, and again no one dies.
T: Barracudas, intending to retake Tau's honour, ground attack the Red Gargant, and while not making damage, give it its last bast marker, breaking it. The Gargant chooses to stay where it is, it is a warm place after all.
O: White Gargant, assaults with a Push'em up the surprised crisis 2 that thought were out of range. The crisis get wiped up completely and the Gargant places himself on the Blitz.
Image


At this point, we decided that there was no way the Tau could win in this situation, at most make the game last till the fourth turn and lose more Tau and probably the Red Gargant, so we called it done.


Victory for the greenskins! The victorious Orks swarm the Red Gargant full of jealously as they had all the fun and torch it, with the fire becoming the center of party for the next days.


The conclusions will have to wait till tomorrow, unfortunately.

_________________
Sculpting Orks thread
Statistics of games for OGBM v.3 list


Last edited by Abetillo on Wed Feb 01, 2017 12:50 pm, edited 2 times in total.

Top
 Profile Send private message  
 
 Post subject: Re: OGBM 3.4 vs Tau Vior'La 1.8a
PostPosted: Sun Jan 29, 2017 1:14 pm 
Brood Brother
Brood Brother
User avatar

Joined: Mon Jun 06, 2016 1:42 pm
Posts: 693
Location: Bundaberg, QLD, Australia
Nice report and thanks for sharing..

Did you change programs for the maps or just formatted them some how? They look really good, well done..

_________________
Regards
Greg

*************************************************

Not against change, so long as it done fairly and no one is left behind....

I'm human and not a !@#$%^# Robot..


Top
 Profile Send private message  
 
 Post subject: Re: OGBM 3.4 vs Tau Vior'La 1.8a
PostPosted: Sun Jan 29, 2017 2:50 pm 
Brood Brother
Brood Brother
User avatar

Joined: Sat Feb 11, 2012 8:24 pm
Posts: 9625
Location: Manalapan, FL
Thank you for your write up. I can actually follow your tactics and plan in such an approach to documenting the battle. I know it is time consuming but it's worth 20 times without

_________________
He's a lawyer and a super-villian. That's like having a shark with a bazooka!

-I HAVE NO POINT
-Penal Legion-Fan list
-Help me make Whitescars not suck!


Top
 Profile Send private message  
 
 Post subject: Re: OGBM 3.4 vs Tau Vior'La 1.8a
PostPosted: Sun Jan 29, 2017 6:43 pm 
Brood Brother
Brood Brother

Joined: Mon Nov 05, 2012 9:35 am
Posts: 3338
Location: Norrköping, Sweden.
Thanks for the report! How many points did you guys kill? And why didn't your opponent use his last 150p?

_________________
https://epic40ksweden.wordpress.com/

"You have a right to be offended" - Steve Hughes
"Your feelings are hurting my thoughts" - Aron Flam


Top
 Profile Send private message  
 
 Post subject: Re: OGBM 3.4 vs Tau Vior'La 1.8a
PostPosted: Sun Jan 29, 2017 6:43 pm 
Brood Brother
Brood Brother

Joined: Mon Nov 05, 2012 9:35 am
Posts: 3338
Location: Norrköping, Sweden.
And most important: What program did you use for ceeating theese images again?

_________________
https://epic40ksweden.wordpress.com/

"You have a right to be offended" - Steve Hughes
"Your feelings are hurting my thoughts" - Aron Flam


Top
 Profile Send private message  
 
 Post subject: Re: OGBM 3.4 vs Tau Vior'La 1.8a
PostPosted: Sun Jan 29, 2017 8:10 pm 
Brood Brother
Brood Brother
User avatar

Joined: Mon Aug 31, 2015 4:24 pm
Posts: 399
Location: Galicia
OK, time for conclusions:

First of all, we geared our armies to deal with each other. My opponent went to include many MW and TK to deal with the WEs, and i took the opposite approach, taking too many Dcs to destroy, also because i wanted to test if the extreme list with 5 Gargants was as powerful as was talked about. Now with the mandatory Great Gargant it isn't as viable as the Gargants have to be almost naked and without support, so i went for the more versatile 4 Gargants, each with a different weapon choice for testing, and some supports as 2 Fightas and one of Killa Kans for sneaky objective grabbing or Blitz Guard.

I wanted to take advantage of the number of Dcs and plunge forwards to the objectives together, taking advantage of the big number of small sized cover we placed, but i had to go out of plan when i saw that opportunity on Turn 1. I didn't do any damage, but i positioned it well so it could sustain tons of damage and force even Skimmers to move as most of the times they had two terrain elements to block them. That worked into getting my opponent nervous and send formation after formation to him, putting them in a good place to kill.

Luck was one of the main actors of the game, with around 8-9 activations lost between both and mainly in the main formations, those Barracudas getting shot so easily which gave me freedom to move on the skies, the most important units not rallying, and me getting the initiative when i need it the most.

That Red Gargant made almost everything, taking almost every shot and attacking half the enemy army till surprising heights, and most of the time i had nothing decent to do with the others. Well, it was also because that poor one was quite isolated fro both allies and enemies alike thanks to the big number of cover. It was so overwhelming that my only damage besides that one was a single Fighta, and 1 shield from the last assault on the White one.


On the Gargant list: Not much i can say, getting max shields on almost everyone, the terrain, the enemy concentrating everything on one Gargant so the others barely had anything to do, and having the luck on my side on some crucial times made things way easier and also i couldn't test much. Also, this issues overwhelmed my opponent so i couldn't get much data from him.

- The mandatory Gargant didn't changed as much as i expected and my opinion on the Great Gargant itself got raised even though i couldn't use it. I'll probably take it more from now on.

- It fared better than expected compared with a list with several Supa-Stompas and liked it. For now i don't think this option of 4 Gargants is too good. The only issue i see comes that i mostly see only extreme lists as viable, because as long as you put only one or two land support units they become the weak part, the main target of the enemy army so you have to reduce the number of Gargants and take more so there is more targets or go full Gargants and air or maybe a single Supa-Stompa between the Gargants. Thats why i chose this list full of Gargants and only one land cheap support.

- The Mega Lobbas is being confirmed more and more in my eyes as a very good weapon and i am loving it very much. For small sized formations, it is better than a Disrupt one, with its reliability. You know it will put some extra BMs most of the times no matter if the unit doubled or the target is in cover. It is still OK as it is, as just as the other 50 points weapons, it shines only on certain situations. Also the fact that the enemies came to it made things easier and the weapon shone the most.

- Push'em up: same as with the other comments i just confirmed more what i thought on previous games: this is a well polished option and very powerful. Well balanced drawback for Turn 1 or 2 uses as the fires tend to grow, but for Turn 3 or 4 becomes too good, as a single fire at that point of the game its usually something that can be completely ignored. On the other side, this is hard to fix without making the drawbacks for Turn 1 use too big and its use on latter turns is a bit less important, except in those cases your opponent forgets about it.


On the Vior'La side: We see it as a good list, liking most of the choices there, highlighting the restrictions on AX-10 use an the inclusion of Riptides, but there are two that bug us: On my side, it continues to confirm that Stormsurges are worse than the other two big armours. Not like these are bad but more that the others are way better, with the 25cm on Riptides and Ind. Fire on the Supremacy being the main reasons for that. Probably the problem comes first from that both were created by the current GW so they are faulty to begin with. My opponent is on the same opinion, but rarely takes Riptides as they don't suit his play style. My opponent is also of the opinion that cadre Fireblade is out of place on this list and i agree on that part but i also think it is well balanced so just from gameplay side is OK.


You are welcome, you three.

PFE200 wrote:
Nice report and thanks for sharing..

Did you change programs for the maps or just formatted them some how? They look really good, well done..


Yeah, i did, i redid everything from scratch. I was using before programs from Adobe because i got accustomed since it was mandatory back in University, but got angry at how un-useful they are so switched to corelDraw. The only good thing Adobe has done well is the PDF format, and Indesign is decent if you back to versions from 12-14 years ago, the rest is crap full of eyecandy.

jimmyzimms wrote:
Thank you for your write up. I can actually follow your tactics and plan in such an approach to documenting the battle. I know it is time consuming but it's worth 20 times without


Good that its easier to follow, that was my aim with all of this. It is time consuming, but not too much except of you go overboard like me, as i replicated as close as possible all the terrain we have, in form, size and colour, and also swam through Warhammer40.000 codex and made all the symbols i could ever need for each army. The good part, now i have everything done and for the next battle report is just move and rotate, so the work is severely reduced.

If you want to try out, my advice is that the main issue is making the units visible: too big and there isn't place to put them ( i made them three times as bigger and sometimes had that problem in this report), and too small and its hard to know which is which. The solution is making the icons simple so an small difference between them is noticeable. Have to refine more towards that. Making the infantry squares helps a lot, and damage can be shown with icons or by reducing the square (i used both for testing).

mordoten wrote:
Thanks for the report! How many points did you guys kill? And why didn't your opponent use his last 150p?


Let me check ... its easy to see ...

Tau: A single Fighta and you could add the Red Gargant if i couldn't rally it at the end of the turn or if it couldn't put out the fires, as it had exactly 3Dcs left and 3 fires on.

Orks: Not much, mostly broken formations that were almost fresh. 1450 points if you count broken, which depend if he got to rally them or not at the end of the turn. Killed:
- One of crisis with Shas'o 400
- One of Recon 175
- One of Barracudas 150
- Around half in Stormsurges, Skyrays, another Recon and his BTS Hammerheds.
- And two crisis stands

If we look at units/shields and Dcs lost it was a lot closer than when looking at objectives.

On about the 150 points, well ... he just forgot. i noticed it myself just because i made this report. Got some laughs together when i told him.

mordoten wrote:
And most important: What program did you use for ceeating theese images again?


Old good corelDraw this time. More details on what i answered to PFE200 above. ;)

_________________
Sculpting Orks thread
Statistics of games for OGBM v.3 list


Last edited by Abetillo on Wed Feb 01, 2017 12:52 pm, edited 2 times in total.

Top
 Profile Send private message  
 
 Post subject: Re: OGBM 3.4 vs Tau Vior'La 1.8a
PostPosted: Mon Jan 30, 2017 4:48 am 
Brood Brother
Brood Brother
User avatar

Joined: Mon Jun 06, 2016 1:42 pm
Posts: 693
Location: Bundaberg, QLD, Australia
good Old corel Draw hey..I may still have copy floating around some where in my collection.

_________________
Regards
Greg

*************************************************

Not against change, so long as it done fairly and no one is left behind....

I'm human and not a !@#$%^# Robot..


Top
 Profile Send private message  
 
 Post subject: Re: OGBM 3.4 vs Tau Vior'La 1.8a
PostPosted: Tue Jan 31, 2017 12:48 pm 
Hybrid
Hybrid

Joined: Tue Jul 05, 2005 1:32 pm
Posts: 4893
Location: North Yorkshire
Thanks for the report, it was a good read.

_________________
_________________
www.epic-uk.co.uk - home of the UK Epic tournament scene
NetEA NetERC Xenos Lists Chair
NetEA Ork + Feral Ork + Speed Freak Champion


Top
 Profile Send private message  
 
 Post subject: Re: OGBM 3.4 vs Tau Vior'La 1.8a
PostPosted: Wed Feb 01, 2017 12:49 pm 
Brood Brother
Brood Brother
User avatar

Joined: Mon Aug 31, 2015 4:24 pm
Posts: 399
Location: Galicia
You are welcome.

On another topic, i have realized that my opponent never missed those 150 points, it was me not noticing he took an extra crisis unit for each formation. In the photo it shows that there is 7 stands per formation and not 6. That has been FIXED.

_________________
Sculpting Orks thread
Statistics of games for OGBM v.3 list


Top
 Profile Send private message  
 
Display posts from previous:  Sort by  
Post new topic Reply to topic  [ 9 posts ] 


Who is online

Users browsing this forum: No registered users and 9 guests


You cannot post new topics in this forum
You cannot reply to topics in this forum
You cannot edit your posts in this forum
You cannot delete your posts in this forum
You cannot post attachments in this forum

Search for:
Jump to:  


Powered by phpBB ® Forum Software © phpBB Group
CoDFaction Style by Daniel St. Jules of Gamexe.net