Tactical Command http://www.tacticalwargames.net/taccmd/ |
|
Doc's Landraiders http://www.tacticalwargames.net/taccmd/viewtopic.php?f=7&t=2371 |
Page 1 of 2 |
Author: | Doc [ Tue Jan 24, 2006 2:17 am ] |
Post subject: | Doc's Landraiders |
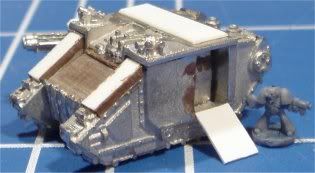
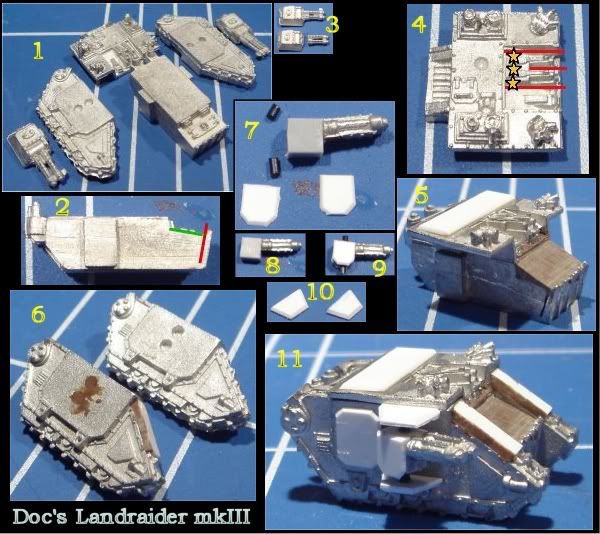
![]() Pic 1, All the parts for an E40k era, Landraider mkII (except I couldn?t find the hatch sprue). 
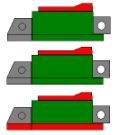
Pic 2, Take the Landraider hull and cut down behind the front ramp (red line), nearly all the way through. Bend the ramp forwards. This enables you carefully cut the hatches from the top of the assault ramp with out damaging the lower ramp (green line). Bend the front ramp back up. If you don?t want to keep the hatches, you can of course just ignore all of that and go onto the next stage. For all this cutting I used a razor saw (I think that?s what it is called). Pic 3, Cut the Larcenous off the old sponsons as close as possible to the armour. Cut the foresight off the top of the Lascannons. Pic 4, All the cutting on the top plate was done with the razor saw. On the rear of the top section of the hull, there are two pairs of aerials and a small hatch. These can be carefully cut off and be kept for later. The top of the hull is then filed flat. 
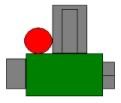
If you want one of the Landraider variants, you need to get rid of the heavy bolters from the hull top piece. Now I did this carefully, trying to keep the heavy bolters intact as much as possible, because if you do four variants, and keep the heavy bolters, you will have enough heavy bolters for one of them to be a Prometheus. The method I came up with was to drill lots and lots of holes along the back of the heavy bolters (yellow stars). Then I cut down the sides of the heavy bolters to the holes you just drilled. If you got enough holes drilled, you will have weakened the joint enough to just snap the heavy bolters off the top piece. Then I cut down the centre of the heavy bolters, just to separate the two barrels (my saw blade was just the right width to do this). Pic 5, Glue the top piece to the main hull and then green stuff (*see note below) the assault ramp, to make it more angled like the mk3. I filed it flat to get it smooth. If you wish you can glue the hatches onto the assault ramp top hatch for detail (the ones you carefully removed in step 1). I also added some armour to the top of the hull, to hide the area where the aerials were. Pic 6, Putting armour over the track. Decide how far down the tracks you want the armour to go and remove the hinges/lumps that join the track links together in this area. File this area to give you a flat surface. Cut a piece of plasticard to size and glue it to the area of the tracks you just filed flat. Add a small length of thin plastic to the front of the track guard to form a lip (not shown in pic). Cut a triangular prism of plastic for the headlight, and glue in place (I never got round to doing this, but it was always my intention to do this). Finally fill the gaps down the side with green stuff. Pic 7, The Larcenous are mounted horizontally on a square of plastic just as wide as the Larcenous are. Two pieces of plasticard are cut to represent the armour plates on the Lascannon sides. Mine are 7mm long and 4mm wide. Two pieces of plastic rod are used as the mounting shaft. Pic 8 shows the glued Lascannon, and pic 9 shows a complete Lascannon. I did toy with the idea of using twisted strands of electrical wire to use as power cables, but couldn?t get them to fit well enough for me (a bit too much fiddle factor, maybe on my next one). 
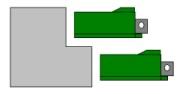
Pic 10, To mount the Lascannons on the land raider hull, you need to cut 2 pieces of plasticard for each side. I actually glued two pieces of plasticard together to double the thickness. My shape started as a 7mm by 4mm rectangle. The short side parallel with the long side is also 4mm long. Chamfer the 3 shorter edges and make sure the long edge is flat. Glue one to the tank hull, where the lower sponson mount would be. The Lascannon is mounted between the top and bottom sponson mount by a little plastic rod (see pic's 7 to 9). The Lascannon is glued in position at the same time as the top sponson mount. Do a few dry runs to make sure you are happy with positioning before doing this. Pic 11, An almost complete example, a door has been added using plasticard (7mm x 5mm). Two hatches from the hatch sprue need to be added to the top plastic plate. On two of my Landraiders I made hunter killer missile tubes instead of using hatches. If you saved the aerials from earlier you can also add one of those too. (*)I have actually used brown stuff instead of green stuff because I read that it behaves the same way as green stuff but is a lot easier to sand, and file etc once it is dry. I have found that this is true, but use what ever you have/like to work with. That is the basic Landraider, next post will be about varients. But before i go to bed, because these "how to's" take blooming ages (any one know a quick way?) here is a concept i was playing with on the last conversion. It might eventually make it to a fully complete model. ![]() |
Author: | Legion 4 [ Tue Jan 24, 2006 5:50 am ] |
Post subject: | Doc's Landraiders |
Nice Work ! ![]() |
Author: | Tas [ Tue Jan 24, 2006 6:26 am ] |
Post subject: | Doc's Landraiders |
You are a sick sick man.... ![]() |
Author: | Markconz [ Tue Jan 24, 2006 6:32 am ] |
Post subject: | Doc's Landraiders |
Wow :O Amazing work! |
Author: | vanvlak [ Tue Jan 24, 2006 7:36 am ] |
Post subject: | Doc's Landraiders |
Good grief - nice work doc! ![]() ![]() ![]() |
Author: | Mojarn Piett [ Tue Jan 24, 2006 8:12 am ] |
Post subject: | Doc's Landraiders |
I bow to your superb conversion skills, Doc. Those sponsons are a work of art. ![]() |
Author: | ortron [ Tue Jan 24, 2006 11:26 am ] |
Post subject: | Doc's Landraiders |
Awesome!! Man thats some really nice work. Thankyou for this. |
Author: | Dwarf Supreme [ Tue Jan 24, 2006 7:35 pm ] | ||
Post subject: | Doc's Landraiders | ||
I echo that sentiment. ![]() ![]() |
Author: | Hojyn [ Tue Jan 24, 2006 8:42 pm ] |
Post subject: | Doc's Landraiders |
You are mad ! In the best possible way, though. ![]() Amazing work. |
Author: | MaksimSmelchak [ Tue Jan 24, 2006 10:18 pm ] |
Post subject: | Doc's Landraiders |
Hi Doc, Amazing work! Shalom, Maksim-Smelchak. |
Author: | primarch [ Tue Jan 24, 2006 10:49 pm ] |
Post subject: | Doc's Landraiders |
Hi! Wow, awesome! Primarch |
Author: | Doc [ Wed Jan 25, 2006 1:33 am ] |
Post subject: | Doc's Landraiders |
Right folks onto the variants. From pic 4 above you will have cut away the section of the top plate with the heavy bolters. Unfortunately i have no pictures of this stage, if you struggle with the description let me know and i will see what i can do. So now you need to remove the heavy bolters from the piece of the hull just below (looks like it has a viewing window or something in it). This should leave the heavy bolters by themselves joined together by the rear section of the bolters. When you glue the top half of the hull to the lower and green stuff the assault ramp you will also need to fill in the gap left by the heavy bolters. For the Helios and Prometheus this is dead easy as you dont need to leave room for anything. However if you are making a Crusader then you need to fill the gap in but no higher than the section of hull you just removed from the bottom of the heavy bolters. Does that make sence? Crusader Hurricane Bolter Sponsons You will need 6 storm bolter hatchs from either the E40k era leman russ or landraider. Cut the stormbolters off the hatchs. Chop off the foresights and shave the ridge off the top of the storm bolters, while you are doing that shave the ridges off the bottom from two (one for each sponson) of the bolters. Stick 3 storm bolters one on top of the other making sure that the one you shaved top and bottom is on the bottom, repeat this with the remaining 3. See pic below, the red sections are sections you should have removed and is in the order of how one set of hurrican bolters would be glued together. ![]() Do both sets of hurricane bolters like this, and you should be able to turn one upside down and get a mirror image of the origonal. Put a section of plastic rod just behind the the ammo feeds (see pic below). Cut it to the same height as the stack of bolters. ![]() If you wish, make a ammo hopper to glue on the rear, I got fed up of trying, and no one would see it anyway so I didn?t bother. Glue it inplace in the same manner as the lascannons above (it should be just the right heightas it is). Then cut a piece of plasticard to represent the armour plate on the outside. Assault Cannons These are dead easy, and agin i dont have any pictures. Cut 2 multilasers off E40k era IG sentinels (keep the rest of the sentinel, or give it to me, as it will come in useful for a Defiler conversion). Cut a rectangle of plastic to use as the armoured mount for the assault cannons. Shape the plastic by carving it to the right size/shape for the part of the hull where the heavy bolters were, and attach the two multilasers. Multimelta Even easier than above, you will need the marine gunner (that you cut off a stormbolter and kept) from the hatch sprue. You will also need an E40k era attack bike with meltagun sidecar. Can you guess what to do? lol Cut the melta off the side car and attach to the gunner, place on the top of the hull. Rights about it for the Crusader. Fill in any unsightly gaps with green stuff. Theres a pic of my two Crusdaers with the Prometheus below. |
Author: | Doc [ Wed Jan 25, 2006 1:33 am ] |
Post subject: | Doc's Landraiders |
Prometheus Right the Prometheus doesnt have a hull mounted heavy bolter, so you can fill in the hole left by the heavy bolters in the top plate how ever you wish. I didnt make the "targeting sensors" as i wanted some flat areas to paint markings on the tank. Sponsons Again no pics, but i do have a diagram. Taking the heavy bolters you cut off the landraider eariler, clean them up and deside which bolters will be positioned where. Cut a square of sprue like you did for the lascannons. If you want the lower bolters sticking out forward of the upper bolters then you need to cut a section out of the upper forward quarter. Then glue the rear of the heavy bolters to the plastic. See pic below. ![]() All you need to do is cut some armour plates like you did with the lascannons, and mount them in the same mannor too. Two Crusaders and the Prometheus ![]() Helios This is a simple conversion, like the Prometheus you dont need the hull mounted heavy bolter so fill in the hole as you please. You can make the targeting sensor if you wish but i never. Using one whirlwind turret, cut the launchers off the turret mount. File down the inside edge and glue the two together. This makes a symetrical box launcher. ![]() Sorry image is a bit blurred, and in my opinion i didnt file the insides of the launcher tubes down enough. The gap between the left and right and side war heads looks too big. I didnt do a dry run fit before i glued! You cant see in the pic but I then glued two of the small hatchs from the top plate (which of course you kept from eariler) on to the back of the launchers as blast deflector type things. Using the mount chop the arms off and chop a little of the top off what remains of the turret, file the turret top smooth, but at an angle (assuming you want the launcher pointing upwards). The Helios flanked by two standard pattern Landraiders. ![]() Silly Little Details On the hatch sprue came a hatch with a search light, use it, cos it looks good. Same for the marine gunner, and the pintle mounted storm bolter (if you havent used them all). i also tried to make a hunter killer missile launcher. I made two , the Landraider on the right in the pic with the Helios and the Crusader on the right of the other picture. It is made from a piece of plastic rod, sat on a small 'L' shaped peice of sprue stuck on top of a circle of plastic tude of larger diameter. To be precise it is the bottom off one of the old style square bases banner poles, while the missile tube itself is the banner pole. Right thats it, any questions? Sorry this last section wasnt as well written as the first section. |
Author: | Doc [ Wed Jan 25, 2006 1:50 am ] |
Post subject: | Doc's Landraiders |
mad? .....yes sick? if only cos then i would have tomorrow off work and i'd get some painting done ![]() There is another conversion of the mkII (i think it was a plastic one) into a mkIII which i think was a hell of a lot better than mine. But searchy isnt being very helpful. All i can remember is that it was mainly made from plasticard had the cool looking chunky reinforced armour. Also it ended up painted red. On a side note, i also found the thread that i first unleashed these on the boards, and in which i said i would make a how to. Do you wanna know the date? [looks sheepish] December 7th 2004 [/looks sheepish] ![]() ![]() |
Author: | Legion 4 [ Wed Jan 25, 2006 5:12 am ] |
Post subject: | Doc's Landraiders |
Wow ! Very Nice !!! ![]() ![]() |
Page 1 of 2 | All times are UTC [ DST ] |
Powered by phpBB® Forum Software © phpBB Group http://www.phpbb.com/ |