Login |  Register |  FAQ
   
Post new topic Reply to topic  [ 31 posts ]  Go to page 1, 2, 3  Next

de-basing

 Post subject: de-basing
PostPosted: Fri Sep 10, 2010 4:45 am 
Brood Brother
Brood Brother

Joined: Thu Aug 19, 2010 6:03 am
Posts: 338
Location: Raleigh, NC
So I have discovered that I truly hate the 20x20 original citadel bases, they are so difficult to flock or paint the minis on. So, What is the preferred (least lossy) way of removing my infantry form their bases, which were assembled with plastic cement? Also is there a good supplier of bases similar to GWs 12*40 bases?


Madmag

_________________
MadMagician
Epic Tyranids


Top
 Profile Send private message  
 
 Post subject: Re: de-basing
PostPosted: Fri Sep 10, 2010 4:58 am 
Brood Brother
Brood Brother
User avatar

Joined: Wed Mar 07, 2007 7:04 pm
Posts: 901
Location: New Haven, CT
I've had bad luck de-basing plastic from plastic like that.

I've had better clipping the old bases into fifths, glueing these bits of bases onto a 20X40 WM base, and flocking over it all.


Top
 Profile Send private message  
 
 Post subject: Re: de-basing
PostPosted: Fri Sep 10, 2010 6:29 am 
Brood Brother
Brood Brother
User avatar

Joined: Wed Oct 05, 2005 1:24 am
Posts: 4499
Location: Melbourne, Australia
I actually bend them till the base cracks, cut around the holes with a pair of clippers then carefully cut the mini out with a hobby knife by wedging it in under the mini's stand and the black base.


Top
 Profile Send private message  
 
 Post subject: Re: de-basing
PostPosted: Fri Sep 10, 2010 7:49 am 
Brood Brother
Brood Brother

Joined: Mon Sep 06, 2010 11:53 am
Posts: 100
Location: Århus Denmark
Dobbsy wrote:
I actually bend them till the base cracks, cut around the holes with a pair of clippers then carefully cut the mini out with a hobby knife by wedging it in under the mini's stand and the black base.


That is how i have debased my minis.

I have started to use small Flames of War bases for my infantry (check my signature). I see a lot of people starting to use round bases.

- F -

_________________
Follow the adventures of Waaagh Nuglug


Top
 Profile Send private message  
 
 Post subject: Re: de-basing
PostPosted: Fri Sep 10, 2010 9:01 am 
Brood Brother
Brood Brother
User avatar

Joined: Thu Aug 03, 2006 8:43 pm
Posts: 453
Location: UK
I'm the same as Dobbsy and Nuglug... Bend the bases, clip the bases, then carefully trim/pry with a knife.

As for replacements... Well it depends on what you want really.

Magister Militum do 40 x 15mm bases, and more besides

Renedra have quite a lot of bases or shapes and colours

Kallistra also do a variety of bases and sizes

Dark Realm Miniatures do resin bases with holes cast into them suitable for Epic figs.

Fenris Games and Litko laser-cut bases from ply, MDF or plastic. They also offer similarly-cut magnetic sheets that you can use to stick your models onto a steel surface for safe transportation (like a steel toolbox for example).

Finally, you can always make your own like me and others here:
Image

The way to do this is to buy two thicknesses of plasticard (I used 1mm for the upper piece and 0.75mm for the lower piece), and then measure a whole pile of bases in one go (so a big 'grid' of bases on the sheet). Then you score and snap them out. Gather the 1mm plates togther, tape them tightly with masking tape and drill holes through them. Take the tape off, and offer each drilled plate to a plain plate and -holding them together- dab the edges with a capillary-action plastic solvent (like Ambroid Pro-Weld). Finally, once the plastic is fully set, tidy up the edges with some emery paper.

It takes a while, but to make mine it took about 2 hours for 120 bases, and them about the same again to file and polish them all to a good finish.

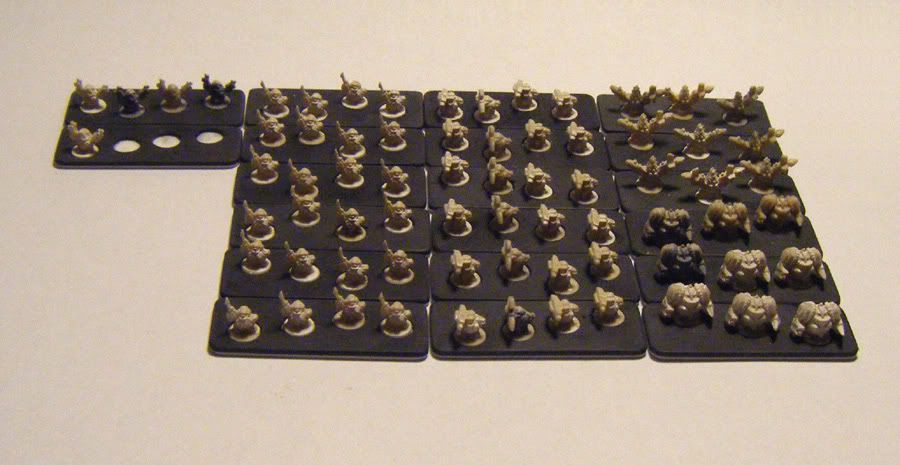
The main advantage of making your own is that you can drill the holes wherever you want, and even different numbers of holes too if you like. I drilled all of mine to accept either three or four models to a base, and the sizes were 40mm x 15mm. As you can see, the bases do not look sparse model-wise - it really depends on what models you are basing, how big the base is, and how crowded you want your bases to be.


Last edited by Major_Gilbear on Fri Sep 10, 2010 12:52 pm, edited 1 time in total.

Top
 Profile Send private message  
 
 Post subject: Re: de-basing
PostPosted: Fri Sep 10, 2010 10:59 am 
Purestrain
Purestrain
User avatar

Joined: Thu Jul 10, 2008 9:04 pm
Posts: 5963
Location: UK
Another vote for making your own plastic strip bases. Other companies are expensive and/or lack holes.

My method for making hole bases differs a bit from Gilbear's in that i drill the base holes before snapping them apart, this means i can just secure/clamp down the entire sheet of bases and drill them all. If you do this ensure that the sheet was well scored, otherwise the bases can break along the holes during the snap.

Quote:
2 hours for 120 bases

I tried 100 or so bases in one go once, i will never do it again :o the blisters!

_________________
AFK with real life, still checking PMs


Top
 Profile Send private message  
 
 Post subject: Re: de-basing
PostPosted: Fri Sep 10, 2010 11:30 am 
Brood Brother
Brood Brother
User avatar

Joined: Thu Aug 03, 2006 8:43 pm
Posts: 453
Location: UK
Apocolocyntosis wrote:
My method for making hole bases differs a bit from Gilbear's in that i drill the base holes before snapping them apart, this means i can just secure/clamp down the entire sheet of bases and drill them all. If you do this ensure that the sheet was well scored, otherwise the bases can break along the holes during the snap.

The main advantage of doing the holes through the bases in 'bricks' is that you don't need to drill so many times if you are making bases in volume. You can drill 25 bases in seconds!

I make several bricks, mark up the top plate on each one and that way get some variation among the hole placements of the bases I make.

I did find that if you do the stack method, you need to start with a pilot hole (~2mm) and then enlarge to ~4mm and finish with a 6.5mm bit. Otherwise the power drill will chew up the bases.

Apocolocyntosis wrote:
Quote:
2 hours for 120 bases

I tried 100 or so bases in one go once, i will never do it again :o the blisters!

I'm starting to get a callous on the outer side of my right thumb from repeatedly sanding the skin off it! I still think it's worth it though. :P

One last quick thing I forgot to mention if you make your own bases; using normal Poly Cement (the gloopy stuff in a tube) means that it takes forever to fully set, and you risk warping the bases in the long run (the voice of experience here - all my home-made bike bases from the E40k era are now all banana-profiled...).
However, the solvent method dries totally overnight (especially if you drilled the holes in the upper plate) and therefore doesn't warp in he long run.
I then glue the models in with the tiniest dab of thick superglue in the centre of each hole - again to reduce the risk of warping - and to improve my chances of recovering the modes in the future if I want to.


Top
 Profile Send private message  
 
 Post subject: Re: de-basing
PostPosted: Fri Sep 10, 2010 11:35 am 
Purestrain
Purestrain
User avatar

Joined: Thu Jul 10, 2008 9:04 pm
Posts: 5963
Location: UK
uh...yes! doing them as a stack so you can drill 25 at once is a much better idea :D The blisters were from drilling 400 holes with a hand drill, that would solve the problem, thanks :D

_________________
AFK with real life, still checking PMs


Top
 Profile Send private message  
 
 Post subject: Re: de-basing
PostPosted: Fri Sep 10, 2010 12:30 pm 
Brood Brother
Brood Brother
User avatar

Joined: Thu May 20, 2010 6:12 am
Posts: 1331
Location: Australia
how do people make circular bases? and how do they do the basing after the painting without leaving gaps around the holes?
(ive a few ideas, but am hoping there are better tricks i'm unaware of)

_________________
~Every Tool Is A Weapon, If You Hold It Right~


Top
 Profile  
 
 Post subject: Re: de-basing
PostPosted: Fri Sep 10, 2010 12:47 pm 
Brood Brother
Brood Brother
User avatar

Joined: Thu Aug 03, 2006 8:43 pm
Posts: 453
Location: UK
I forgot to mention a few more sources of bases above, so I've edited my post! ;)

Jaggedtoothgrin wrote:
how do people make circular bases?

I either use a circle cutter (cheap to buy on places like Ebay, about £4 usually), or buy ready-made rounds (like stainless steel washers or poker chips, tiddly winks/game counters, etc)

Jaggedtoothgrin wrote:
how do they do the basing after the painting without leaving gaps around the holes?

Not sure what you mean here?

If you mean - paint the base, paint the models, then stick the two together, then there are two answers:

1) Do the final basing stage after the two elements are joined, and be very careful you don't get the final basing stage on the model.

2) Remove the tab/plinth/integral base from the model. Put into the bottom a brass pin. Paint and fully finish both elements separately, then drill small hole(s) into the base and insert the model on its pin(s). I do this with all my 28mm stuff.


Top
 Profile Send private message  
 
 Post subject: Re: de-basing
PostPosted: Fri Sep 10, 2010 1:16 pm 
Brood Brother
Brood Brother
User avatar

Joined: Thu May 20, 2010 6:12 am
Posts: 1331
Location: Australia
i do method 2 for my 28mm stuff aswell, but for 6mm infantry, that poses something of a problem
the gaps i am refering to are the edges where the circular tab that the model comes with meet the circular hole cut from a base.

for example, i have a bunch of washers of a suitable size, with the intent to put my Crimson Bondsmen infantry on them. first step i cover the top of the washer with a piece of thin card of the same size as the base, however, if i put my infantry directly on top of these, they will stand up on little plinths, which will look odd unless i conceal it in some way.

i could use a set of plasticard circles the size of the base, with smaller circles drilled from them (although that is quite plasticard intensive, especially since the hole-punch i have to correspond with the washers would break if i tried to run 1m plasticard through it, so i'd be using 2 sets of .5mm plasticard glued on top of each other. i also have a problem with the card splitting if the holes i drill are too close together, although that may be solved with pilot-holes)
but if i do this, i will have small gaps around the edges of the models. theoretically the texture paint i'm using to put down the initial ground-cover will fill this, but i'm not super-sure about that

alternately, i could use greenstuff/polyfilla to build up the area around the models, building up to the same height as the circular tabs on the bottom of the models. this also seems absurdly intensive (and expensive, given how much putty would be used) and obviously a danger to the models in question

so my questions where how do people get around these things in their own models? i figure/hope there are people with hidden experience that may have discovered some great trick to it that i am unaware of or something to that effect

_________________
~Every Tool Is A Weapon, If You Hold It Right~


Top
 Profile  
 
 Post subject: Re: de-basing
PostPosted: Fri Sep 10, 2010 1:51 pm 
Brood Brother
Brood Brother
User avatar

Joined: Thu Aug 03, 2006 8:43 pm
Posts: 453
Location: UK
Ha, I understand what you mean now!

Well, you can still make your own bases; two sheets of Plasticard, a circle cutter, and you follow the method I detailed when making my rectangular ones. You need to use a drill bit rather then a punch though, and the size to use is 6-6.5mm in order to accept the integral infantry tabs. If you stack the bases and bind them tightly prior to drilling, each base 'supports' the other when you drill through (just make sure you are positioned over the drill and that the drill is vertically straight as much as possible). Pilot holes as I described earlier really do make this easier and less likely to rip the bases - I never even damaged one out of the batch I made for example.

The next method is to buy pre-cut rounds that are about 1mm thick. Drill half of them as above, and then stick them together. This should save you time, and being pre-cut, the two halves ought to line up perfectly.

You could also try sanding the bases on the models down so that they are quite thin. This makes them very easy to blend onto the top of a base with a smidge of putty (it's what I'm currently doing with my Mole Mortars that are going onto SS washers). You can even scrape the edges of the integral bases flush to the main base surface after you've glued them down. If you get them sanded thin enough (~0.25mm), you can just base over the lip without worrying about the step being visible.

The cost of buying the plasticard or the pre-cut bases is relatively small and worthwhile when you consider the amount of effort saved compared to puttying or to the cost of the figures themselves (IMHO).

As far as the resulting gap around the edge of the model if you use inset-style bases, this will be invisible after you put sand/flock/whatever over as long as the gaps are under about 0.5mm wide. If you are unsure about some of the gaps, just smooth a crumb of cheap putty (Milliput is good) over the worst offenders.


Top
 Profile Send private message  
 
 Post subject: Re: de-basing
PostPosted: Fri Sep 10, 2010 2:30 pm 
Brood Brother
Brood Brother
User avatar

Joined: Thu Aug 03, 2006 8:43 pm
Posts: 453
Location: UK
Actually, I had another idea for making round bases... Bear with me!

If you made a 'mould' out of 2mm thick plasticard you could 'cast' the bases in putty. I'd suggest doing it like this:

1 ) Get a piece of 2mm thick plasticard. Cut your 25mm round bases (or whatever diameter) out of it. Perhaps cut a strip of four bases in a single piece of plasticard for production efficiency. Make sure that the edges of the circle are smooth and perpendicular - this is important!

2 ) Acquire a round piece of dowel with a 6mm diameter. A short length of plasticard of tubing that has been filled in at the end will work too - just make sure that the end is solid and square to the shaft.

3 ) Spread a clean print-free carrier bag or bin liner onto your work surface or a tray.

4 ) Mix up a 1-2" ball of Milliput - (Yellow-Grey is cheap and would work well I think).

5 ) Lube the edges of the mould void with a drop of cooking oil - just a dab will do, and then plant the plasticard firmly onto the plastic from (3).

6 ) Take a piece of the Milliput and make a little patty out of it, and press it firmly into the mould, pushing into the edges. You can make sure it's flush by rolling something across the top of the plasticard - a clean de-labelled beer bottle filled with water or sand and corked makes a cheap and effective rolling pin.

7 ) Push the 6mm diameter rod into the putty to make the indents for your infantry. You can draw around the end of the tube if you like so that you know how deep to push it into the base.

8 ) Remove the plasticard carefully, leaving the disc/base stuck onto the plastic bag underneath.

9 ) After it has cured, you can peel the putty bases off the plastic bag easily, and wash them in warm soapy water to remove the oil residue. You may need to smooth the edges of the bases with some emery paper to finish them off.

Apologies for the simple step-by-step suggestion (I'm not implying that you are in any way simple or undertalented by it!), but I wanted to make sure that my explanation was as clear as possible. I've done something very similar when I made some 30mm putty base-toppers for a friend's birthday gift, and they worked very well.

The trick is that the putty sticks to the plastic bag, but not to the mould. That's why you don't lube the work surface, and why the mould edge has to be very smooth.

I suppose you could go the whole hog and resin cast, but that is messier and more expensive than this method if you're only making a hundred or so bases. Also making good silicone moulds and resin casts is an artform in itself!


Top
 Profile Send private message  
 
 Post subject: Re: de-basing
PostPosted: Fri Sep 10, 2010 2:47 pm 
Purestrain
Purestrain

Joined: Thu Feb 13, 2003 10:52 pm
Posts: 9617
Location: Nashville, TN, USA
Darnit. Deleted my post. In summary:
========

You can make bases with plain plasticard without having to do all the base-drilling everyone describes:

Styrene sheets

Cut them with an old-fashioned, lever-action paper cutter - speed and good straight lines. You can crank out hundreds of blanks in no time like this.

Glue your minis on them with an excess of glue.

Sprinkle sand so that when the glue dries, the sand/glue mix provides a slope up to the base of the individual infantry models. You're going to cover it with flock anyway. As long as it's not a sharp rise, no one will notice.

*caveat* Make sure your styrene is thick enough that the extra glue doesn't cause warpage when it dries. If it does, you can usually run a line of glue down the underside to pull it back straight.

===============

Debasing the old 20x20 bases glued with plastic cement is just not worth it to me. When I used to do it, I used a method like Dobbsy described. Now I either suffer with it as-is or buy new minis.

You might be able to cut the old 20x20 bases into pieces with snips and use the sand trick to glue them to styrene sheet bases as above. They'd end up pretty thick but if it is within a range you can tolerate it would be vastly quicker than any other option.


Top
 Profile Send private message  
 
 Post subject: Re: de-basing
PostPosted: Fri Sep 10, 2010 2:50 pm 
Brood Brother
Brood Brother
User avatar

Joined: Wed Mar 07, 2007 7:04 pm
Posts: 901
Location: New Haven, CT
Another way of counter-sinking your miniatures is to use thin (1/16") sheets of cork cut to base size with holes punched out with a standard hole punch.


Top
 Profile Send private message  
 
Display posts from previous:  Sort by  
Post new topic Reply to topic  [ 31 posts ]  Go to page 1, 2, 3  Next


Who is online

Users browsing this forum: No registered users and 28 guests


You cannot post new topics in this forum
You cannot reply to topics in this forum
You cannot edit your posts in this forum
You cannot delete your posts in this forum
You cannot post attachments in this forum

Search for:
Jump to:  


Powered by phpBB ® Forum Software © phpBB Group
CoDFaction Style by Daniel St. Jules of Gamexe.net