Tactical Command http://www.tacticalwargames.net/taccmd/ |
|
[BatRep] ABC Tau Army Test Battle 1 http://www.tacticalwargames.net/taccmd/viewtopic.php?f=23&t=9021 |
Page 1 of 3 |
Author: | Chroma [ Mon Mar 26, 2007 2:46 pm ] |
Post subject: | [BatRep] ABC Tau Army Test Battle 1 |
A couple of people in my local EPIC group are quite interested in Tau, but are hesitant to buy any models until the list is "very firm", so we occasionally run proxy games just to get a feel for the greyskins and see how they play. One of the "types" of armies that has been floated around here is the "ABC Tau Army", that is "Aircraft, Broadsides, and Crisis Suits". My D&D game was cancelled yesterday, so we were able to squeeze in an ABC game vs Orks... lots of fun! (I used the same Ork armylist I used against the Titan Legions previously, we've got an "unofficial" play-an-army-til-it-loses competition going on at the moment.) |
Author: | Chroma [ Mon Mar 26, 2007 2:50 pm ] |
Post subject: | [BatRep] ABC Tau Army Test Battle 1 |
Rules Used Tau v4.1.1 Armies Used ABC Tau Army - 3000 points Battlesuit Cadre 1 - (BTS Goal) 4 Crisis Suit units Shas'O Battlesuit Cadre 2 4 Crisis Suit units Battlesuit Cadre 3 4 Crisis Suit units Battlesuit Cadre 4 4 Crisis Suit units Broadside Contingent 1 6 Broadsides Broadside Contingent 2 6 Broadsides Broadside Contingent 3 6 Broadsides Broadside Contingent 4 6 Broadsides Markerlight Group 1 3 Markerlight Sentry Drone Turrets Markerlight Group 2 3 Markerlight Sentry Drone Turrets Markerlight Group 3 3 Markerlight Sentry Drone Turrets Barracuda Squadron 1 3 Barracudas Barracuda Squadron 2 3 Barracudas Barracuda Squadron 3 3 Barracudas Raddak's Rumblas - 2995 points Normal Warband 1 Warboss 1 x Nobz 2 x Nobz 6 x Boyz 2 x Grotz 5 x Boyz 5 x Grotz Mekboy Stompamob - (BTS Goal) 3 Stompas 1 Supa-Stompa 1 x Mega-Choppa 2 x Soopa Gunz 3 Power fields Big Mekboy Gunzmob 1 10 Big Gunz 2 Oddboyz 2 Soopa Gunz Big Mekboy Gunzmob 2 10 Big Gunz 2 Oddboyz 2 Supazapp Gunz Stormboyz Warhorde 6 Stormboyz 5 Deth Koptas Normal Kult of Speed 2 Skorchas 3 Buggies 3 Warbikes Big Blitz Brigade 1 6 Gunwagonz 2 Flak Wagonz 2 Oddboyz 2 Supazapp Gunz Big Blitz Brigade 2 6 Gunwagonz 2 Flak Wagonz 2 Oddboyz 2 Soopa Gunz Fighta-Bomma Sqwadron 5 Fighta-Bommerz |
Author: | Chroma [ Mon Mar 26, 2007 3:13 pm ] |
Post subject: | [BatRep] ABC Tau Army Test Battle 1 |
Battlefield: 4x6 Roll-off and Orks win, choosing corner deployment. Deployment: Orks garrison both Gunzmobs in cover and on overwatch. The Stormboyz are also garrisoned, hidden behind ruins. Tau garrison all the Sentry Drones, one group off of each Tau objective. Broadside Contingents 1 and 2 are garrisoned on overwatch, while the other two Broadside Contingents are garrisoned as well. Remaining deployment as shown: |
Author: | Chroma [ Mon Mar 26, 2007 3:45 pm ] |
Post subject: | [BatRep] ABC Tau Army Test Battle 1 |
Turn 1 No teleports. Strategy Roll: Tau Barracuda Squadron 1 is set on combat air patrol. (Perhaps the first time this order has ever been given here! *laugh*) The Warboss sends his Warband doubling up the hill into the Bastion and fortifications chuckling loudly. Broadside Contingent 4 goes on overwatch, scanners scanning and sensors sensing! Gunzmob 1 needs the brutal threats of the Warboss to sustain fire on Broadside Contingent 1 and Sentry Group 1, but the yelling pays off as 2 Broadsides are trashed and 1 Sentry Drone shorts out. Broadside 1 marshals, moving into a better positions and clears all its Blast markers. Gunzmob 2 tries to sustain fire as well, but fails, and only manages to place a single Blast marker on Broadside Contingent 2. 
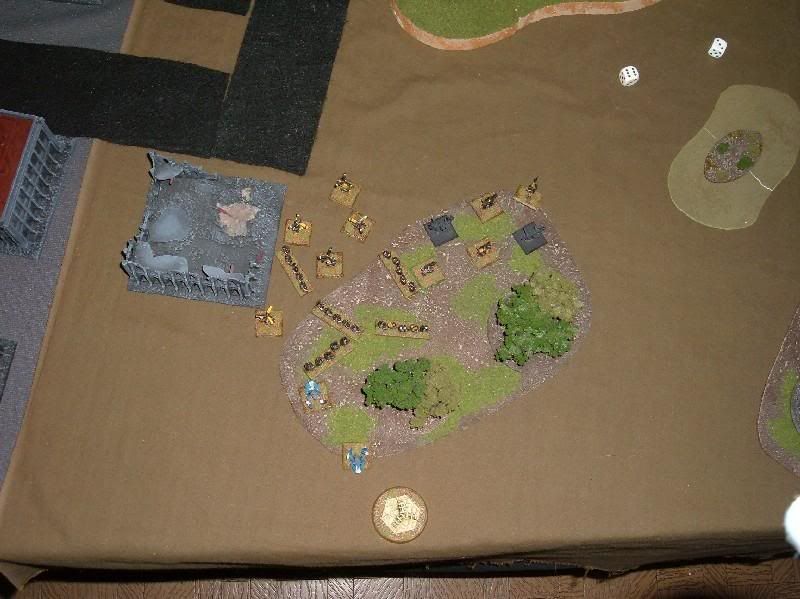
Crisis Cadre 2 doubles forward into a building to fire on Gunzmob 2, but scores no hits. Blitz Brigade 1 doubles up to return fire on Crisis Cadre 2, but they also score no hits. Crisis Cadre 4 doubles into the protection of the small fortified hill and fires on the Warband, killing a Grot. The Fighta-Bommerz come wheeling in to attack Crisis Cadre 2, ending their approach move mainly within the protective AA umbrella of Blitz Brigade 1? ![]() But Barracuda Squadron 1 still makes the CAP attack, downing 1 Fighta-Bommer and *just* outside the Orky flak range? disengagement will be fun! The Fighta-Bommerz have no effect on the Crisis Battlesuits. Crisis Cadre 3 doubles towards the Ork Warband, sticking to the scrub and manages to kill? 1 Grot. The Kult of Speed doubles to fire on Crisis Cadre 3, staying out of line of sight of the Broadsides, and places a Blast marker on the elite Tau. Barracuda Sqaudron 2 dives down to strafe the slightly marked Kult of Speed? and trashes 1 Warbike unit. Blitz Brigade 2 doubles around the rear of the fortified hill, but can't quite get a good line of sight on anything? but the Barracudas will be heading their way soon. Broadside Contingent 3 tries to advance, fails, and even the Shas'O can't get them to move, so they regroup, sticking to the Black Rock, and clearing their Blast marker. The Stompas double over the hill, offering a single Stompa to Broadside 2 overwatch, but they don't take the bait. The Orks fire on Crisis 3, but do no damage at all. The Shas'O takes Crisis 1 doubling against Gunzmob 2, but the Tau are unable to shift the Ork weapon teams. The Stormboyz then take to the air to engage Crisis Cadre 2? kunningly keeping their Koptas out of line of sight (and the fight) from the overwatching Broadsides. The Crisis suits leap back, but not far enough and are hosed down with wild shoota firing while taking down 1 Stormboy. ![]() 
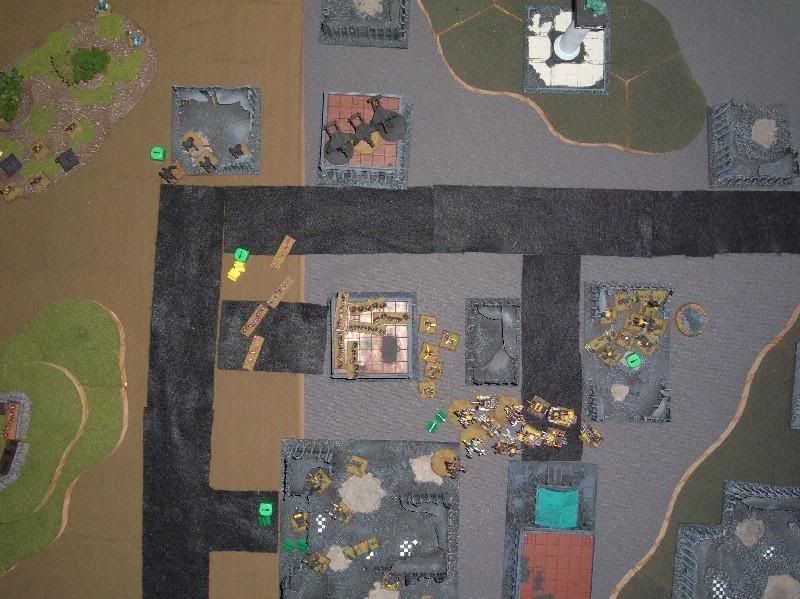
Barracuda Squadron 3 hammers the Kult of Speed and only a single Skorcha survives to flee back to the Ork lines? End of Turn Barracuda 1 loses 1 Barracuda as they fly over Brigade 1 Barracuda 2 loses *2* Barracudas as they jink over Brigade 2 Barracuda 3 loses? nothing, just gets a Blast marker and flies back to base. The Stormboyz are the only Orky formation to rally, while Crisis Cadre 3 is the only Tau formation that fails to rally. |
Author: | Chroma [ Mon Mar 26, 2007 4:01 pm ] |
Post subject: | [BatRep] ABC Tau Army Test Battle 1 |
Turn 2 No teleports. Strategy Roll: Tau In a shocking reversal, Crisis Cadre 3 engages Blitz Brigade 2! ?The Crisis Suit armour prevents the Tau from receiving any damage and they trash 1 Flak Wagon and 2 Gunwagonz, winning by "1"! ![]() The Stompamob gets revenge by pretending to be Tau and sustaining fire on Crisis Cadre 1, obliterating 2 Crisis Teams and breaking the Cadre which jumps back to the Black Rock. Gunzmob 2 sustains fire on Broadside 1, wreaking 3 Broadsides and breaking the contingent which flees out of line of sight. Broadsides 3 double from the Black Rock, losing 1 Broadside to the treacherous footing and retake the small fortified hill. ?They fire obliquely at Blitz Brigade 1 and slag 1 Flak Wagon and 1 Gunwagon. Seeing easy prey, the Fighta-Bommerz dive down against Crisis Cadre 1 and scare the Shas'O right out of his Battlesuit! Gunzmob 2 requires the hoots and catcalls of the Warboss to get them to double on Crisis 2, but they still only place a Blast marker. Crisis 4 advances on Gunzmob 2 and annihilates them taking out 2 Big Gunz as well as both Supa-Zzap-Gunz! ?The Orks break and slowly flee. Blitz Brigade 1 doubles to fire on Crisis Cadre 4, takes out 2 Crisis Suit teams and breaks the formation. The Stormboyz double on the last survivor of broken Broadside 1 and take him out with mocking gunfire. Barracuda Squadron 3 flies an interception mission on the Fighter-Bommerz, staying out of range of defensive fire, and downs two of the Ork aircraft. The Warband doubles into a better position and fires on Crisis Cadre 3, breaking them. Barracuda Squadrons 1 and 2 both stand down for repairs and make no appearance this turn. Broadside Contingent 2 fails to advance and just regroups. Broadside 4 doubles to fire on Blitz 1 and takes out 2 Gunwagonz and both Supa-Zzap Wagonz! End of Turn Squadron 3 gets off board safely. All Tau rally except the last member of Crisis 1, as he's in mourning for the lost Shas'O. Gunzmob 2 and both Blitz Brigades fail to rally for the Orks. |
Author: | Chroma [ Mon Mar 26, 2007 4:25 pm ] |
Post subject: | [BatRep] ABC Tau Army Test Battle 1 |
Turn 3 No teleports. Strategy Roll: Tau Barracuda Squadron 3 goes on combat air patrol. Broadside 3 tries to sustain fire on the Stompamob, but fails to get a lock, but does manage to take out 1 Stompa. The Stompas double down the road towards Broadside 4 and takes out one of the heavy Battlesuits. Feeling extremely cocky, the Stormboyz jet forward to engage Broadside Contingent 2. ![]() They score no hits? not one, and the Tau trash 3 Deth Koptas and kill 2 Stormboyz, pushing the Orks back! Taken with some kind of bloodlust, Broadsides 2 doubles after them, losing one excited team member to a tree-strike, but the manage to take out 1 more Stormboy and 2 Deth Koptas. Gunzmob 2 doubles on Broadside 2 and takes out another Broadside. Barracuda Squadron 2 dives down to stray the markerlit Stompamob and takes out 1 more Stompa. The Warband doubles against Broadsides 4, but scores no hits. Broadsides 4 marshals, firing ineffectively on the Warband, but clearing all their Blast markers. The Iron Baron leads the Fighta-Bommerz down to attempt to finish off Crisis Cadre 1. ? ![]() Barracuda 3 flies in to try and stop them, staying out of the Orks short range? and missing. ?Cackling with glee the Baron pulls the trigger, eliminating the enemy BTS formation! Crisis Cadre 4 advances on the dug-in Warband and takes out a measly 3 Grots. The Kult of Speed's last Skorcha doubles to fire on the entrenched Broadsides 3 and places a Blast marker. Barracuda Squadron 1 dive bombs the Stompamob, taking out the last Stompa, and breaking the Supa-Stompa, which charges into contact with some nearby Broadsides! Crisis Cadre 2 marches to get into the cover of the recently evacuated Bastion? End of Turn: Tau formations except Broadside 3 regroup. Ork formations aren't so lucky as the Supa-Stompa, both Blitz Brigades, and Gunzmob 2 fail to rally. Orks 1 (BTS) vs Tau 0 (none) [Forgot to take an end of turn shot for Turn 3] |
Author: | Chroma [ Mon Mar 26, 2007 4:37 pm ] |
Post subject: | [BatRep] ABC Tau Army Test Battle 1 |
Turn 4 No teleports. Strategy Roll: Tau Crisis Cadre 4 sustains fire on the Ork Warband taking out 2 Grots and 2 Boyz. Broadsides 4 advances on the Supa-Stompa and takes out 2 Power fields. The lone Skorcha of the Kult of Speed doubles to flame Crisis 2, taking one of them out and breaking them; the Tau flee towards the Orky Blitz. The Fighta-Bommerz ground attack the dug-in Broadsides 2, but only place a Blast marker. Broadsides 3 marshal, moving away from the Supa-Stompa and clearing their Blast markers. Gunzmob 1 doubles to fire on Broadside 2, but only places a Blast marker. Broadsides 2 try to double into enemy territory, but fail, their single move being 5mm short of crossing into enemy territory, so the regroup instead. The Warband rushed forward to engage Broadsides 3, finally getting stuck in. ![]() And they really get stuck, taking out 1 Broadside, but losing 5 Boyz and breaking back to the safety of the Bastion! Barracudas 3 strafes Gunzmob 1, taking out both Soopagunz, 4 Big Gunz, and clearing the Orks from the Tau half of the battlefield. Barracudas 1 attacks the Supa-Stompa, but only drops its last Power field. The lone plane of Barracuda 2 hits the lone survivor of the Kult of Speed and succeeds in a vengeance kill against the Orks? Commander Farsight would be proud! End of Turn: Nothing Ork rallies? The one Tau formation on the Ork side of the battlefield? fails to rally. Orks 2 (BTS, TSNP) vs Tau 1 (TSNP) |
Author: | The_Real_Chris [ Mon Mar 26, 2007 4:51 pm ] |
Post subject: | [BatRep] ABC Tau Army Test Battle 1 |
With current stars i would always go for the tigershark fighter bombers over barracudas my post is at the end. |
Author: | Chroma [ Mon Mar 26, 2007 5:04 pm ] |
Post subject: | [BatRep] ABC Tau Army Test Battle 1 |
(The_Real_Chris @ Mar. 26 2007,16:51) QUOTE With current stars i would always go for the tigershark fighter bombers over barracudas my post is at the end. Well, my opponent put together that list, I suppose it was a 3 Air Activations vs 2 Air Activations thing or something. All in all, the Tau probably should'be won that battle, the one Broadside formation failing is all that prevented it from going into Tie-Breaker which the Tau would've dominated. I've gotta say, those Broadsides are *terrifying* at six for 250! They can just double places and still hammer any AV or mixed formation. I feel the ABC Tau army is a very strong contender. |
Author: | Moscovian [ Mon Mar 26, 2007 5:09 pm ] |
Post subject: | [BatRep] ABC Tau Army Test Battle 1 |
As always, you provide an excellent batrep. Chroma, what is your opinion of the Tau. Are they balanced against the core three? |
Author: | The_Real_Chris [ Mon Mar 26, 2007 5:18 pm ] |
Post subject: | [BatRep] ABC Tau Army Test Battle 1 |
(Chroma @ Mar. 26 2007,16:25) QUOTE Barracuda Squadron 1 dive bombs the Stompamob, taking out the last Stompa, and breaking the Supa-Stompa, which charges into contact with some nearby Broadsides! You know that you can't withdraw into base contact right? Air wise it would have cost 150 oints more to replace them with fighter bombers and they would have been a lot more deadly - especially to fighter bombers as they can remain outside that 15cm defence, not to mention to ground forces, would have lost less planes and done more damage every turn. Were the markerlights ever actually used? |
Author: | Chroma [ Mon Mar 26, 2007 5:26 pm ] |
Post subject: | [BatRep] ABC Tau Army Test Battle 1 |
(The_Real_Chris @ Mar. 26 2007,17:18) QUOTE You know that you can't withdraw into base contact right? Actually, a broken fearless unit *can* withdraw into base contact with the enemy as they ignore enemy ZoC and aren't destroyed when they end there; it's especially nasty with Titans or fearless Tyranid creatures. It's an odd quirk of the rules, one I'd actually like to see fixed. Air wise it would have cost 150 oints more to replace them with fighter bombers and they would have been a lot more deadly - especially to fighter bombers as they can remain outside that 15cm defence, not to mention to ground forces, would have lost less planes and done more damage every turn. I'm not debating their effectiveness, it's just what my opponent chose for the battle. I agree that as the stats now stand, Tigersharks are the superior choice over Barracudas... and completely blow away any other army's 300 point aircraft choices. Were the markerlights ever actually used? Hmmm... I thought I indicated when things were marked. Any time the Orks approached the enemy objectives they were marked, it hurt the Kult of Speed and the Stompamob, as the only formations with Guided Missiles were the aircraft. |
Author: | The_Real_Chris [ Mon Mar 26, 2007 5:42 pm ] |
Post subject: | [BatRep] ABC Tau Army Test Battle 1 |
(Chroma @ Mar. 26 2007,17:26) QUOTE Ah, sorry, getting mixed up with barging. Ah, I see now. I thought markerlights teleported so was looking for that - I generally skip the deployment section of bat reps, looking at the pictures and looking for unit moves and stuff instead ![]() What was the desire to use markerlights but not guided missiles? |
Author: | Chroma [ Mon Mar 26, 2007 5:49 pm ] |
Post subject: | [BatRep] ABC Tau Army Test Battle 1 |
(The_Real_Chris @ Mar. 26 2007,17:42) QUOTE What was the desire to use markerlights but not guided missiles? The Barras have Guided Missiles, so I believe the Sentries were mainly to be a thorn in the side of any enemy units trying to take Tau-side objectives as it made them more vulnerable to ground attacks. My opponent doesn't like to post that much to message boards, so I'll have to ask him the next time I see him. |
Author: | Pulsar [ Mon Mar 26, 2007 6:56 pm ] |
Post subject: | [BatRep] ABC Tau Army Test Battle 1 |
Thanks for the battle report Chroma!, I'm not surprised that an army of Tau Battle and Broadside Suits does well, in 40K there one of the most hardcore armys. |
Page 1 of 3 | All times are UTC [ DST ] |
Powered by phpBB® Forum Software © phpBB Group http://www.phpbb.com/ |